Coastal Creators of Connecticut

Coastal Creators of Connecticut coastalcreatorsct.com

  • HOME
  • BLOG
  • YOU TUBE
  • CONTACT
    • Our Policies

Face Mask Storage Pouch to Make and Sell

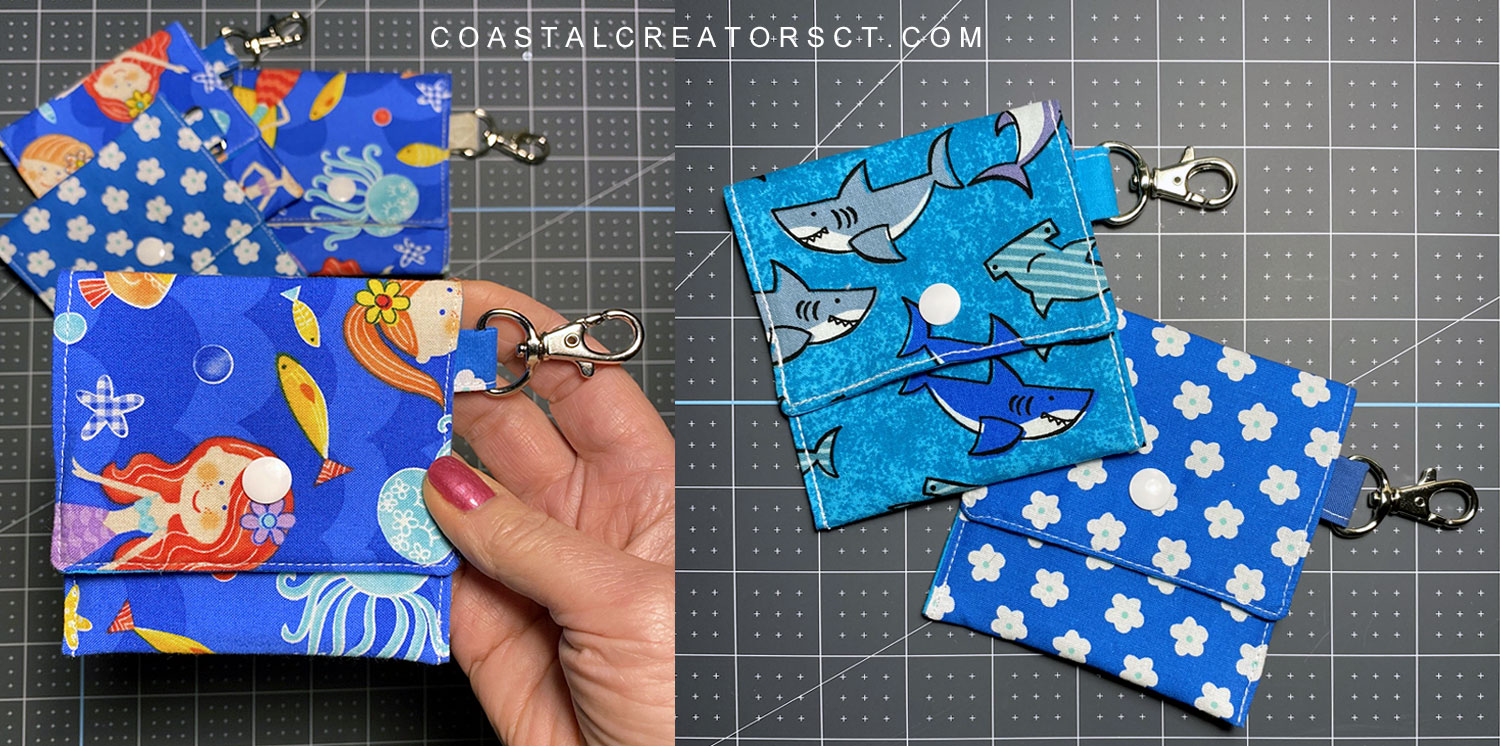
Here’s a fun project you can make and sell. I will teach you how to make a face mask storage pouch that you can sell on Etsy, your own website, on Facebook, Instagram and in local shops where you live. With so many people are sewing face masks so why not sew a storage pouch to go with the face masks you make. (See how to make a 3D kids face mask)

You will need a variety of supplies and fabric on hand to make these face mask storage pouches. You don’t need a lot of fabric. You could use coordinating fabric from the face masks you are already making.

Note: this sewing project assumes you know the basics of sewing. I am not teaching how to sew, just how to make this specific project.

Face Mask Storage Pouch to Sew and Sell

Alternative Uses

These face mask storage pouches can be used for other things as well. We may not be making and selling face masks in the future but you could still make these little pouches and sell them for other uses. Just change the wording on the package and voila, you have a completely new product. A lot of times, the way you market a single product makes all the difference.

Since these pouches have a swivel hook added on one side, they can easily hook on the outside of a backpack or a purse handle. They could be hooked inside of a purse or tote bag as well. Here are some things you could store inside of these pouches besides a face mask.

  • Tampon or Feminine care pads
  • Hand sanitizer and/or individual wipes
  • Coin and bills (lunch money for kids?)
  • Gum and mints

You could even add a gift card and give the whole thing as a gift. The recipient gets a cute little pouch to use for various reasons plus a gift card or cash for shopping.

Face Mask Storage Pouch to Sew and Sell


Supplies List

  • Cotton fabric
  • Thread
  • Pellon fusible Fleece 987F (see alternative below)
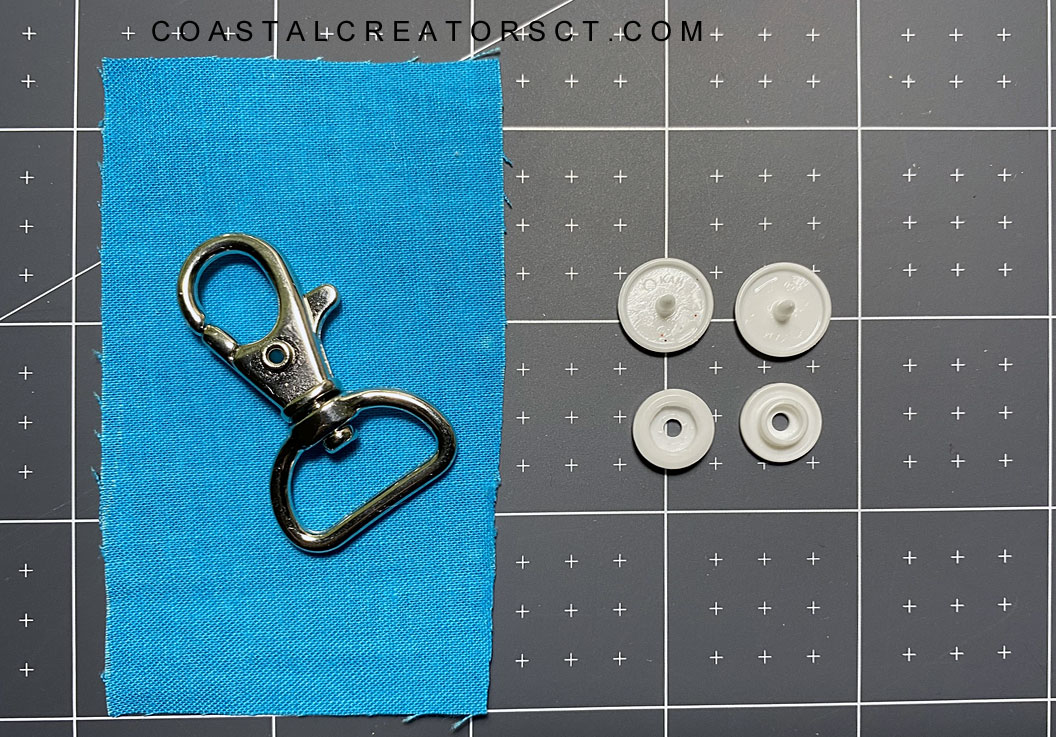
  • 3/4″ swivel hook with lobster claw
  • Plastic snaps
  • KAM Snap Pliers tool
  • Awl (comes with KAM Snap Tool)
  • 1/4″ presser foot (optional)
  • Point Turner (optional)

Instead of the Pellon fusible Fleece you could use a lightweight interfacing. I like the Pellon Fleece because it makes my pouch feel more professional. You definitely need some type of interfacing to give this pouch some body and form. I use fusible because it keeps it in place and makes it much easier to sew.

Sewing Instructions

1. Cut the inside fabric and the outside fabric 4-1/2″ wide x 11-1/2″ long.

2. Cut the Pellon Fusible Fleece 3-3/4″ wide x 10-3/4″ long.

3. Cut the strap fabric piece 2″ wide x 3-1/4″ long.

4. Position the fusible fleece on the wrong side of the inside fabric. Because the fleece (or interfacing) is slightly smaller you will have an approximate 1/4″ space, or should have, all the way around. I do this so it won’t get caught when sewing the seam and when you turn it isn’t too bulky. Iron the fleece in place.

5. Put the two fabric pieces, rights sides together, and sew a 1/4″ seam all around, leaving a 3″ gap for turning. I like to make the gap on one of the long sides and not on the short side. Make sure to back-stitch when you start, finish and also at all 4 corners (before and after each corner).

Tip: Make sure you are careful to sew a straight seam. This makes a difference in how the corners look. The corners need to be perfectly straight so they line up when you fold the piece. You want to make sure the corners do not angle out at all. I use a 1/4″ presser foot that helps me get that perfectly straight sewing line.

Face Mask Storage Pouch to Sew and Sell

6. Trim the corners to get rid of the excess fabric, being careful not to cut too close to the sewing.

7. Turn the piece, poke out the corners with a Point Turner and iron flat. You can even use a chopstick if you have it. Just make sure not to use something with a sharp point to poke out the corners or you could blow them out.

When ironing you will turn under the fabric at the opening. Make sure you iron this as straight as you can. Because, once again you want all sides to match up when you fold the piece to make the pouch.

8. Take note of the direction of the design on the fabric. Fold your pouch with inside fabric touching to see what it will look like when it is closed. Top-stitch 1/8″ from the edge on the short side that will be the side you see when you open the pouch.

Face Mask Storage Pouch to Make and Sell

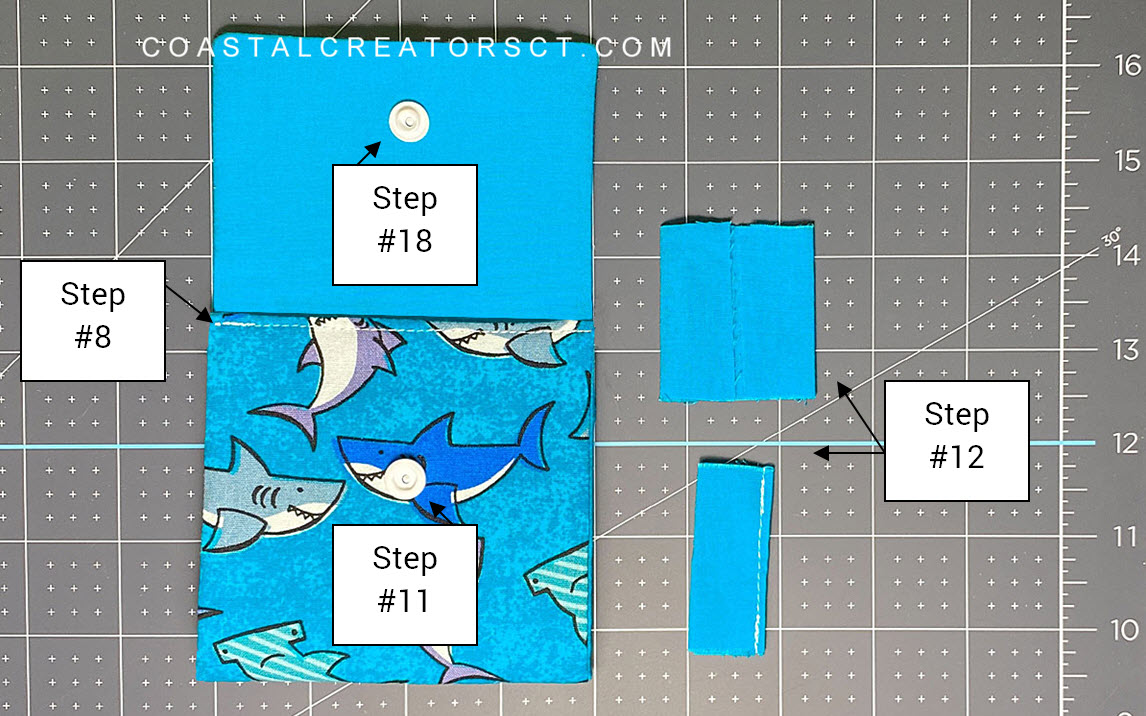
9. Fold one end up until it measures 4″ and iron. Fold the top flap down and iron. Your pouch should measure 4″ x 4″ if you have it folded correctly.

10. With the pouch still folded, measure the flap to find the center from the sides and then about 1″ up from the edge. Place your hand in between the flap + front layer and the bottom layer so the awl won’t pierce through the back. Using the awl, poke a hold through the top layer and front layer.

11. Using your KAM Snap tool, attach the female part of the plastic snap to front layer only. You will add the male snap component after you finish sewing.

FREE KAMsnaps Plastic Snaps Basic Pliers Desktop Stand Pattern

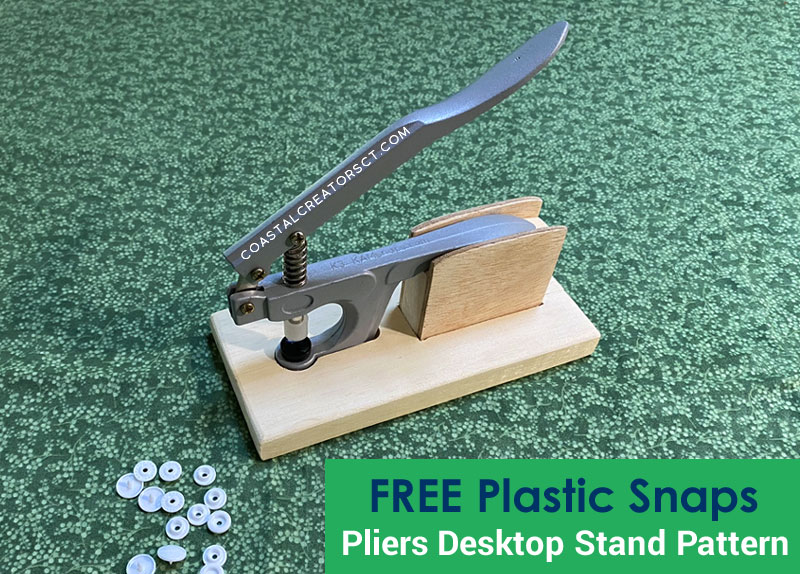
We have a handy KAM Snap tool desktop stand pattern with instructions that you can build using scrap wood.


12. Fold the strap piece in half on the long side. Open it and fold one edge to the center and then the other edge to the center. Then fold over again and sew 1/8″ where the edges meet. You could back-stitch at the beginning and the end but this piece will get sewn inside of the pouch so this is optional.

13. Slide the strap into the swivel hook and make the edges touch together.

14. Place the strap with the swivel hook inside the pouch so only about 1/2″ is sticking out. You will place it about 1/4″ from the top-stitched edge. Pin or hold in place for sewing.

15. Starting about 1/4″ down from the edge, top-stitch 1/8″ from the edge, making sure the strap with swivel hook stays positioned straight. Sew to the bottom corner and back-stitch.

16. Pick up your presser foot and raise the needle, pull the piece out a bit, turn and start working from the other bottom corner. You will be sewing from opposite bottom corner all the way around until you meet up with where you started sewing. Make sure to back-stitch where the top-stitched edge meets on both side.

17. Clip the threads.

18. Now you will attach the male part of the plastic snap to the flap. Fold the flap over and use your awl again to make sure the hole you created in step #10 is still in the correct position. When you push the awl through the hole you should be able to touch the female plastic snap part. If it does not touch, just add another hole until it does. Using your KAM Snap Tool, add the male plastic snap to the flap.

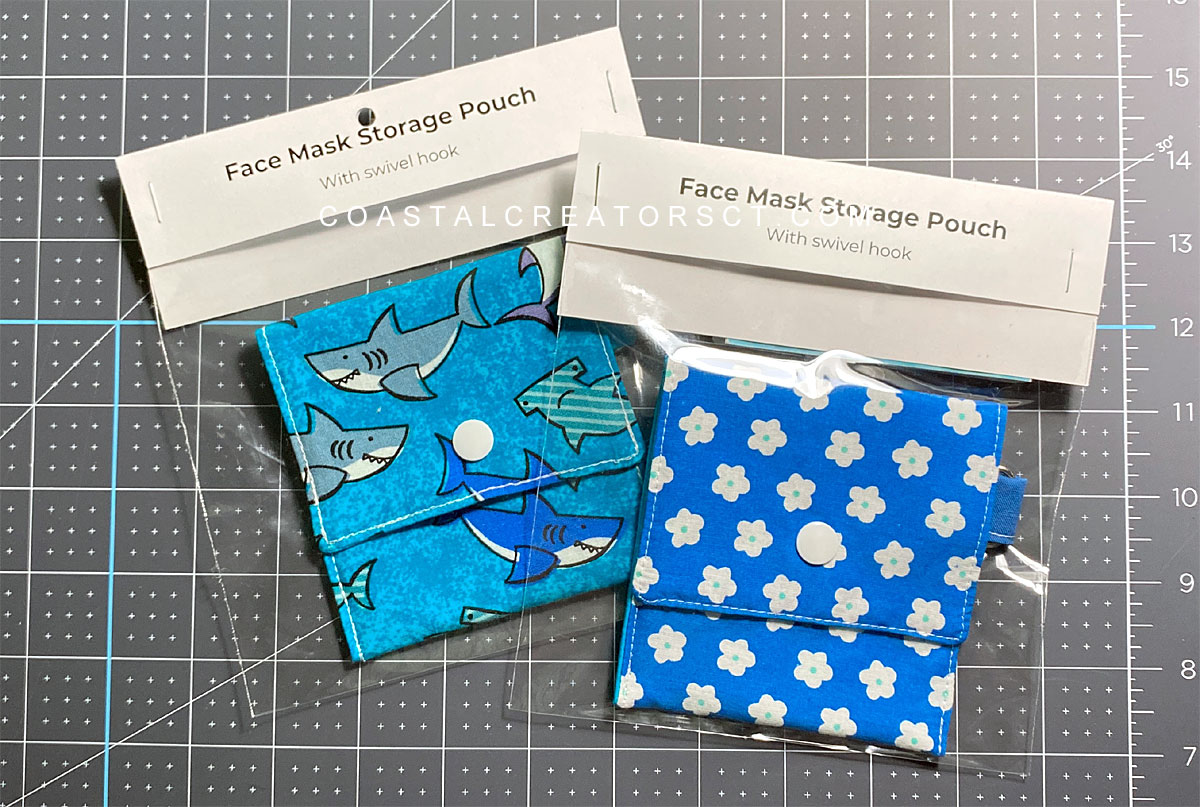
Done! If all goes well you should have a completed face mask storage pouch.

Face Mask Storage Pouch to Make and Sell

How to Package

If you are going to sell these face mask storage pouches you will want to package them properly to make them look professional. Packaging can be the reason why one product sells and the same product from another seller does not sell. It’s all in the presentation. If it isn’t appealing people won’t want to buy it. The same goes for photos online. A photo can make or break a product sell.

Of course, packaging works better in person so if you are selling these online you may not want to package them in this manner. However, everything I sell whether it be online or in-person gets packaged the same because ultimately it is all about my business image. I want people to know they received a quality item and packaging is a big part of that.

Since I do not want to pay very much for packaging or buy expensive headers card, I make my own with just cardstock and my HP laser printer. Yes, I could add a graphic or make them glossy or in color but the customer is going to take one look at it and throw the packaging away as soon as they open it. Why spend the money! For this type of product, my simple black and white header card works fine. I have these face mask pouches in a high end gift shop and also in an art studio in my local area and they look perfectly fine with this packaging.

As long as your packaging has the important information on it that’s all you need. Of course, there are a million ways to do something. This is just how I do it. I don’t want to add additional cost to my product because of the packaging.

I tend to sell more wholesale than retail and remember, when selling wholesale what you earn is cut in half because the retailer is getting the other half. That means your packaging needs to be cheap. If you purchase a header card it could cost 50 cent to $1 just for one piece depending on the color and type of cardstock used. The way I make it costs almost nothing for the header card and approximately 11 cent for each bag.


Packaging Supplies

You will need some supplies if you are going to package these face mask storage pouches to sell.

  • 6″ x 6″ Crystal Clear Zip Bags, 2 mil
  • 110 lb. white cardstock
  • Printer
  • Stapler
  • Paper cutter (or scissors)
  • Scoring board (optional)
  • hole puncher (optional)

About the Bags: I suggest that you do not use poly bags. They don’t look professional for a product you are trying to sell. Poly bags are fine for a sandwich you add to your child’s lunchbox but not for products. Always use crystal clear “crisp” bags. I buy mine from clearbags.com and they come within a couple of days. They even have a discount for larger quantities. They are VERY reasonably priced. I have been buying bags from them for over 15 years with no problem. They don’t sell all of their sizes on Amazon so you do need to buy from their website.

Free Packaging Template

I design my header cards in a Word program. You are welcome to download, print and use my header card template for free. I am only giving the free header card template to my email subscribers. You will also find a face mask packaging header card in the Template Gallery.

Subscribe below or click here to fill out the form and get access to the file.

My header card is pretty basic and only requires cardstock and a printer to make. You get 3 to one sheet. Once you print out the header card you will need to cut the cards apart. I use a rotary cutter, mat and clear ruler but you can also use a Paper cutter or even scissors. Just make sure you cut inside of the black lines.

I created a scoring line to show you where to fold the header card. You can try to just fold it on that line or use a scoring board. I just recently purchased a scoring board and I don’t know why I waited so long. It really is a time saver and your lines come out much straighter.

To package you will place your face mask storage pouch in the clear bag, press the air out, and zip it shut. Place the header card over top the zipped edge and position it evenly so no edges of the bag are showing. Staple on both sides of the header card. I do not staple in the center because the corners will flap out. If you are selling at an outdoor craft show in the summer, the card stock will definitely flap out from the humidity so staple on each side.

If you are selling these face mask storage pouches in a shop you may want to put a single hole in the center about 1/2″ down from the edge using a hole punch. This way they can be hung on a display unit.

Build and Decorate a Broken China (Mosaic) Birdhouse

A Broken China Birdhouse is a labor of love created by adding broken china pieces to a wood birdhouse using glue and grout. We will teach you how to build the birdhouse, how to find broken china, how to add broken china pieces to your birdhouse and how to give your broken china birdhouse a good finish so it will last for many years.

Build and Decorate a Broken China Mosaic Birdhouse

When building a broken china birdhouse you will need certain materials but they are very affordable. You’ll need some china you don’t mind breaking or tiles you purchased, pine wood to build the birdhouse and a few other supplies, that we list below.

Build and Decorate a Broken China Birdhouse

One day, I bumped into my hutch and broke this beautiful tea cup and saucer. It literally came flying out at me and crashed onto the floor. All was not lost because I decided to turn it into the lovely birdhouse I am going to show you how to build and decorate.

Where to Get Broken China

If you own a piece of china that has chips on it and you are willing to part with it, you can use it for your broken china birdhouse. If you don’t have any broken china, you will easily find a chipped tea cup or china saucer or maybe a tea cup that is missing it’s saucer at your local Goodwill store or Thrift shop. If it is summertime, stop by some yard sales and see what pieces of china you can find.

Online you can also visit local “free cycle” or “buy it nothing” groups to see who is giving away china that you could use for your broken china birdhouse project. Check Facebook Marketplace and Craigslist under the free section. Someone is always giving away china they don’t want or use anymore that would be perfect for this project.

Using Other Embellishments

You can also embellish your birdhouse with other elements such as stained glass, jewelry beads, pieces of decorative stone, Tesserae tiles, ceramic tiles, or even pieces of metal. This is the kind of project that allows you to be creative.

Mosaic Tile Supplies

Supplies Needed

  • 1/2″ plywood
  • 1″ x 6′ pine board
  • 2″ square piece of fiberglass screen
  • 1 1/4″ brad / finishing nails
  • Saw to cut the wood (we used a compound miter saw)
  • Sand paper or random orbit hand sander
  • Drill
  • Tile Cutter
  • Pointed Tweezers
  • China you can break or purchased tiles
  • Grout Sealer
  • work gloves
  • Tile Adhesive (We use Mapei Type 1)
  • Tile Grout
  • Plastic Spatula
  • Tile Grout


Build and Decorate a Broken China Birdhouse

Step-by-Step Birdhouse Instructions

1. Using the 1/2″ plywood, cut one piece to be 3-1/2″ wide by 5″ long.

2. Cut a second piece to be 4″ wide by 5″ long.

3. Using the 1″ x 6″ pine board cut a 4-1/2 ” square to be used as the bottom of the birdhouse.

4. Using the 1″ x 6″ pine board cut the two sides to be 2-1/2″ wide by 4″ long.

5. Using the 1″ x 6″ pine board cut two pieces to be 4″ wide by 6″ long. These are the front and back of the birdhouse.

6. The front and back need to have a peak. Do this by measuring in 2″ from the side of each piece at the top of the 6″ length. Using a 45 degree angle, draw a line from where the angle intersects the 2″ mark to the edge of the board.  This should result in the correct length of the peak.

If a 45 degree angle is not available, still mark the top 2″ inches in, basically the middle of the board. Then measure 2″ down from the top of the board and draw a line from side to side.  Taking a straight edge, draw a line from the 2″ mark at the middle of the top to the 2″ line on the edge of the board.  Do either method for the left and right sides of the board. Cut on the 45 degree lines to form the peak.

Build and Decorate a Broken China Mosaic Birdhouse

7. Select one of the 4″ x 6″ pieces for the front. Drill a 1-1/8″ diameter hole, 3″ up the bottom and 2″ in from the side.

8. Lightly sand each piece of wood. (Sand paper or random orbit hand sander)

9. Before assembling, attach the fiberglass screen behind the hole, using staples.

10. To assemble the birdhouse, start by nailing the sides to the front and back. The sides go between the front and backs, so once fully assembled the body of the birdhouse will be 4″ x 4″.

11. Next, nail the 3-1/2″ x 5″ roof piece onto the body of the birdhouse at the peak with the 5″ side going across the wide of the birdhouse.  The top edge of this roof piece needs to be flush with point of the peak. The sides and bottom of the roof piece should overhang the birdhouse by 1/2″.

12. Nail the 4″ x 5″ roof piece to the other side of the peak. Align this roof piece so one edge overlaps the already attached roof piece. This roof piece should also overlap the birdhouse by 1/2″.

13. Nail the bottom to the birdhouse so that there is approximately 1/4″ of the bottom showing around all sides of the birdhouse.

Now that your birdhouse is built you may want to sand it lightly. I also give my birdhouse a base coat. I use basic white acrylic paint. You could skip this step if you wish.

Build and Decorate a Broken China Birdhouse

Cover the Opening

We use fiberglass screen to cover the opening in our birdhouse. We are not building a birdhouse that is actually going to be used by birds. Our birdhouse is a decorative art piece that we will display in the garden, to display on a shelf in our home, or even to sell.

If you are using our birdhouse instructions, you will want to add a piece of fiberglass screen behind the hole because you do not want birds to go into the birdhouse and build a nest. There are two reasons for this. Our birdhouse is small, too small for a bird to build a proper nest. Also, the hole is small and most birds will not be able to fit properly. The second reason is, if you want to make this broken china birdhouse as a decorative piece, you want to discourage birds from trying to build a nest inside. The fiberglass screen solves both.

You could use metal screen instead of fiberglass screen if you have it on-hand. We just had some fiberglass screen on hand that was leftover from the screen door project. We replaced the screen in our screen door and we had a small amount leftover. If you can use scraps for projects like these, you can make them super affordable. Fiberglass screen is also easier to work with and staple onto the wood.

Build and Decorate a Broken China Birdhouse

Prepare the China Pieces

To prepare the china pieces you will want to break the pieces of china into pieces that are about 1/2″ in size. Each piece of china is going to be a unique shape anyway but generally keeping the pieces around 1/2″ to 3/4″ in size seems to work out the best.

Put gloves on to protect your hands from getting shards of the china in your skin. Grab the nippers and make a clean break on the edge of the china. Continue until the whole piece has been cut and you have a lot of small pieces to work with for your birdhouse design.

Build and Decorate a Broken China Mosaic Birdhouse

Create Your Design

Lay out the china pieces on the birdhouse before you glue everything down. Once you glue a piece down it will be harder to move things around. This is where the tweezers come in handy. Some china pieces may be small and using tweezers makes it easier to get them positioned just right. You may need to use the Tile Nippers to cut small edges of the tiles to fit them into your design just right.

Visit our Birdhouse Design Gallery to get some ideas.

Glue the China Pieces to the Birdhouse

Once you have your design in place, use the tweezers to pick each piece up and put some glue on the wood. Then press your piece firmly in place. If you want to skip this step, you can cover one side of the birdhouse with glue and press the broken china pieces in place, arranging your design as you go.

Let your birdhouse set overnight to make sure the glue is really firm and dry.

Grout the Broken China

Mix your grout with a spatula or plastic spreader. Using the spatula to spread the grout over the surface of your broken china, making sure to get in all of the little grooves. When you are finished with the whole birdhouse, use an old rag and wipe it down to make a level surface.

Let your birdhouse set overnight to make sure the grout is really firm and dry.

Apply a Finish

Your broken china birdhouse is now finished. You may want to add a Grout Sealer that will protect it and also give your birdhouse a more finished look. Grout Sealer is completely clear so it won’t add any color to your beautiful creation.

Build and Decorate a Broken China Mosaic Birdhouse

Sell Broken China Birdhouses

Broken China, Tiled and Hand Painted birdhouses are always in demand. People like pretty things to decorate their home and garden. Pretty things sell! If you are a craft, artist or painter you most likely make your own pretty things but there are millions of people who are not artistic or have no time to create pretty things for their home or garden. These decorative birdhouses could be sold at arts and craft fairs, online at Etsy, or your own website.

Creating these decorative birdhouse is very affordable. You can make one for probably $3 to $5 and sell them upwards of $40 each! All you need to do is invest some of your time. As a hobbiest you could work on them in your spare time. It’s good for the soul too as painting and crafting is very therapeutic! When we craft we don’t think of the cares and woes of our daily lives.

If you don’t mind taking a bit less, you could sell them directly to gift shops in your area at wholesale prices or on consignment. To sell to a local shop you usually cut your price in half so the shop owner can charge double and earn the other half. The advantage of selling to a shop owner is that you deal with one person and not individual people. Sell 40 birdhouses to 1 person or deal with 40 people. One makes you more money but you will have to figure out how to find and sell to 40 people whereas selling to a shop owner takes the pressure off of you having to find those customers.

Mosaic Ceramic China Tile Birdhouses

  • « Previous Page
  • 1
  • 2

Coastal Christmas Trees

DIY Coastal Home Decor Ideas

Sea Glass Crafts to Make and Sell

10 Beautiful Rustic Wood Centerpiece Boxes

Coastal Creators participate in the Amazon Services LLC Associates Program, an affiliate advertising program designed to provide a means for sites to earn advertising fees by advertising and linking to Amazon and other affiliate programs. Read more

  • HOME
  • BLOG
  • YOU TUBE
  • CONTACT

Copyright © 2025 · Coastal Creators · Our Policies