Coastal Creators of Connecticut

Coastal Creators of Connecticut coastalcreatorsct.com

  • HOME
  • BLOG
  • WHOLESALE
  • CONTACT
    • Our Policies

3D Kids Face Mask with Adjustable Elastic Ear Loops

The 3D face mask is the most comfortable mask to wear, especially for children. Many face masks don’t fit your face properly so you spend a lot of time adjusting them. Oftentimes you suck in the fabric when you talk, but the 3D face masks solves these issues. The unique design creates a pocket that helps keep the fabric away from your mouth when you talk. This also helps you breath better when wearing a face mask.

While this is not the easiest face mask to create or suggested for beginner sewers, I believe your kids will like wearing it more than other face mask designs.

3D Kids Face Mask with Adjustable Elastic Ear Loops

My 3D Face Mask for Kids pattern is based off of the Sweet Red Poppy pattern with my own variations added. Since she provided the printable pattern already I didn’t think there was a need to create a new one. You can print out the free 3D Face Mask Pattern for free from her website here and if you like the changes I made, just follow my sewing instructions.

Important! My instructions show you how to sew the elastic inside and not make a casing for the elastic. To follow my sewing instructions you will need to cut off a 1/4″ on either side of the 3D mask pattern where the elastic will be sewn.

3D Kids Face Mask with Adjustable Elastic Ear Loops

3D Kids Face Mask Supplies List

  • 100% quilter’s cotton fabric, 2 different designs
  • 3 mm Round elastic
  • rubber bead adjusters
  • Metal Nose bridge strips
  • bone folder
  • sewing machine
  • thread
  • scissors


How to Make a 3D Kids Face Mask

Watch my YouTube video if you find it easier to follow the instructions. Some steps may be confusing to read and it helps to hear someone explain the process.

video

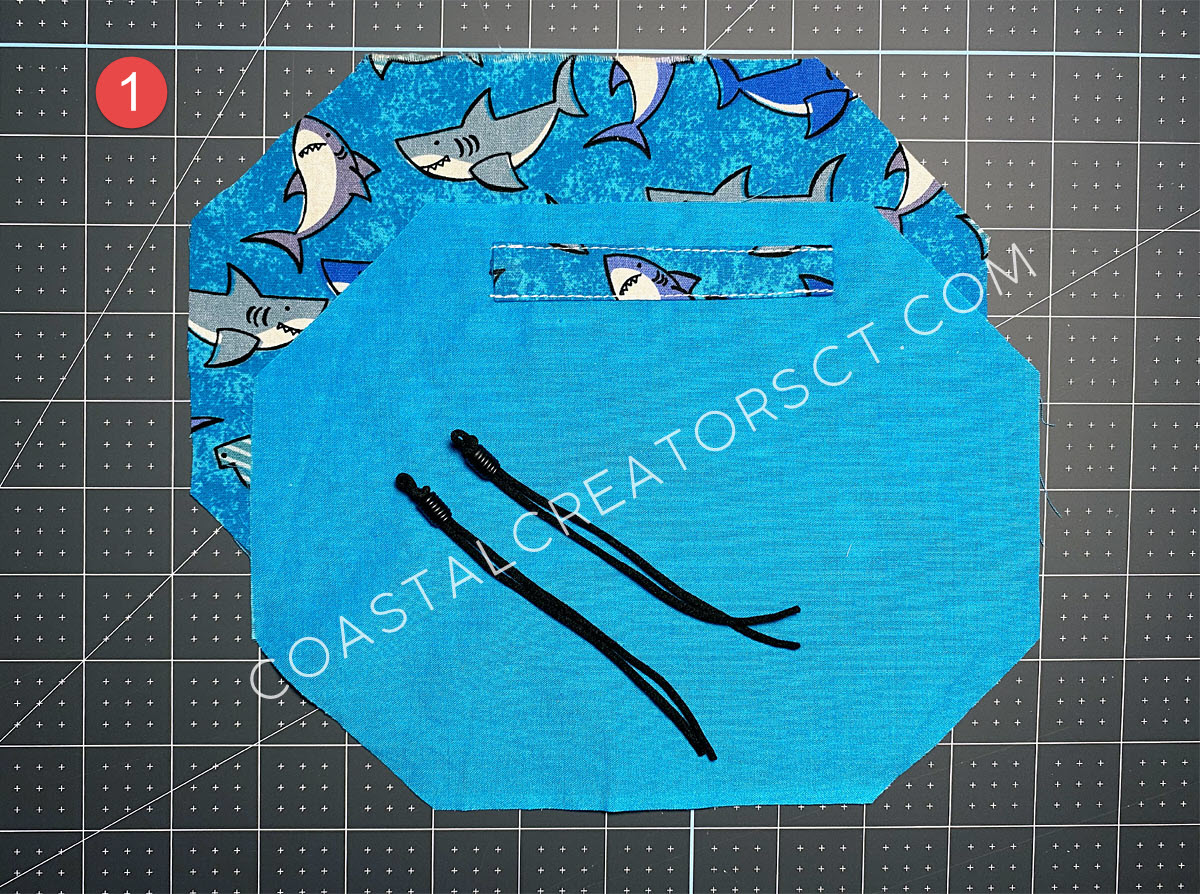
Cut Out the Fabric Pieces

Lay the two pieces of fabric on top of each other, right sides together. Using the pattern you printed from the Sweet Poppy website (make sure to cut off a 1/4″ from the sides), lay the pattern on top of the 2 fabrics. You can pin the paper pattern onto the fabrics if you like. Then cut out the two fabric pieces you need to make the 3D kids mask.

Create Adjustable Elastic Ear Loops

Watch my video to learn how to make adjustable elastic ear loops. In the video I use pony beads as ear loop adjusters. Note: this video uses 1/4″ latex elastic. If you have that on hand and not the round elastic you can use it to make adjustable elastic ear loops. I find that latex elastic is rough on the ears and has strong smell so I stopped using it and switched to round elastic instead.

Cut a piece of elastic, 9″ long. Using the metal hook that come with the rubber beads (or piece of twine if you are using pony beads), pull the elastic through the bead. Adjust the elastic to that the ends match. Tie a small knot at the end of the loop so the bead adjuster does not come off.


Create the Nose Wire Pocket

For my version of the 3D kids face mask, I create a nose wire pocket and sew it on the inside fabric before sewing the two pieces of fabric together. Watch the video to learn how to create a nose wire pocket. The fabric is cut 1-1/2″ x 4-1/2″ for the nose wire pocket. I use metal nose bridge strips to insert into the nose wire pocket. I find that they are flexible and last a long time. They will break overtime, just like any piece of metal you would use in the pocket, so buying a pack of 50 or 100 is a good idea.

Sew the Adjustable Elastic Ear Loops to the Mask

Locate the side edge where the elastic should be placed. Place the fabrics right sides together. Lift up the top fabric and lay one end of the elastic ear loop 1″ down from the edge on the bottom fabric. Leave a 1″ gap and place the second end of the elastic ear loop on the fabric. Lay the top piece of fabric over the elastic. You can pin the elastic down or hold it in place as you sew.

Adult Measurements: If you are making the adult 3D face mask the space in between the elastic ends will be wider. Just start at 1″ from the edge for the first end and then put the other end 1″ from the opposite edge.

Sew the Fabric Together

Sew across the edge where you have just placed the elastic inside. Add the other elastic ear loop to the other side of the fabric and sew. Continue sewing all around, leaving a 2-1/2″ gap for turning.

Turn and Iron

Snip each corner just at the tips to get rid of the bulk fabric. This will help you get a sharp point at the corners. Since this is an octagon shape, there will be 8 corners to snip. Using a chopstick or bone folder, poke out the corners and iron the whole piece flat. Make sure not to get near the elastic or bead adjusters with the iron because they will melt.

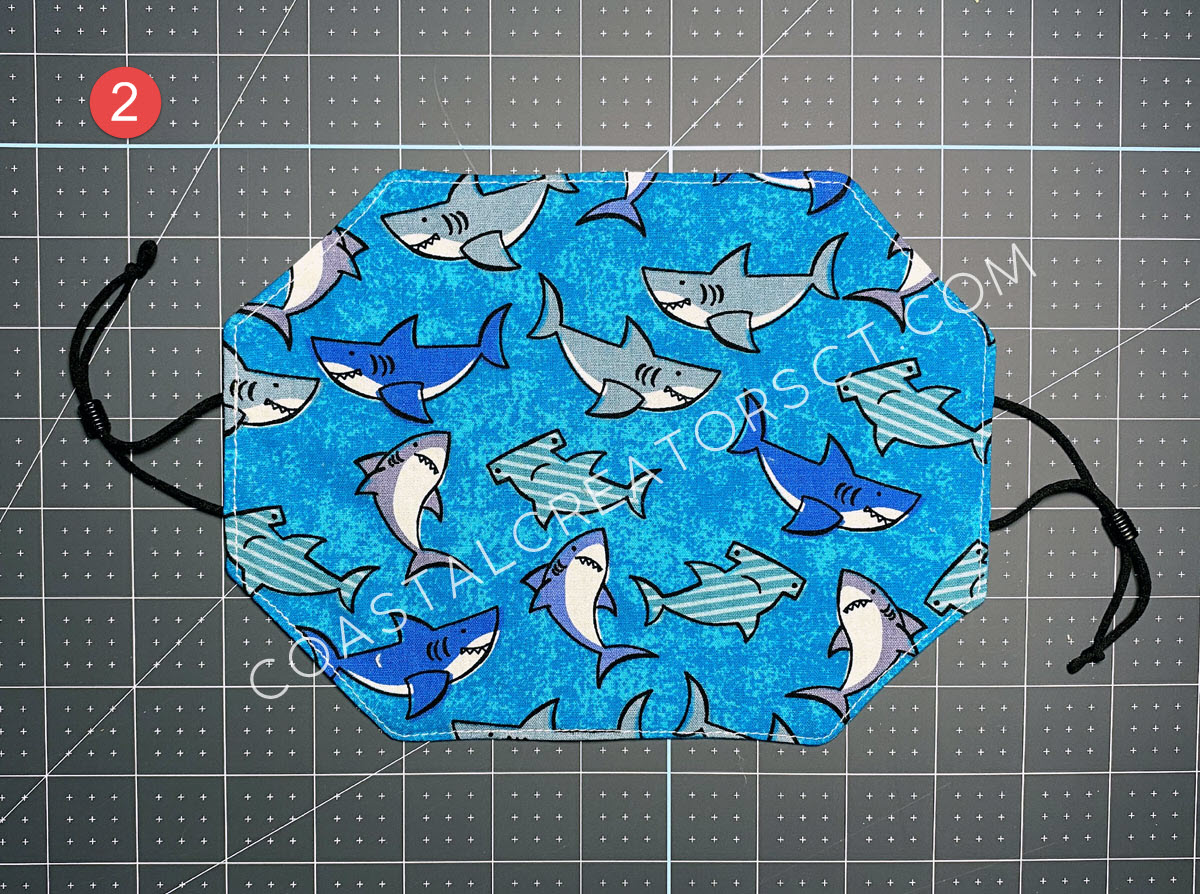
Top-stitch All Around

Top-stitch 1/8″ away from the edge all around the around the edge. If you are selling face masks, top-stitching is suggested to give them a professional look.

3D Kids Face Mask with Adjustable Elastic Ear Loops

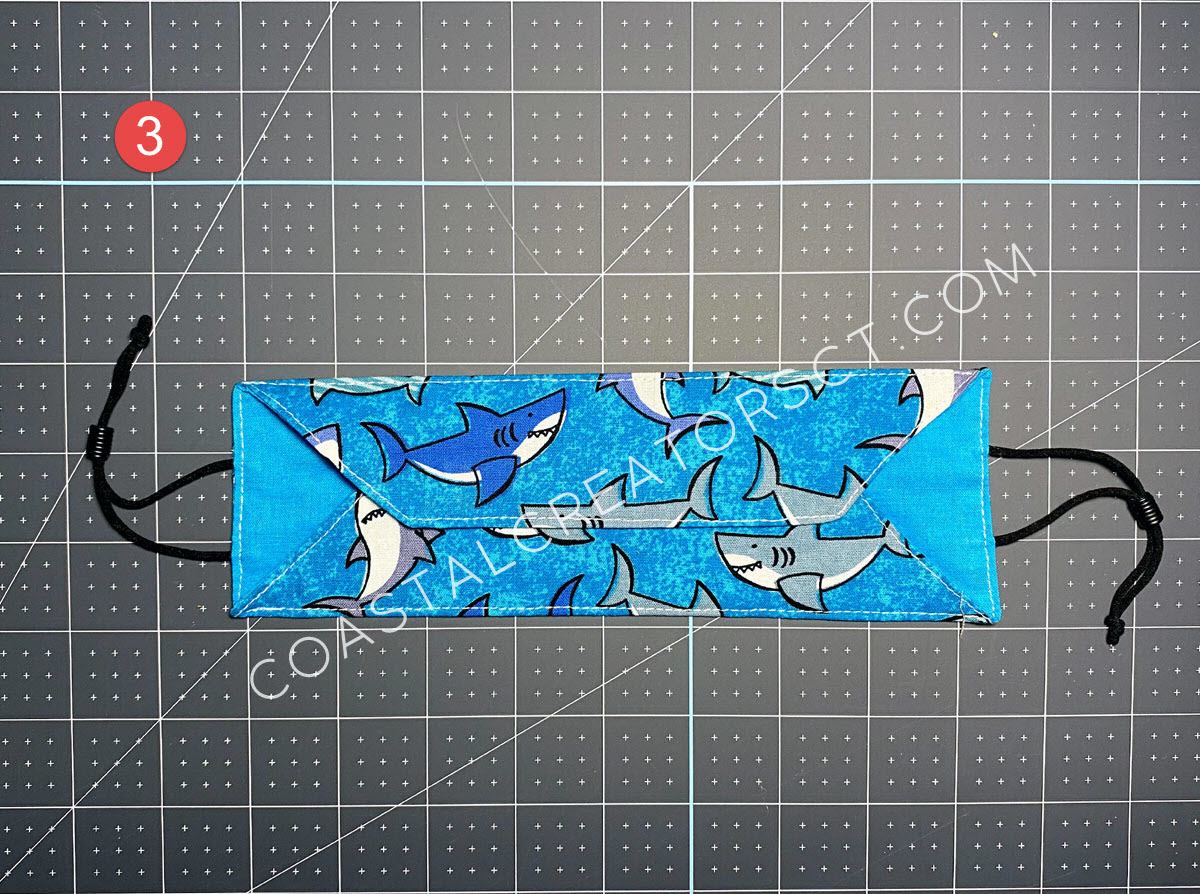
Fold up the Edges and Top-Stitch

Fold the long edges up right at the corners, pin and top-stitch 1/8″ from the edge. Open, lay flat and iron.

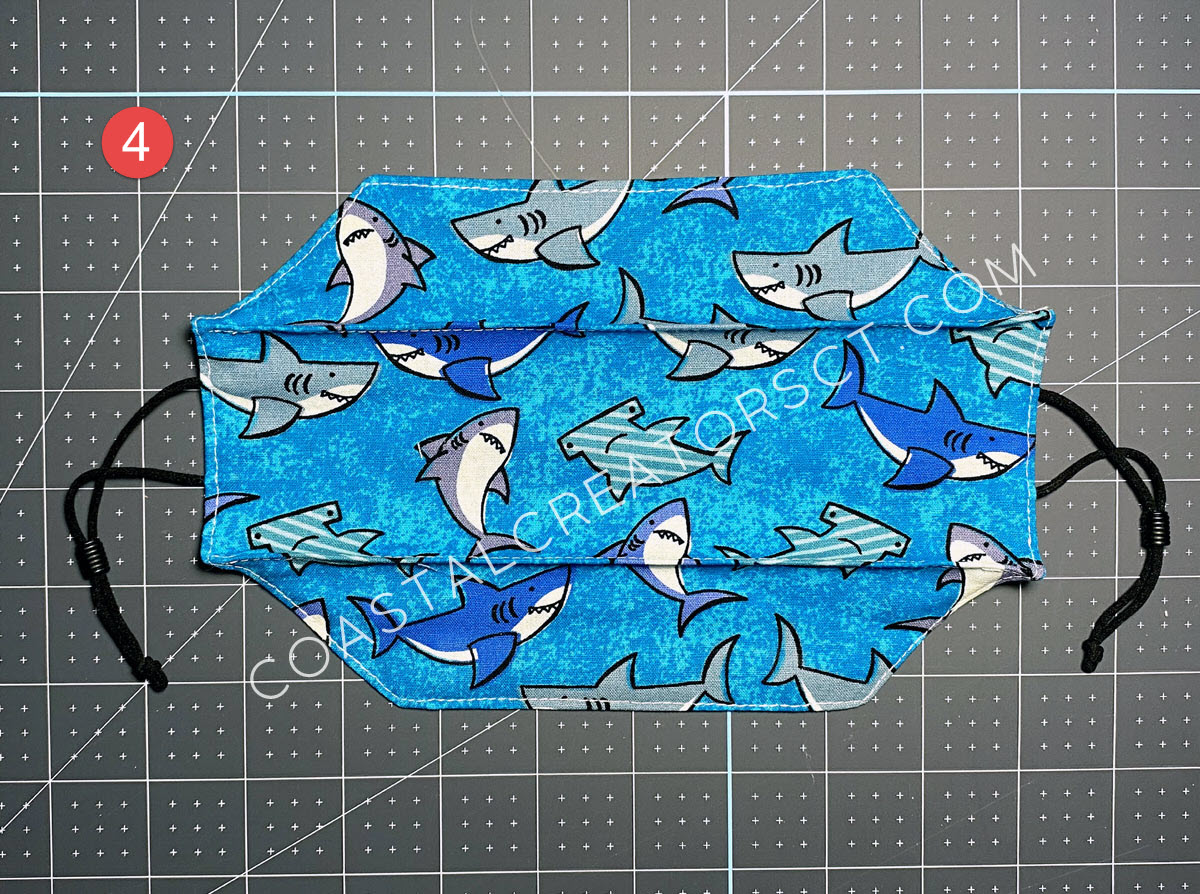
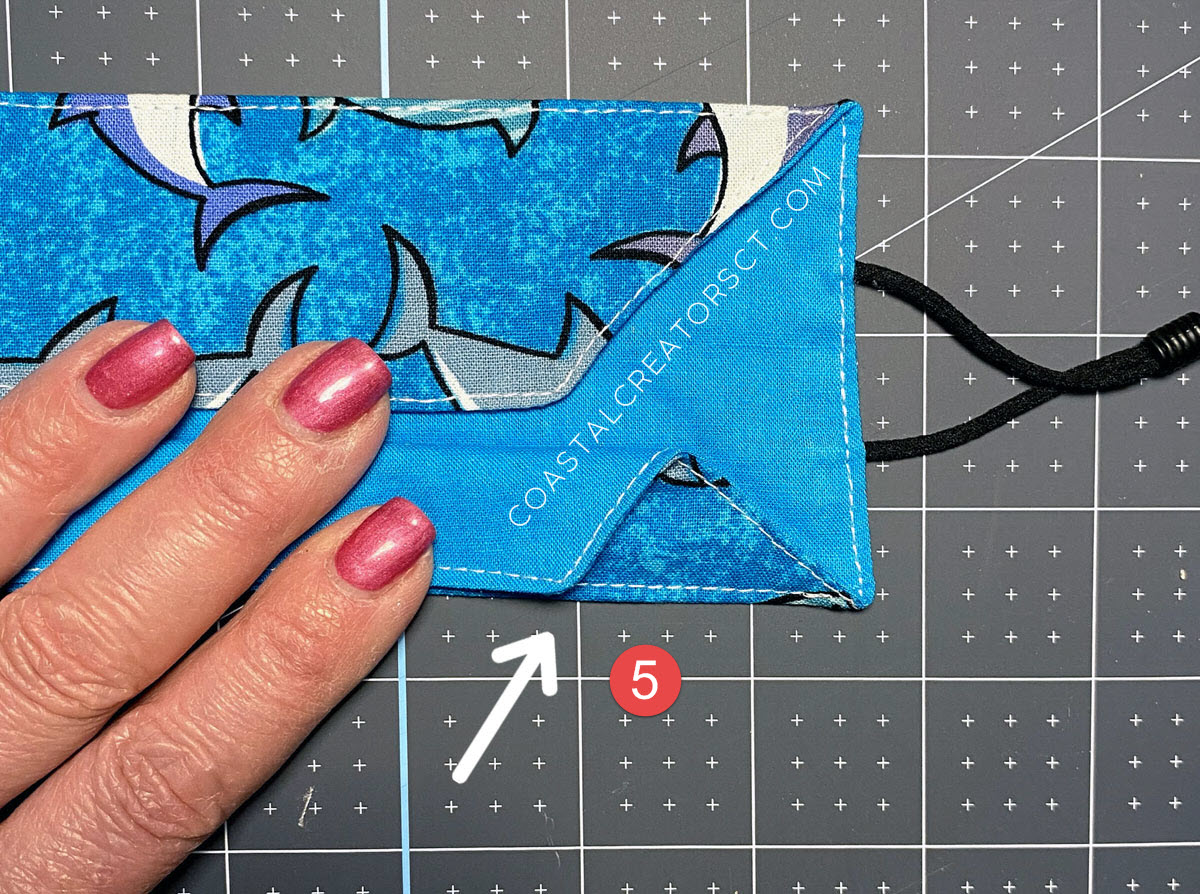
Create the 3D Effect

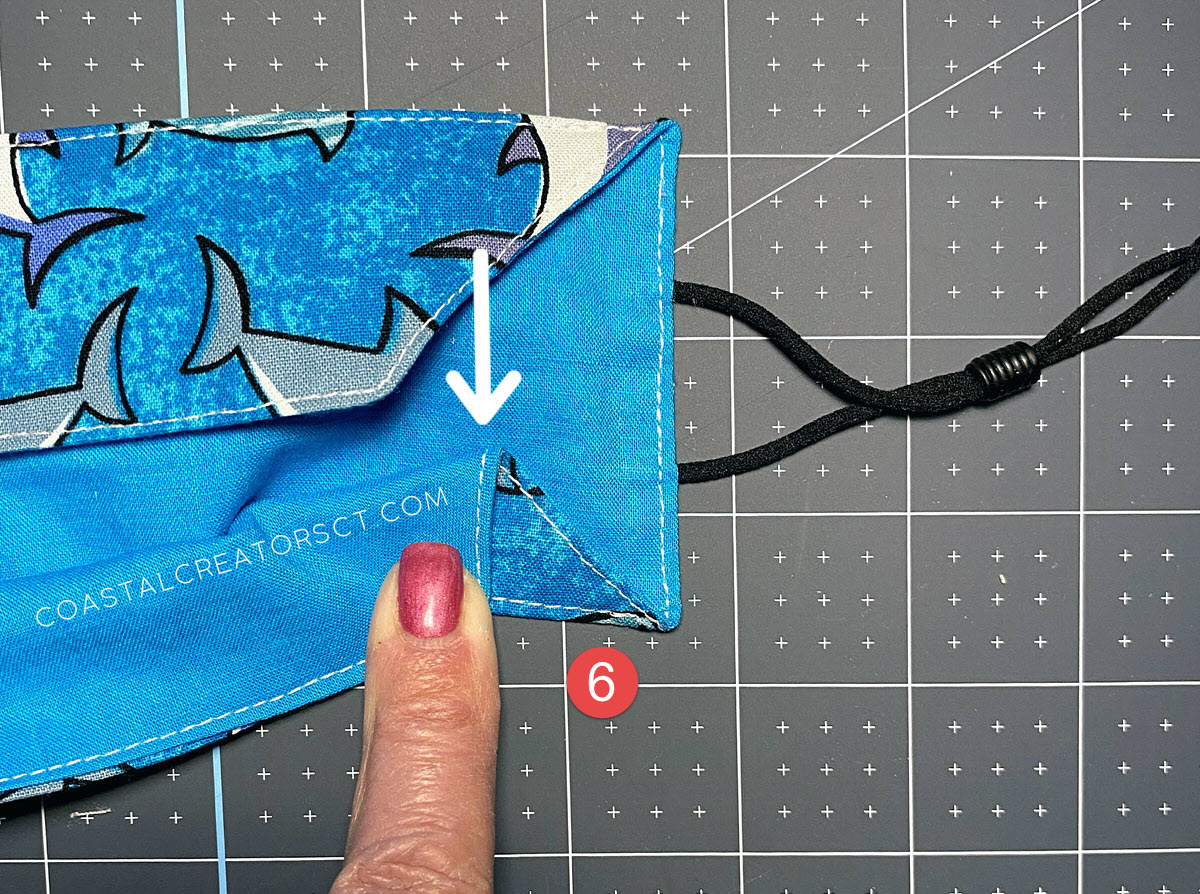
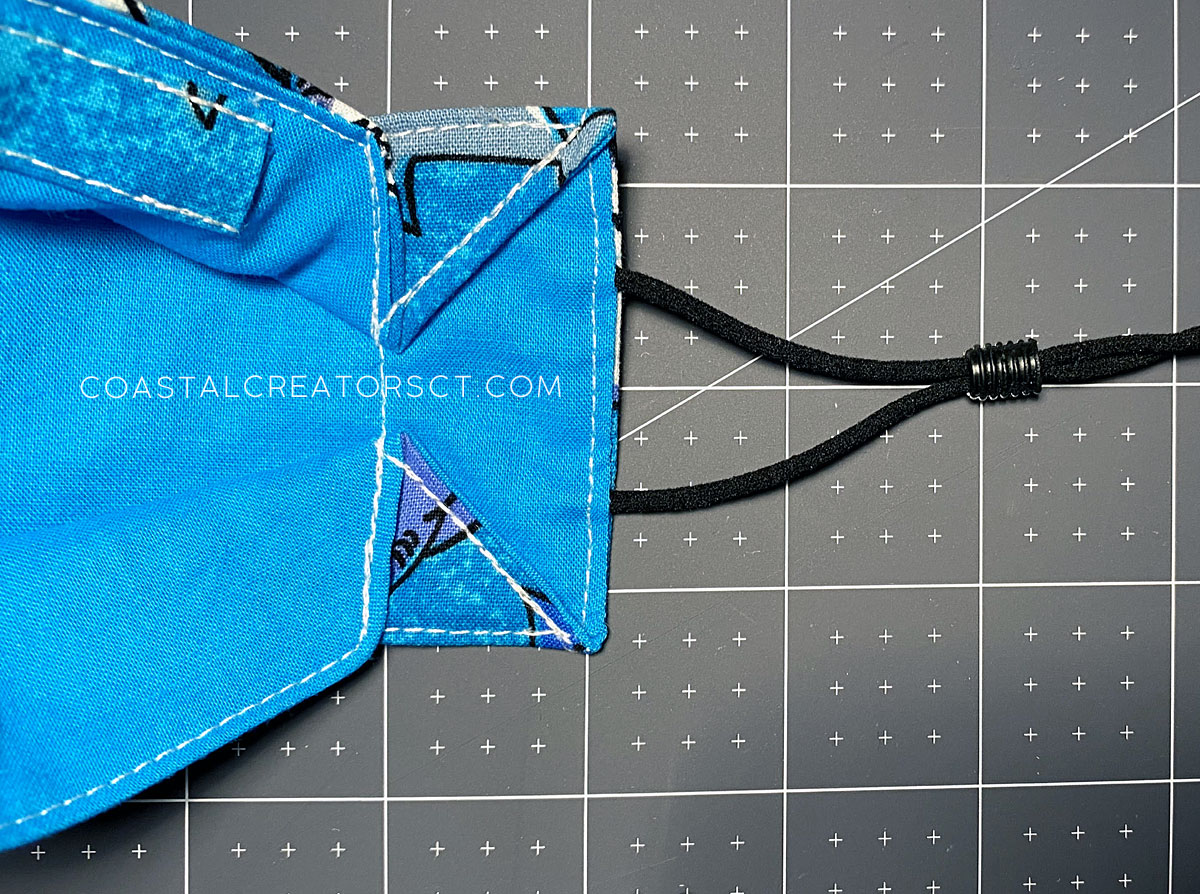
Fold the long down until you see a triangle shape. Place your thumb at the corner. Use you other hand to shift the fabric to the right until it is parallel with the side. You must get this step correct to ensure the mask will have the 3D effect. Pin in place. Do this to the top side. Sew making sure to keep things even. I also like to sew the corners to create a nice triangle top-stitch on the front.

Update: I stopped sewing in between the triangle corners. I just sew each triangle individually.

3D Kids Face Mask with Adjustable Elastic Ear Loops

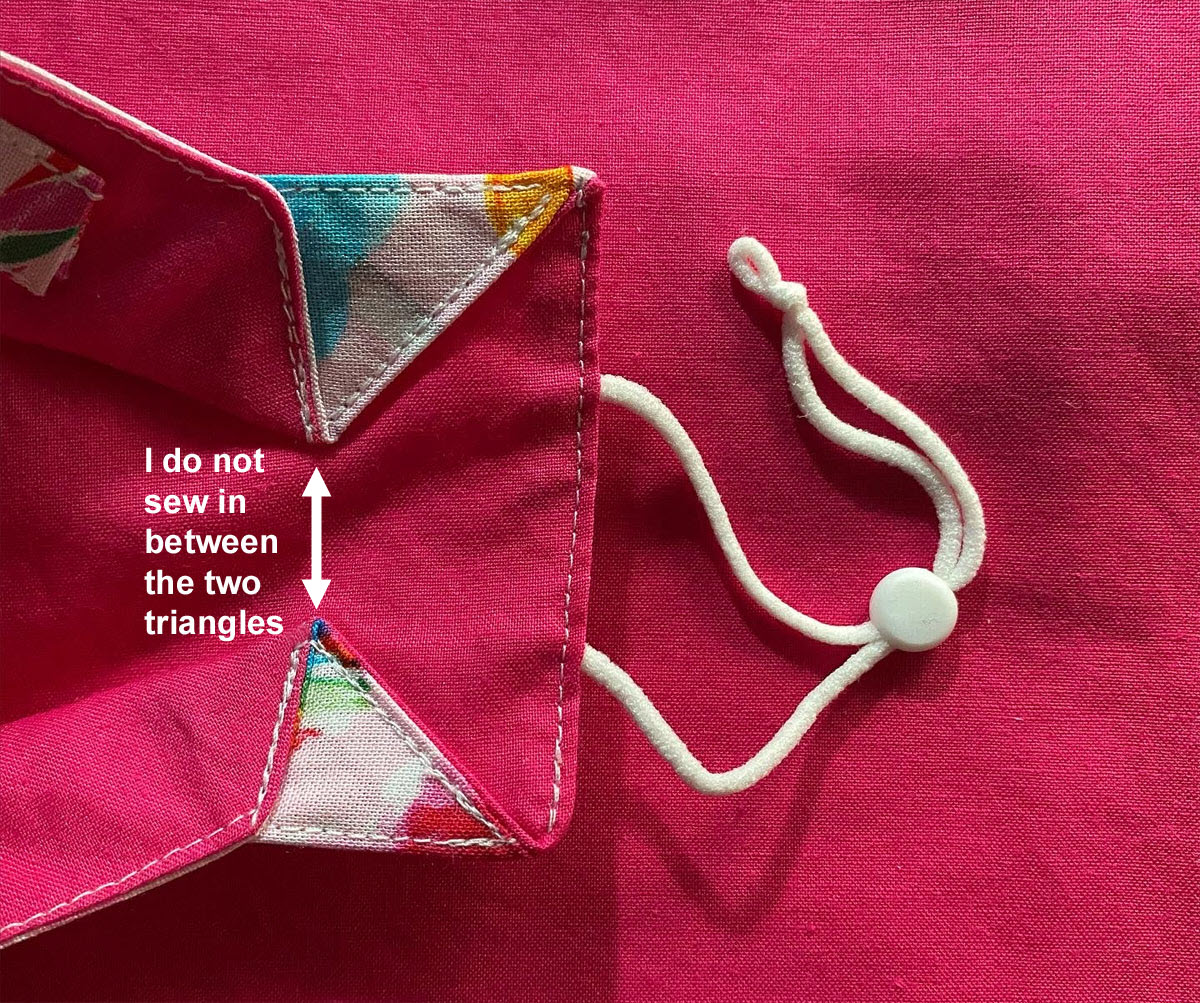
This is the original view where I sewed in between the triangle corners. It is much easier to not sew in between each corner and it looks just a good or even better.

3D Kids Face Mask with Adjustable Elastic Ear Loops

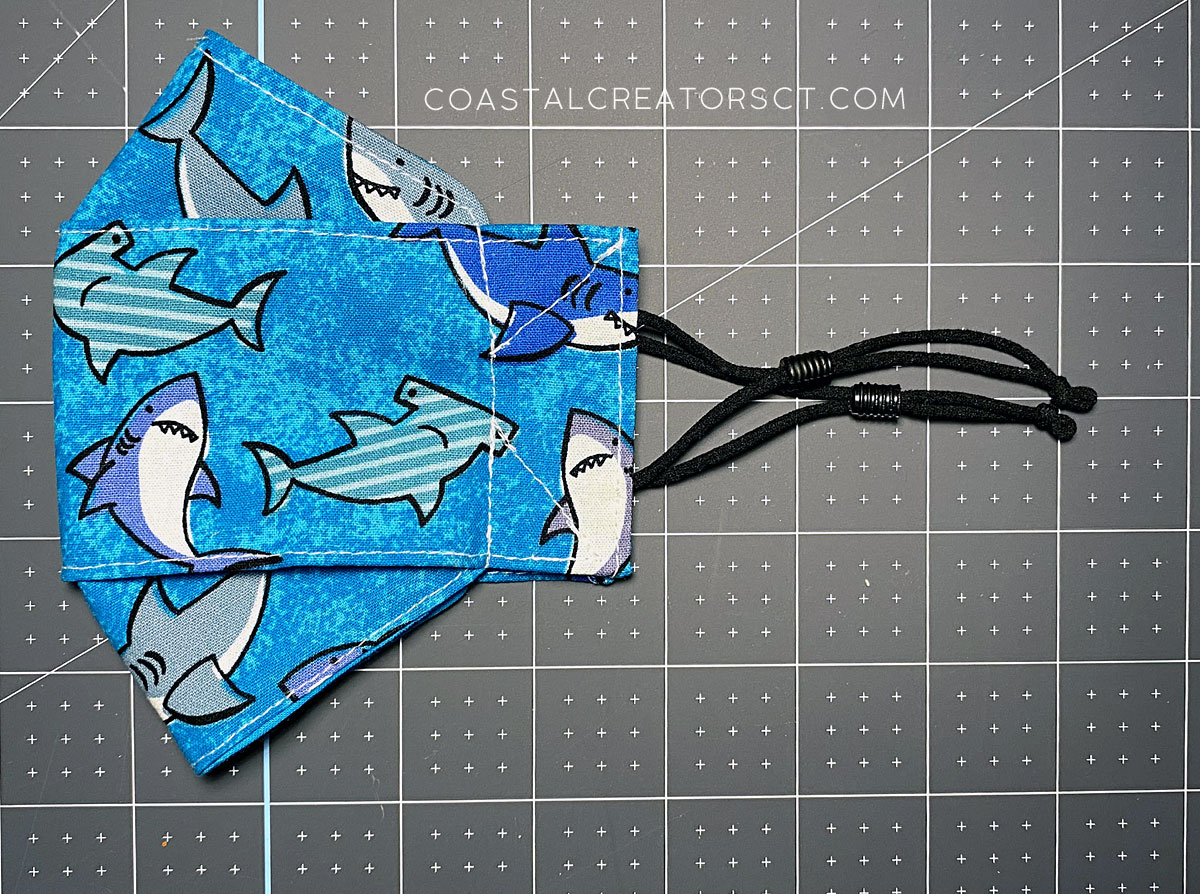
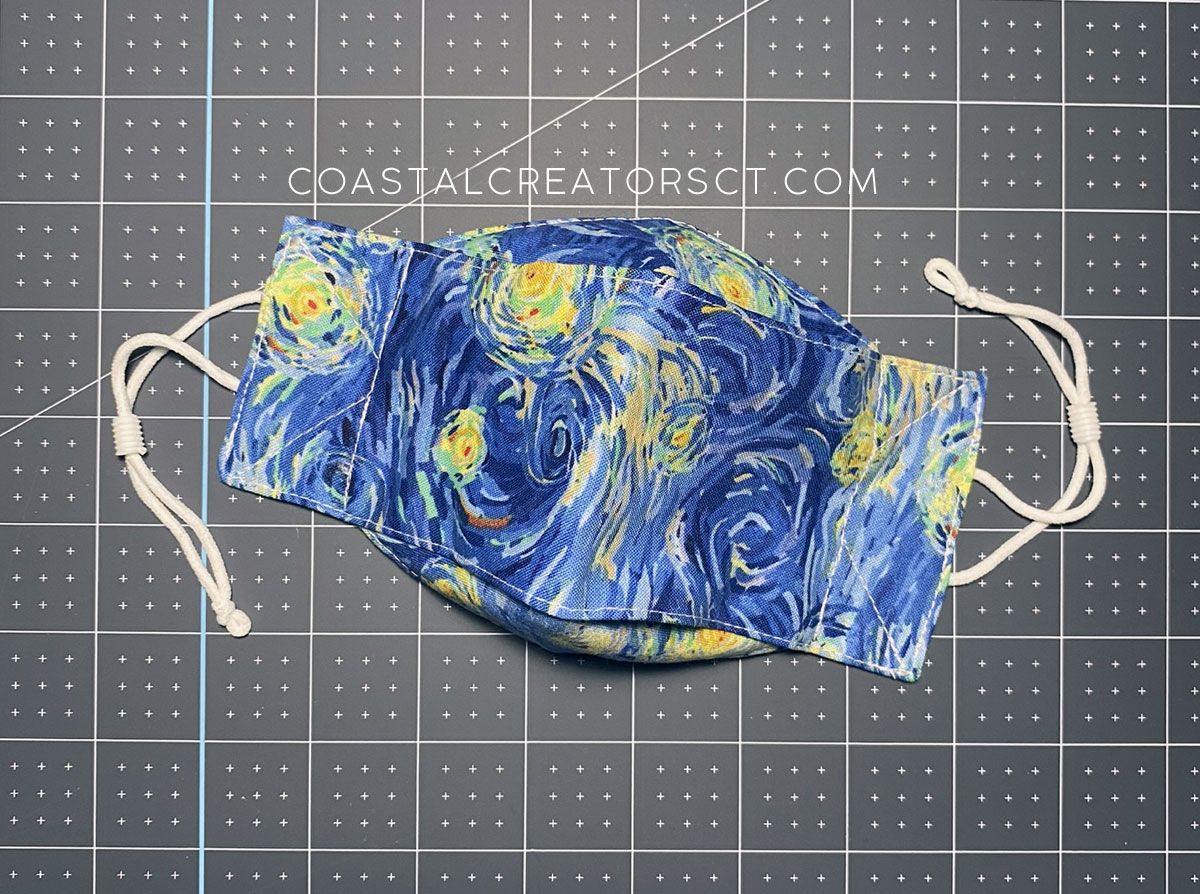
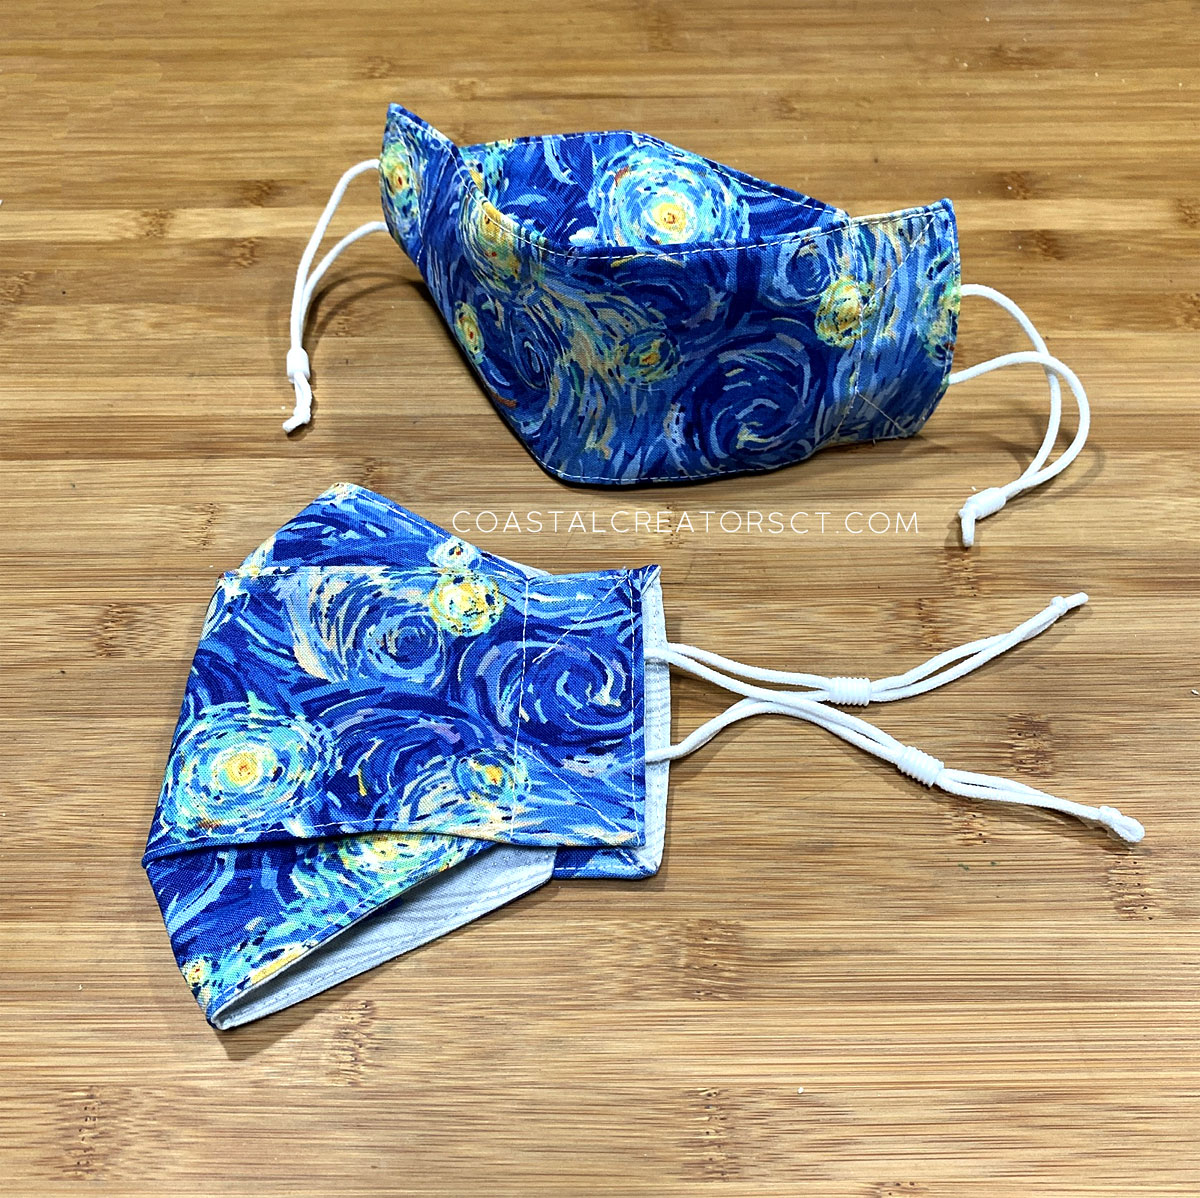
The unique 3D face mask design makes this look like an Origami face mask. It’s very artsy looking.

3D Kids Face Mask with Adjustable Elastic Ear Loops

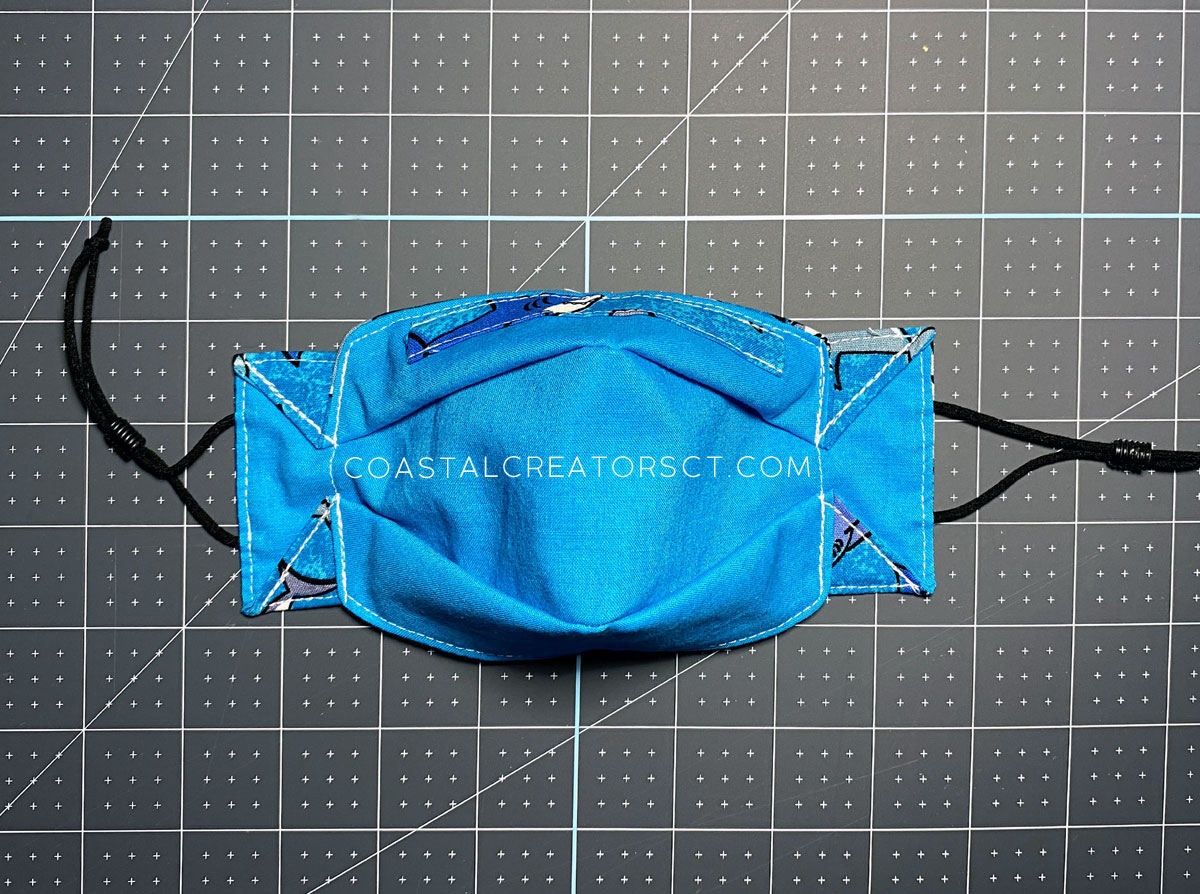
Sewing a 3D face mask for kids is a little bit more work but you will find that this face mask is super comfortable, especially if you make the elastic adjustable. No matter what face mask you create, I highly suggest you make the elastic ear loops adjustable because every face shape and size are different.

3D Kids Face Mask with Adjustable Elastic Ear Loops

3D Kids Face Mask with Adjustable Elastic Ear Loops

Build and Decorate a Broken China (Mosaic) Birdhouse

A Broken China Birdhouse is a labor of love created by adding broken china pieces to a wood birdhouse using glue and grout. We will teach you how to build the birdhouse, how to find broken china, how to add broken china pieces to your birdhouse and how to give your broken china birdhouse a good finish so it will last for many years.

Build and Decorate a Broken China Mosaic Birdhouse

When building a broken china birdhouse you will need certain materials but they are very affordable. You’ll need some china you don’t mind breaking or tiles you purchased, pine wood to build the birdhouse and a few other supplies, that we list below.

Build and Decorate a Broken China Birdhouse

One day, I bumped into my hutch and broke this beautiful tea cup and saucer. It literally came flying out at me and crashed onto the floor. All was not lost because I decided to turn it into the lovely birdhouse I am going to show you how to build and decorate.

Where to Get Broken China

If you own a piece of china that has chips on it and you are willing to part with it, you can use it for your broken china birdhouse. If you don’t have any broken china, you will easily find a chipped tea cup or china saucer or maybe a tea cup that is missing it’s saucer at your local Goodwill store or Thrift shop. If it is summertime, stop by some yard sales and see what pieces of china you can find.

Online you can also visit local “free cycle” or “buy it nothing” groups to see who is giving away china that you could use for your broken china birdhouse project. Check Facebook Marketplace and Craigslist under the free section. Someone is always giving away china they don’t want or use anymore that would be perfect for this project.

Using Other Embellishments

You can also embellish your birdhouse with other elements such as stained glass, jewelry beads, pieces of decorative stone, Tesserae tiles, ceramic tiles, or even pieces of metal. This is the kind of project that allows you to be creative.

Mosaic Tile Supplies

Supplies Needed

  • 1/2″ plywood
  • 1″ x 6′ pine board
  • 2″ square piece of fiberglass screen
  • 1 1/4″ brad / finishing nails
  • Saw to cut the wood (we used a compound miter saw)
  • Sand paper or random orbit hand sander
  • Drill
  • Tile Cutter
  • Pointed Tweezers
  • China you can break or purchased tiles
  • Grout Sealer
  • work gloves
  • Tile Adhesive (We use Mapei Type 1)
  • Tile Grout
  • Plastic Spatula
  • Tile Grout


Build and Decorate a Broken China Birdhouse

Step-by-Step Birdhouse Instructions

1. Using the 1/2″ plywood, cut one piece to be 3-1/2″ wide by 5″ long.

2. Cut a second piece to be 4″ wide by 5″ long.

3. Using the 1″ x 6″ pine board cut a 4-1/2 ” square to be used as the bottom of the birdhouse.

4. Using the 1″ x 6″ pine board cut the two sides to be 2-1/2″ wide by 4″ long.

5. Using the 1″ x 6″ pine board cut two pieces to be 4″ wide by 6″ long. These are the front and back of the birdhouse.

6. The front and back need to have a peak. Do this by measuring in 2″ from the side of each piece at the top of the 6″ length. Using a 45 degree angle, draw a line from where the angle intersects the 2″ mark to the edge of the board.  This should result in the correct length of the peak.

If a 45 degree angle is not available, still mark the top 2″ inches in, basically the middle of the board. Then measure 2″ down from the top of the board and draw a line from side to side.  Taking a straight edge, draw a line from the 2″ mark at the middle of the top to the 2″ line on the edge of the board.  Do either method for the left and right sides of the board. Cut on the 45 degree lines to form the peak.

Build and Decorate a Broken China Mosaic Birdhouse

7. Select one of the 4″ x 6″ pieces for the front. Drill a 1-1/8″ diameter hole, 3″ up the bottom and 2″ in from the side.

8. Lightly sand each piece of wood. (Sand paper or random orbit hand sander)

9. Before assembling, attach the fiberglass screen behind the hole, using staples.

10. To assemble the birdhouse, start by nailing the sides to the front and back. The sides go between the front and backs, so once fully assembled the body of the birdhouse will be 4″ x 4″.

11. Next, nail the 3-1/2″ x 5″ roof piece onto the body of the birdhouse at the peak with the 5″ side going across the wide of the birdhouse.  The top edge of this roof piece needs to be flush with point of the peak. The sides and bottom of the roof piece should overhang the birdhouse by 1/2″.

12. Nail the 4″ x 5″ roof piece to the other side of the peak. Align this roof piece so one edge overlaps the already attached roof piece. This roof piece should also overlap the birdhouse by 1/2″.

13. Nail the bottom to the birdhouse so that there is approximately 1/4″ of the bottom showing around all sides of the birdhouse.

Now that your birdhouse is built you may want to sand it lightly. I also give my birdhouse a base coat. I use basic white acrylic paint. You could skip this step if you wish.

Build and Decorate a Broken China Birdhouse

Cover the Opening

We use fiberglass screen to cover the opening in our birdhouse. We are not building a birdhouse that is actually going to be used by birds. Our birdhouse is a decorative art piece that we will display in the garden, to display on a shelf in our home, or even to sell.

If you are using our birdhouse instructions, you will want to add a piece of fiberglass screen behind the hole because you do not want birds to go into the birdhouse and build a nest. There are two reasons for this. Our birdhouse is small, too small for a bird to build a proper nest. Also, the hole is small and most birds will not be able to fit properly. The second reason is, if you want to make this broken china birdhouse as a decorative piece, you want to discourage birds from trying to build a nest inside. The fiberglass screen solves both.

You could use metal screen instead of fiberglass screen if you have it on-hand. We just had some fiberglass screen on hand that was leftover from the screen door project. We replaced the screen in our screen door and we had a small amount leftover. If you can use scraps for projects like these, you can make them super affordable. Fiberglass screen is also easier to work with and staple onto the wood.

Build and Decorate a Broken China Birdhouse

Prepare the China Pieces

To prepare the china pieces you will want to break the pieces of china into pieces that are about 1/2″ in size. Each piece of china is going to be a unique shape anyway but generally keeping the pieces around 1/2″ to 3/4″ in size seems to work out the best.

Put gloves on to protect your hands from getting shards of the china in your skin. Grab the nippers and make a clean break on the edge of the china. Continue until the whole piece has been cut and you have a lot of small pieces to work with for your birdhouse design.

Build and Decorate a Broken China Mosaic Birdhouse

Create Your Design

Lay out the china pieces on the birdhouse before you glue everything down. Once you glue a piece down it will be harder to move things around. This is where the tweezers come in handy. Some china pieces may be small and using tweezers makes it easier to get them positioned just right. You may need to use the Tile Nippers to cut small edges of the tiles to fit them into your design just right.

Visit our Birdhouse Design Gallery to get some ideas.

Glue the China Pieces to the Birdhouse

Once you have your design in place, use the tweezers to pick each piece up and put some glue on the wood. Then press your piece firmly in place. If you want to skip this step, you can cover one side of the birdhouse with glue and press the broken china pieces in place, arranging your design as you go.

Let your birdhouse set overnight to make sure the glue is really firm and dry.

Grout the Broken China

Mix your grout with a spatula or plastic spreader. Using the spatula to spread the grout over the surface of your broken china, making sure to get in all of the little grooves. When you are finished with the whole birdhouse, use an old rag and wipe it down to make a level surface.

Let your birdhouse set overnight to make sure the grout is really firm and dry.

Apply a Finish

Your broken china birdhouse is now finished. You may want to add a Grout Sealer that will protect it and also give your birdhouse a more finished look. Grout Sealer is completely clear so it won’t add any color to your beautiful creation.

Build and Decorate a Broken China Mosaic Birdhouse

Sell Broken China Birdhouses

Broken China, Tiled and Hand Painted birdhouses are always in demand. People like pretty things to decorate their home and garden. Pretty things sell! If you are a craft, artist or painter you most likely make your own pretty things but there are millions of people who are not artistic or have no time to create pretty things for their home or garden. These decorative birdhouses could be sold at arts and craft fairs, online at Etsy, or your own website.

Creating these decorative birdhouse is very affordable. You can make one for probably $3 to $5 and sell them upwards of $40 each! All you need to do is invest some of your time. As a hobbiest you could work on them in your spare time. It’s good for the soul too as painting and crafting is very therapeutic! When we craft we don’t think of the cares and woes of our daily lives.

If you don’t mind taking a bit less, you could sell them directly to gift shops in your area at wholesale prices or on consignment. To sell to a local shop you usually cut your price in half so the shop owner can charge double and earn the other half. The advantage of selling to a shop owner is that you deal with one person and not individual people. Sell 40 birdhouses to 1 person or deal with 40 people. One makes you more money but you will have to figure out how to find and sell to 40 people whereas selling to a shop owner takes the pressure off of you having to find those customers.

Mosaic Ceramic China Tile Birdhouses

Build a Pallet Wood Swimming Pool Deck

If you own an above-ground swimming pool or plan on adding one to your yard, you are going to love this DIY project. The supplies are basically free. All you need to do is supply the labor. Who knew that wood pallet could be so versatile but keep reading because you will find out just how to build a swimming pool deck out of free wooden pallets.

Wooden pallets are easy to come by. You can find them at local businesses who want to give them away. If you don’t spot some in your area, just go on Craigslist or Facebook Marketplace because someone is always giving away free wood pallet s.

We didn’t come up with this idea to use pallets to create a swimming pool deck. This idea came from José Adimilson Franco who lives in Brazil. We loved his ideas and thought our readers could benefit from his ingenuity. You can check out other wood projects he has created by visiting his Facebook page.

This swimming pool deck made out of pallet wood is built around an approximately 12′ x 30″ above-ground swimming pool.

Step One: Prepare the Pallets

The first step is to acquire free wooden pallets. Then you will need to take the pallets apart so you have the wooden slats to work with. Of course, this type of platform could also be built by purchasing brand new wood from a hardware store but we want to make this project as cheap as possible.

Not all pallet wood will be suitable for a swimming pool deck and platform. You need to pick the best wood that will weather well and have uniform sizes you can use. You may also want to preserve the wood by adding a coat or two of Rust-Oleum paint. Rust-Oleum paint weathers well in the elements. You could also stain the pallet wood if you prefer.

Step Two: Prepare the Area

You will want to prepare the ground around and under the swimming pool. A large tarp should be laid on the ground before the swimming pool is erected. With any type of above-ground swimming pool you add to your yard you will want to level the ground first, then add the tarp, and then the swimming pool. If you already have the swimming pool in place you can skip this step and move to the next step.

How to Build a Swimming Pool Deck out of Wooden Palettes

Step Three: Build the Base

The next phase of this swimming pool deck project is to create the foundation. While we are not providing the exact measurements because each swimming pool size will be different, you can use the photo to get a good idea of what you will need to create.

How to Build a Swimming Pool Deck out of Wooden Palettes


Step Four: Build the Platform

Once the swimming pool platform base has been erected, arrange the pallet wood on the deck until you have the design you will to create. Use 1-1/2″ finishing nails and a brad nailer to nail each board in place. You could use a regular hammer but a brad nailer will cut the time in half and save your tired hands. You will also need a saw to cut odd size pallet wood pieces. We suggest using a circular saw.

A set of 3 steps have been added to one corner. Pallet wood can be used to create the steps but in a pinch wood crates will also do the trick. You will want steps to make it easy to climb onto the swimming pool deck.

How to Build a Swimming Pool Deck out of Wooden Palettes

Now that you have seen what you can do with pallet wood and a swimming pool, you could keep building you deck up on the sides by adding lattice walls and even an outdoor shower.

How to Build a Desktop Paint Bottle Organizer

If you use acrylic paints for craft projects, kids craft, and other painting projects, you probably have a lot of those little 2 oz. bottles of paint. Our favorite to use is Apple Barrel paints and we have ALL of the colors, because let’s face it, you never know what color you will need to have on hand.

We were looking for a good way to organize our paints to we could easily see the color and we came up with a nifty paint bottle organizer using wood and PVC piping. This is an inexpensive project to make. You can make it as large as you like just by adding more rows of PVC piping.

How to Build a Desktop Paint Bottle Organizer

Supplies Needed

  • 8′ length of 1-1/4″ inner diameter PVC pipe
  • 1″ x 4″ pine board (you will need 20″)
  • Glue – we used Gorilla Glue
  • 1-1/4″ Brad Finishing nails
  • Sand paper or random orbit hand sander
  • Saw to cut the wood (we used a compound miter saw)
  • Paint (we used acrylic or satin house paint we already had)


How to Build a Desktop Paint Bottle Organizer

Step-by-Step Instructions

  1. Cut twenty-three (23) 3-3/8″ long pieces from the PVC pipe.
  2. Smooth edges of the PVC pipe sand paper or hand sander.
  3. You may want to lightly sand the outer surface of the PVC to remove the wording. If you don’t want to sand you can also paint over it.
  4. Cut one piece of the 1″ x 4″ wood to 8-1/4″ long.
  5. Cut 2 pieces of the 1″x 4″ wood to 4-1/2″ long.
  6. Lightly sand the wood pieces.
  7. Finish the wood as desired. We painted ours with white paint to match the PVC but you can paint it any color you like.
  8. Nail the 8-1/4″ piece of wood to the two 4-1/2″ pieces of wood.

How to Build a Desktop Paint Bottle Organizer

How to Build a Desktop Paint Bottle Organizer

  1. Glue six pieces of the PVC pipe together, making three rows of six pieces.
  2. Glue the three rows of six pieces on top of each other.
  3. Glue the remaining five pieces of PVC pipe in the valleys of the top row of six pieces of PVC.
  4. Glue the wood frame to PVC pipe so that the frame sits on top of the row of five PVC pieces.

How to Build a Desktop Paint Bottle Organizer

Optional: We didn’t add a piece of wood as a base but you could easily do this by cutting another piece of wood, 8-1/2″ x 1″ x 4″ and nail it onto the bottom.

Conclusion

Our paint bottle desktop storage unit will definitely come in handy on your craft desk to keep all of your paints organized. It’s a much better way to see all of the colors you have on hand when you are working on a paint project. By putting the paint bottles in the PVC tubes you can have the colored ends of the bottles hang out so you can see the colors. You could even organize them by color and make more than one of these paint bottle organizers. Stack them on top of each other to make a whole wall of organizers.

Low Maintenance Landscape Designs on a Budget

If you are looking to beautify your landscape but you want low maintenance on a budget, then look no further than these landscape designs on a budget ideas. There are so many beautiful ideas you will have a hard time trying to decide which one to plan for your own yard.

Low Maintenance Beautiful Garden Designs

There are so many ways to create a beautiful, but low budget, and low maintenance walkway in your garden or yard. Simple bricks laid down in a decorative pattern create something unique and special without a lot of cost.

Low Maintenance Beautiful Garden Designs

Low Maintenance Beautiful Garden Designs

Patio pavers, which are inexpensive and easy to lay, can be placed in between grassy areas. Use your imagination and carve out sections of grass and lay pavers to make a walkway. You can also fill in gaps with pea gravel.

Low Maintenance Beautiful Garden Designs

QUIKRETE’s WalkMaker Country Stone Pattern Concrete Mold is easy to use. Once you clear your space ad level the ground, place the model on any relatively flat surface and the WalkMaker will automatically configure the concrete to the existing base. You will need some concrete to create this low maintenance landscape look.


While the concrete is still in mold, pat and smooth cavity surface with trowel, remove mold promptly, after removing mold, smooth all edges with a trowel until appearance is satisfactory.

Add QUIKRETE liquid cement color to dramatically enhance and WalkMAker project.

Low Maintenance Beautiful Garden Designs

Decorative grasses are easy to grow and literally maintenance-free. Large pebbles or decorative polished stones make for an easy border around the garden.

Low Maintenance Beautiful Garden Designs

Here is another example of using common bricks to make a raised garden. You don’t need any fancy tools to create this look, just a bit of concrete and a trowel. Quick setting Quikrete cement is easy to use.


Low Maintenance Beautiful Garden Designs

  • « Previous Page
  • 1
  • …
  • 4
  • 5
  • 6
  • 7
  • 8
  • Next Page »

250th United States Anniversary Wholesale Laptop and Water Bottle Stickers Products

Wholesale 250th Anniversary Products for Retailers (America 1776–2026)

250th United States Anniversary Wholesale Bookmarks Products

The 250th Anniversary of the United States: A Semiquincentennial Moment

Coastal Christmas Trees

DIY Coastal Home Decor Ideas

Coastal Creators participate in the Amazon Services LLC Associates Program, an affiliate advertising program designed to provide a means for sites to earn advertising fees by advertising and linking to Amazon and other affiliate programs. Read more

  • HOME
  • BLOG
  • WHOLESALE
  • CONTACT

Copyright © 2026 · Coastal Creators · Our Policies