Coastal Creators of Connecticut

Coastal Creators of Connecticut coastalcreatorsct.com

  • HOME
  • BLOG
  • WHOLESALE
  • CONTACT
    • Our Policies

Fun Birdhouses to Make, Sell and Just Enjoy!

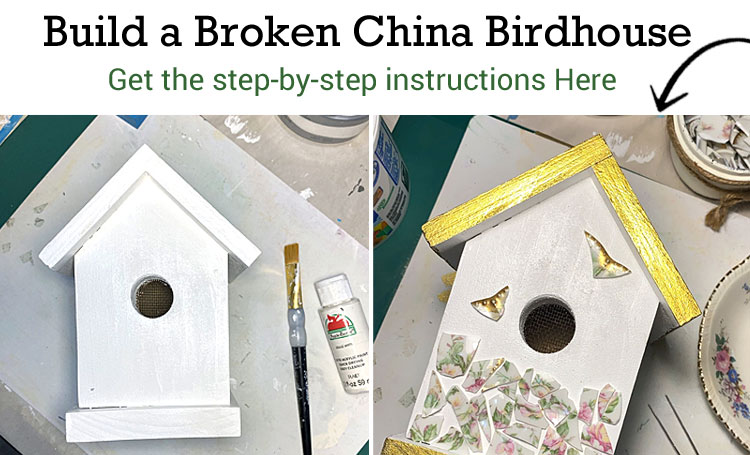
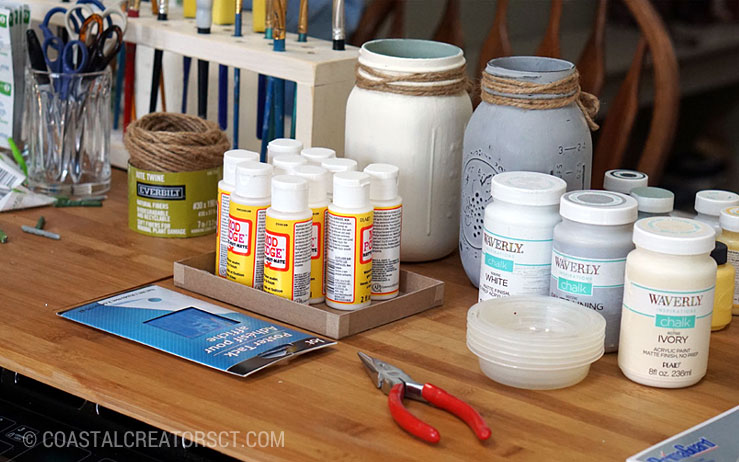
Birdhouses are functional but they can also be decorative. We like to paint, use broken china, tiles, embellishments, flowers, and even dollhouse shingles for the roof of our birdhouses. There are so many creative ways you can decorate a birdhouse. Let us give you some ideas.

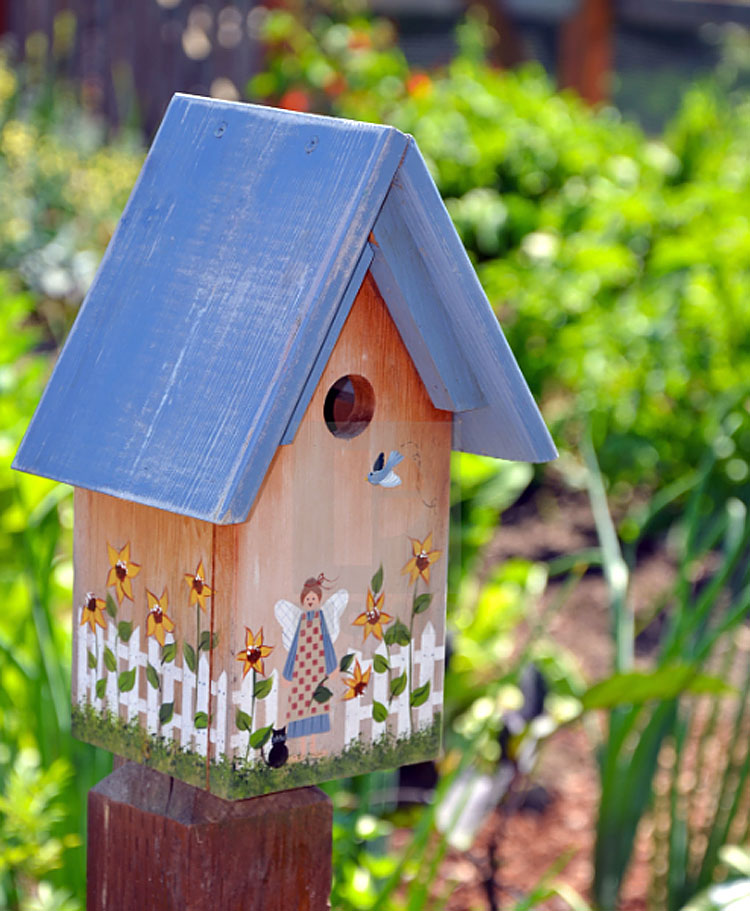
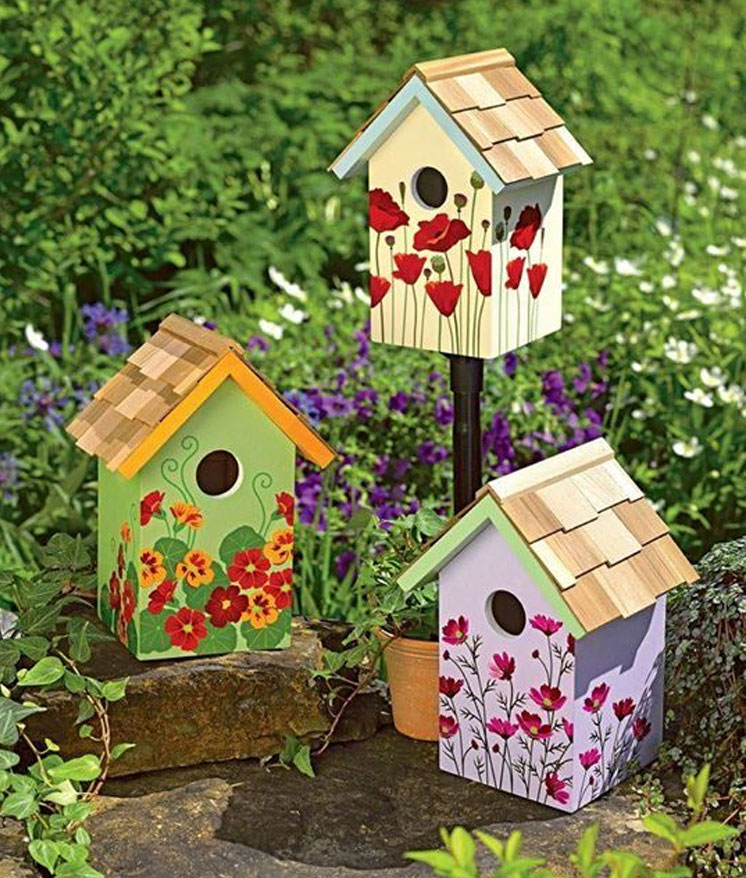
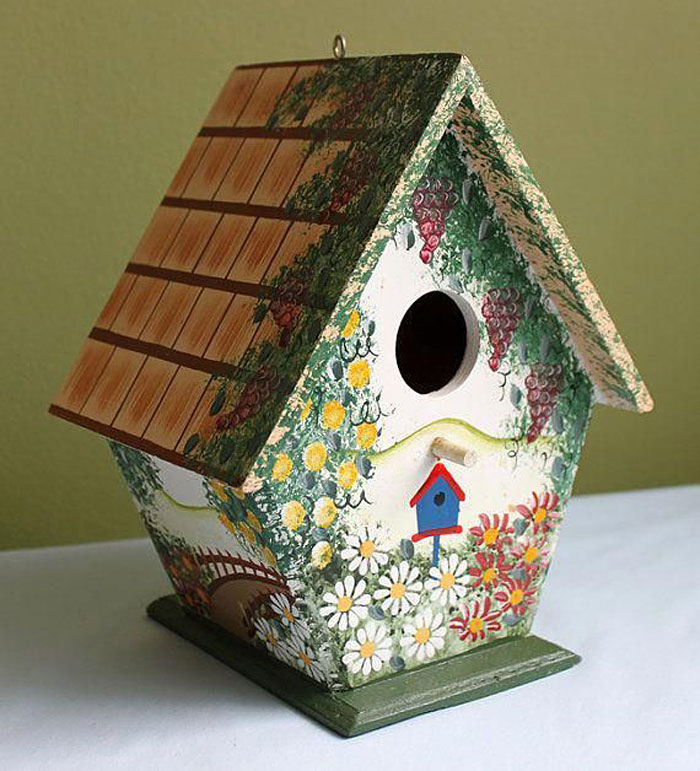
Let your imagination run wild with these painted birdhouse ideas. Bright colors and fun designs will bring your birdhouse to life and fill your garden with color and flair.

Decorative Birdhouses to paint

decorative birdhouses

Broken China Mosaic Birdhouse

Build a Broken China Birdhouse

painted birdhouse ideas

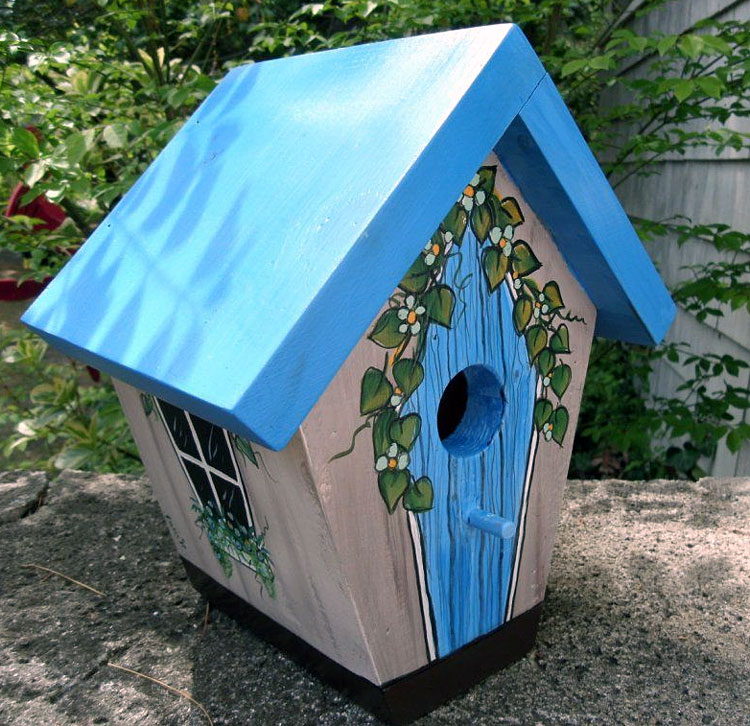
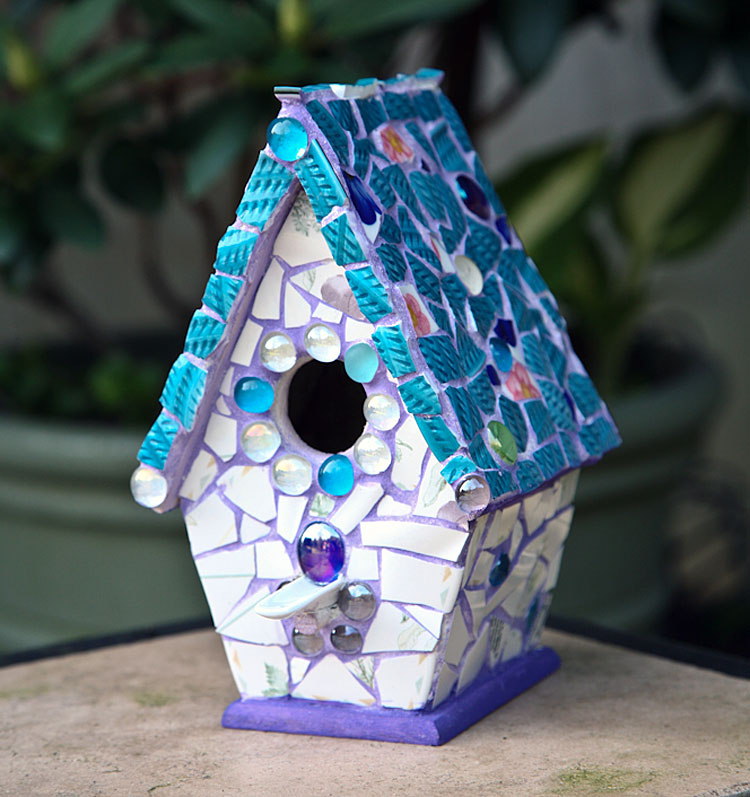
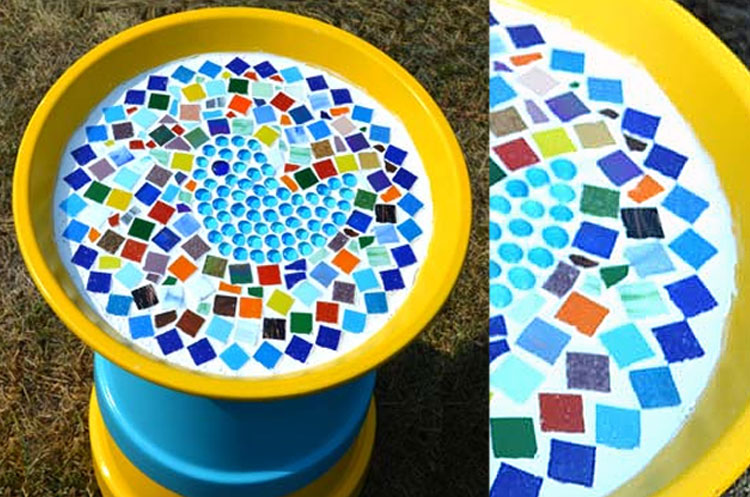
Bright and whimsical colors make this birdhouse a great addition to any garden, indoors or out!

Stacy McFadden Art

Stone Birdhouse Ideas

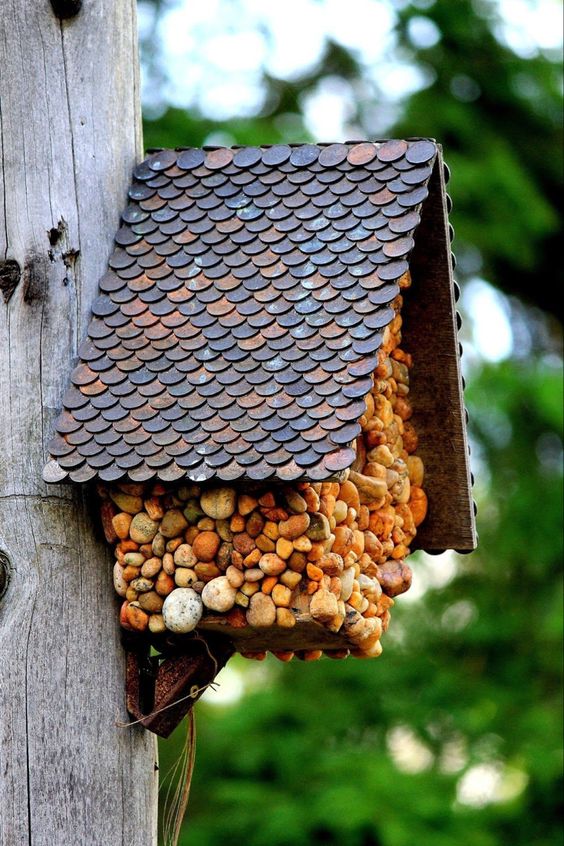
Have you ever thought of using coins or stones to decorate a birdhouse? These birdhouses utilize stones and coins to decorate roofs and walls. These DIY birdhouse are embellished with stones and a roof made out of pennies

DIY Birdhouse with a Pretty Penny Roof
Source: Dream a Little Bigger

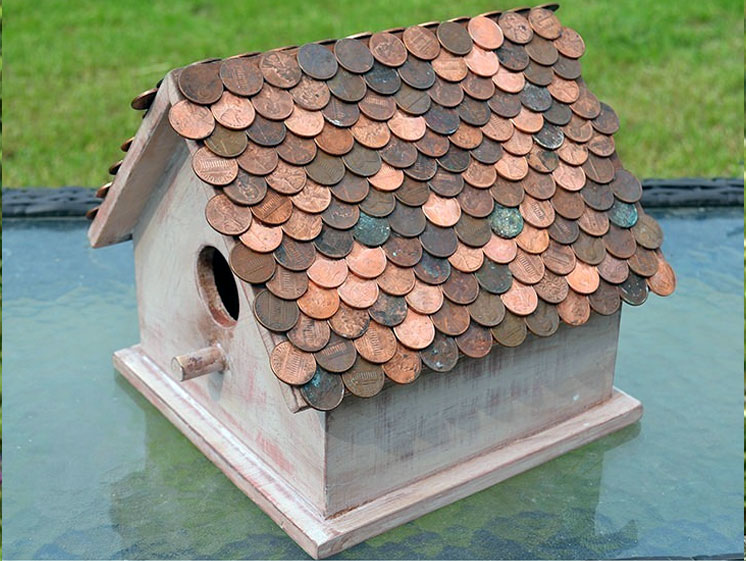
Repurpose those old pennies you have lying around and use them to add a roof to a birdhouse. The copper will age over time and turn a nice patina shade. This rustic birdhouse is definitely something fun to create.

Rock Bird House
Plow & Hearth

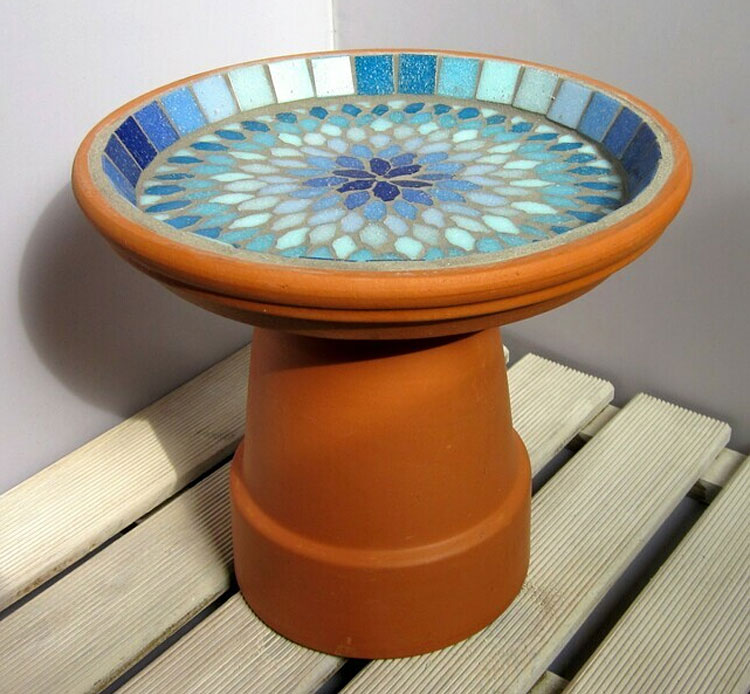
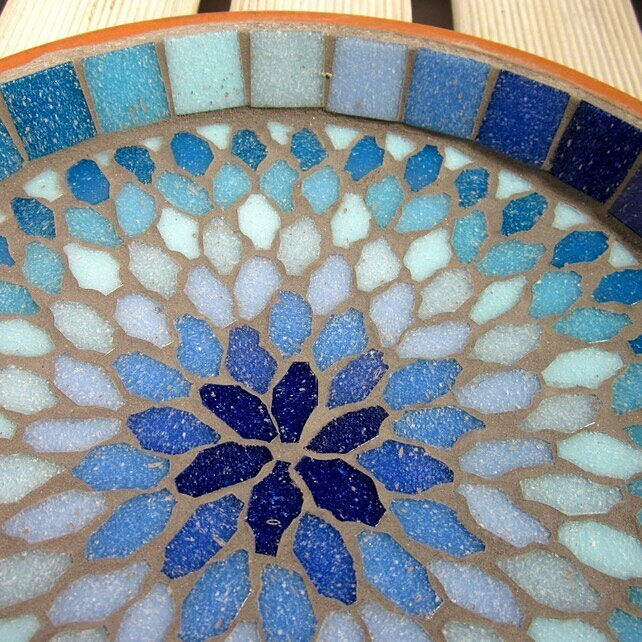
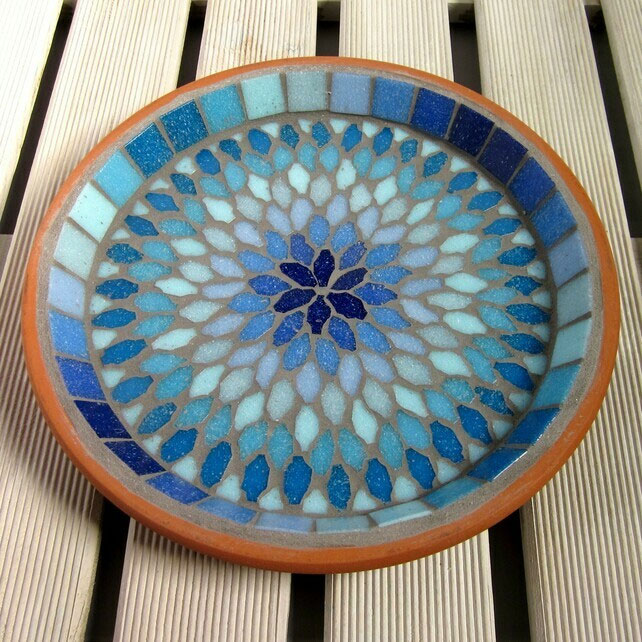
How cute is this rock bird house with it’s flower pot. rocking chair, screen door, window box, side window, and dormer roof window added as embellishment. The birds will want to move right in!

Stained Glass Red Blue Bird House

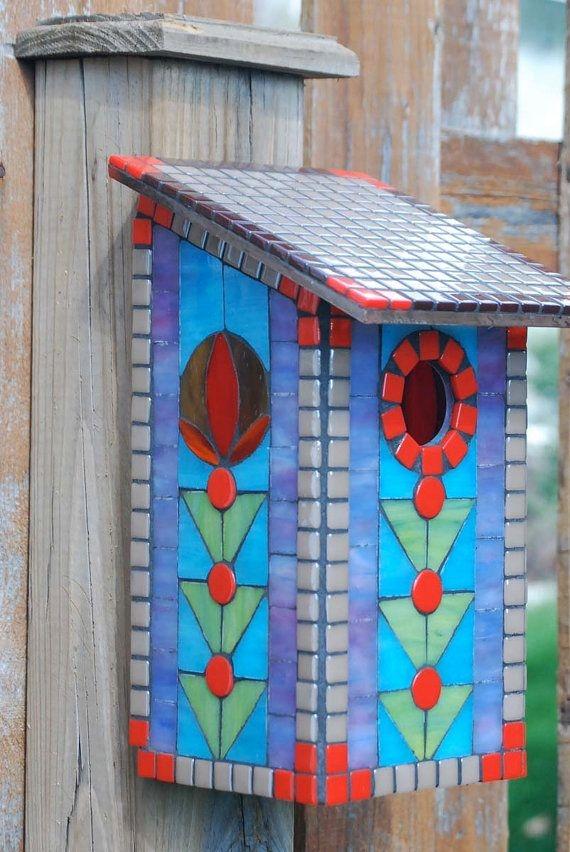
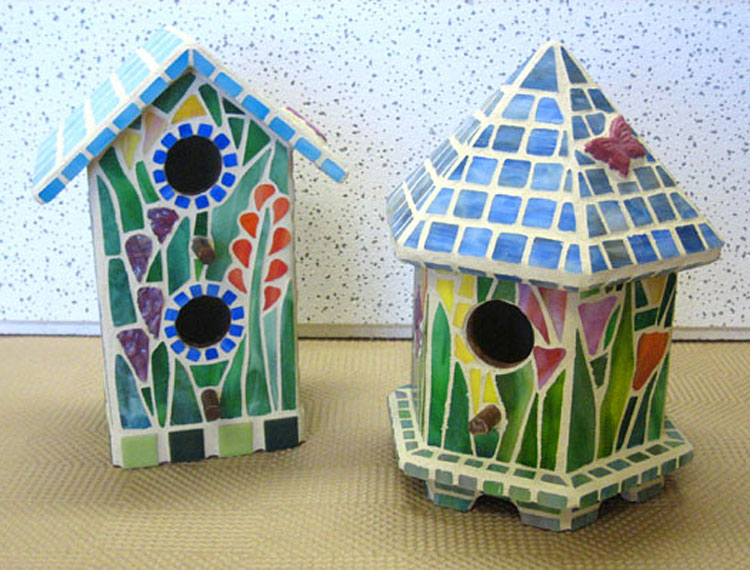
Note the beautiful craftsmanship in the stained glass design on this birdhouse.

Free DIY Birdhouse Plans

Crafts by Amanda

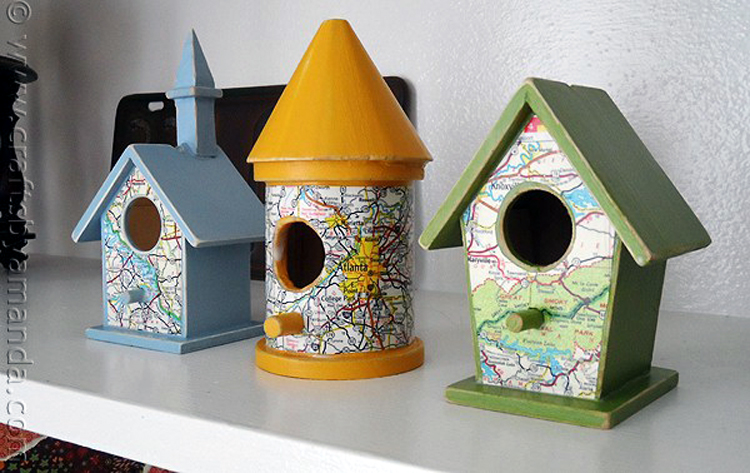
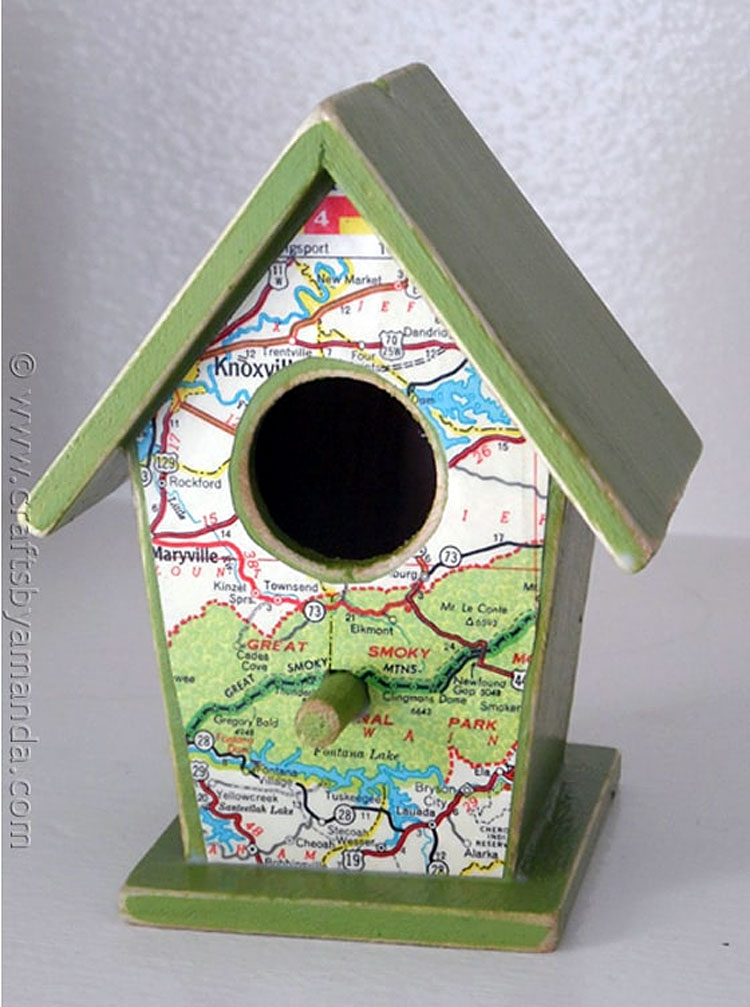
Do you have old maps not being used? If you don’t you can always find some at flea markets, thrift shops and yard sales. There are so many things you can do with old maps. Here is an idea for a decorative birdhouse. Amanda took the original idea from Midwest Living Magazine to paint and then glue old maps to her wood birdhouses using Mod Podge.

Home Bazaar Windy Ridge Stone Birdhouse

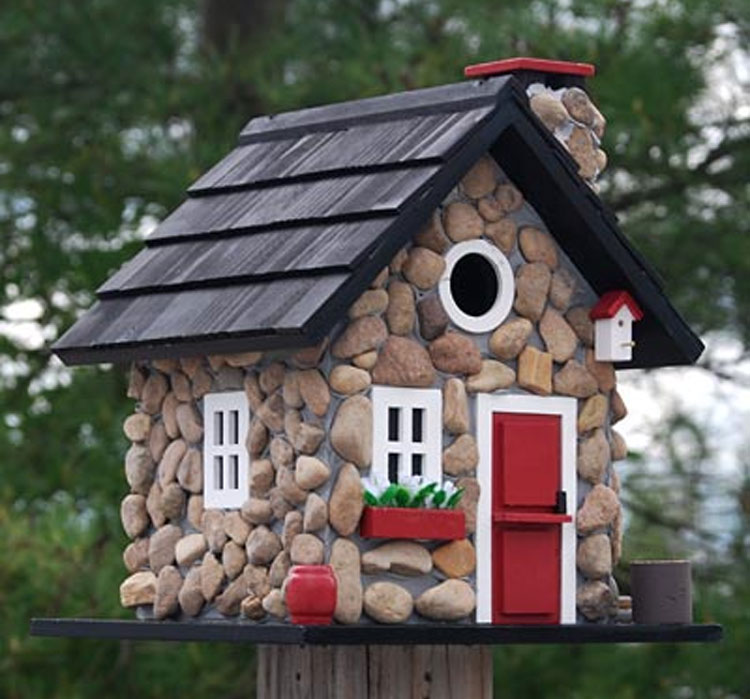
Create an enchanted feel in your bird garden with the Home Bazaar Windy Ridge Stone Bird House. Blending style with realistic details, this cottage will certainly bring a charming touch to your home or backyard in moments. The stone covered façade lends a rustic feel to the piece, furthered by the faux wood pile, bird house, and window box with fabric flowers.

Mosaic Birdhouses
Desert Rose Art Glass
Blue Tile Mosaic Birdhouse
Elzabieta Frydel

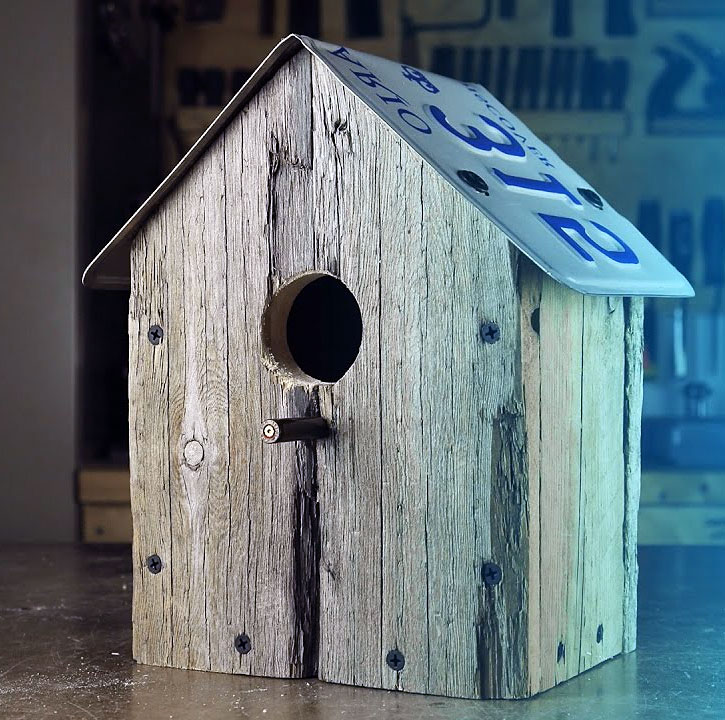
You can make a Rustic pallet wood birdhouse with a license plate for a roof for little or no money. Inspire to Make shows you how on his YouTube channel. It’s a very easy DIY woodworking project for beginners that requires minimum amount of tools.

license plate birdhouse ideas

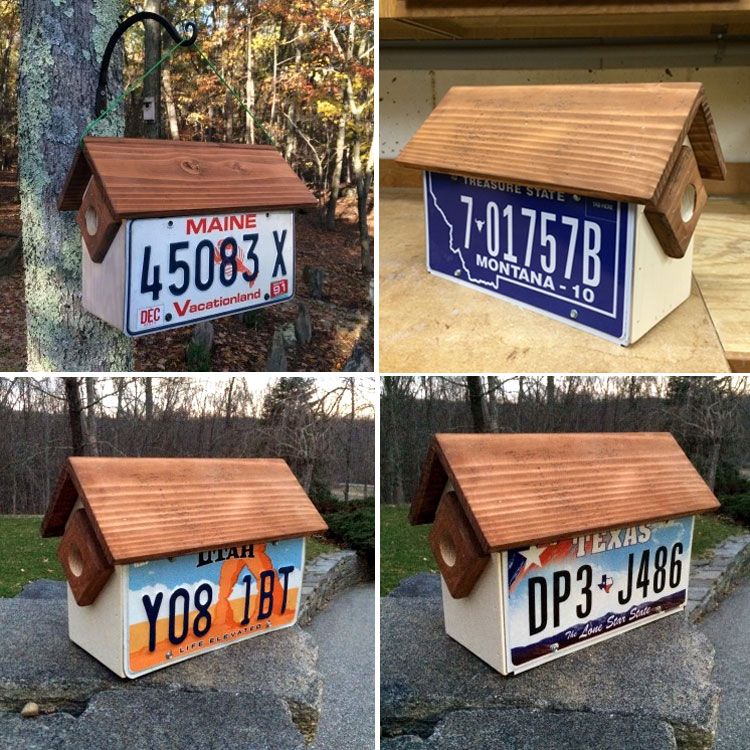
Add a bit of whimsy to your birdhouse by using an old license plate as the walls. Felt Magnet provides step-by-step instructions for this birdhouse condo.

This Stained Glass Birdhouse is easy to achieve. Purchase an unfinished wood birdhouse or build your own birdhouse, use painter’s tape and create an exquisite stained glass design. Paint inside of the sections, remove the painter’s tape, use a ruler and draw lines around each section with a thin paintbrush and black paint or a Sharpie marker.

Stained Glass Birdhouse Pattern Instructions

Let your creative juices run wild, grab your paints and paintbrushes and paint a garden scene on a birdhouse.

Handpainted Birdhouse

Exquisite Mosaic Bird Baths To Make & Enjoy

Mosaic Bird Baths are so unique all of your friends and neighbors will be envious and want one of their very own. Add a pedestal to your bird bath as a platform. Using a large terracotta saucer, you can create and design the most beautiful mosaic bird bath that doesn’t cost a lot. Use a large terracotta pot turned upside down to create the pedestal base. You can even tile the base if you want or paint it. Just use your imagination. If you don’t want a pedestal just place your bird bath anywhere you like – on a rock, bench, porch, anywhere. Use shades of blue, turquoise, aqua to give your bird bath a calming feel of the ocean.

Disclaimer: this article contains affiliate links. Please read our affiliate policies.

Gypsy Sky Mosaic Garden Bird Bath
Jo Sara Designs
Gypsy Sky Mosaic Garden Bird Bath

The Gypsy Sky Mosaic Garden Bird Bath has a Bohemian feel it and a design which reminds me a bit of tie die, and a bit of a Mandala. The pattern uses shades blue from turquoise to aqua, and dark sapphire to sky, and then is finished with graduating blues as a border.

Blue Green Mosaic Birdbath
whors USA, Inc.

Bright and brilliant mosaic tiles are used to create a gorgeous birdbath that the birds will want to take a splash in. Terracotta flower pots aren’t just for flowers either. Turn a terracotta pot upside down to make the birdbath pedestal.

DIY Mosaic Bird Bath Supplies

If you want to try your hand at making some of these easier mosaic bird baths, here are some of the supplies you will want to keep on hand.

You will need a variety of Tesserae tiles, ceramic tiles, tile cutter (to break plates), tile grout, and some strong Tile Adhesive.

Mosaic Tile Supplies

These beautiful mosaic birdbaths are ready for the birds to visit in your garden! These unique designs are made on a terracotta base and includes a range of materials from a broken china to Tesserae tiles and glass pebbles. There are lots of elements which will sparkle through the water in the sunlight.

Mosaic Birdbaths
Claire Davies
Mosaic Birdbaths to Make and Enjoy
Mosaics by Hippo
Mosaic Birdbaths
Claire Davies

This DIY birdbath project is so simple and inexpensive that even a child can help with it with adult assistance. You will need a terracotta pot and large saucer, spray paint (optional), tiles and glass gems, strong glue such as E-6000 or Gorgilla Glue, white grout and sponges.

Mosaic Birdbaths to Make and Enjoy
Happiness is Homemade Blog

Sparkling mirrors and a burst of blue make a beautiful addition to your Spring Garden with this gorgeous concrete and mosaic birdbath that is made with hundreds of pieces of hand cut silver mirror tile, blue Italian glass tile, glass gems and Italian Millefiori.

Blue Green Mosaic Birdbath
Artisan Crafted Home

The pastel tile colors in this mosaic birdbath include pale and light aqua blue, mint green, and pale sea green. The center of the daisy flowers are translucent amber glass which give a lovely depth to the design.

Mosaic Birdbaths to Make and Enjoy
Jo Sara

This mosaic bird bath might look difficult or expensive, but it is actually easy to make and the supplies are cheap. You’ll be making many of these DIY bird baths in no time for our garden and to giveaway to friends. Put out several of different designs in your yard, or give them as gifts to bird-loving friends!

Mosaic Birdbath
Birds and Blooms
Blue Green Mosaic Birdbath
source unknown

FREE Rock Flower Garden Projects

We don’t always think of taking a plain rock and using it to decorate our yard and garden. Rocks are free so what better material to use when money is tight.

We have so many ideas for creating fun yardscapes with rocks and stones to share with you. Stones and rocks are an affordable way to create a majestic yard and garden. You just need some ideas to get you started and then the sky is the limit in what you can create. You can gather stones in your yard, at the beach, in the woods, at the park, or even purchase them.


Rock Flower Garden DIY Project Ideas

For some of the rock garden projects we listed, you may need basic supplies like quick grout or quick cement to put in between the cracks but those items are fairly cheap to buy.


Rock Flower Garden DIY Project Ideas

Some rock garden projects may require outdoor paint. Outdoor house paints or acrylic paints work well for these rock garden projects. My favorite paint for outdoor projects is Rust-Oleum. It really projects outdoor projects against the elements and looks great with a sleek finish. For kids, Spray Chalk paint is a good option.

Rock Flower Garden DIY Project Ideas

Great family project!

If you have kids you can get them involved in the fun of creating a colorful rock garden and remember, it’s a free project so it’s a win-win. Let them scavenge for rocks in your yard or take a trip to a park, go hiking and make it a family event. This could even be a summer project. Start by coming up with the one project you want to create, figure out how many rocks you will need to collect. When school is out for the summer, start your project by making a making a chart to show what days you found the rocks on and where. It will make a fun record of your project and keep the kids interested for the whole summer break. By the time summer is over you will have collected rocks, painted rocks, and right before school starts again, you can assemble your rocks into a fabulous rock flower garden.

Rock Flower Garden DIY Project Ideas

These free rock flower garden projects will put you in your happy place. They are also easy and fun to create. Go all out and fill a space in your yard with color rocks, or take ordinary rocks and make a design like a butterfly or a flower design.

How to Make & Decorate a Rustic Wooden Christmas Tree

Coastal Creators Crafters group met for our monthly craft class in December and we decorated Rustic Wooden Christmas trees.

Disclaimer: this article contains affiliate links. Please read our affiliate policies.

Each person received two trees – one traditional pine tree and the other more like a birch tree with straight lines. We provided the wooden trees, paint, decorative papers, ribbons, stickers, stencils and embellishments and students brought their creativity to decorate their trees with their own unique flair!

Take a look at some of the Christmas tree designs our students came up with.

Scroll down to find out how to make your very of Wooden Christmas Tree.

Rustic Wooden Christmas Tree Supplies List:

If you are following along at home, you will need the following supplies to make your own set of Wooden Christmas trees. These make great accents to put on the mantel, dresser, foyer, or anywhere you decorate for the holiday season.

Wooden Christmas Tree Supplies List

  • Pine boards or plywood
  • Decorative Scrapbook Papers
  • Double-back tape, Modge Podge, Tacky Glue, Glue Runners, or glue sticks
  • Acrylic Paint
  • Paint Brushes, Makeup sponge applicators for dabbing
  • Tiny clothes pins
  • Bakers Twine
  • Tiny Ribbon Bows
  • Sanding blocks
  • Stencils (see below)
  • 4mil to 6mil Mylar
  • Embellishments

How to Cut a Wooden Christmas Tree

We created our own template to make these trees. You can download the stencil to make your own. Trace the tree onto the wood and then use a jigsaw to cut out the design.

  • Large Christmas Tree Stencil
  • Small Christmas Tree Stencil

The large tree measures approximately 7″ x 9-3/4″ (10-1/2″ high with base) and the smaller tree measures 3-1/4″ x 7-1/2″ (8-1/4″ high with base). These are just guidelines and you can make them any size you wish. We even made a larger 16″ high trees to make a “Sweater Christmas trees” (see photo above)

Wooden Christmas Tree Base

You may want a base to keep your trees from falling over. We used a 1×2 board to create the bases. Scraps of wood work fine as well. The large tree base measures 3-1/4″ x 1-1/2″ x 3/4″ thick and the small tree base measures 1-1/2″ x 1-1/2″ x 3/4″ thick.

We glued the bases on the bottom of the trees and then used Quick-Grip Clamps to hold them in place. Then we used Cordless Nail Gun to staple the base into place. We let the bases dry overnight.

Use a power sander or sanding block to shape the edges and get rid of any rough edges and bumps on the surface of the wood.

How to Decorate a Wooden Christmas Tree

The first thing you will want to do is paint your tree with a base color. Even if you are using decorative papers on your tree you want to make sure the wood is painted because the edges will show and maybe some of the wood around the paper. We also created our own stencils and used 4mil Mylar with our Cricut machine to cut them out. You can also create vinyl stencils.

Free Christmas Stencils

Here are some of the stencils we created for our students that you can download and use for free. You can use these .png files and upload them to your Cricut or other cutting machine and cut out stencils from Mylar, or make vinyl sticker stencils or even vinyl stickers.

  • Star border
  • Holly leaf border
  • Poinsettia
  • Large Snowflake
  • Merry Christmas – Design #1
  • Merry Christmas – Design #2
  • Wreath with berries

If you want to use decorative papers to decorate your wooden tree, use the original tree stencil to cut out the shape of the tree on the decorative paper. By laying the stencil on the paper you can see what the design will look like once it is glued to the tree.

TIP: Since the tree may be a slightly different shape than the original stencil once you are done cutting it out, you may want to make your decorative paper cutout slightly larger and then trim the edges around the tree.

You can use glue sticks, Double-back tape, Modge Podge, Tacky Glue, Glue Runners, or glue sticks to adhere decorative paper to your trees.

You may want to use Baker’s Twine and tiny clothespin to add to your tree and then you can hang tiny greeting cards or photos from the clothespins.

Paint or decorate both sides of your trees and if you get tired of looking at one side, you can turn them around.

Wooden Christmas Tree Decoration Inspiration

These handmade Wooden Christmas trees make great gifts and so much fun to make if you are hosting a craft class.

Take a look at how some of our students decorated their wooden Christmas Trees. Hopefully they will inspire you to make your own. Most of the students decorated both sides of each tree.

How to Make & Decorate a Rustic Wooden Christmas Tree


How to Chalk Paint Mason Jars

We recently offered a craft class and taught our guests how to chalk paint on Mason Jars. It’s quite simple and the results are stunning. These chalk painted Mason jars are the perfect addition to our Simply Blessed wooden centerpiece box.

How to Chalk Paint Mason Jars

How to Chalk Paint Mason Jars

Disclaimer: this article contains affiliate links. Please read our affiliate policies.

How to Chalk Paint Mason Jars

Chalk Paint Mason Jars Supplies List

Here are some of the items you will need to complete your project.

  • 32 oz. Mason Jars (quart size is what we used but you can use smaller)
  • Alcohol pads (Rubbing Alcohol and paper towels work too)
  • Chalk Paint (we like FolkArt Brand)
  • Paint Brushes
  • Sanding Block
  • Twine
  • Rubber gloves (Optional)
  • Mod Podge (Optional)

How to Chalk Paint Mason Jars

How to Chalk Paint Mason Jars

How to Chalk Paint Mason Jars

1. The first thing to do is lay out your supplies and be ready with your chalk paint.

2. Next, you need to clean your Mason jar with the alcohol wipe. Put your hand inside of the jar and wipe all around the outside of the jar up and around the rim. Make sure you do not touch the jar once you have cleaned it. By using the alcohol wipe you are removing any dirt or oil. If you have oil on the jar your paint won’t stick properly.

3. The alcohol should dry almost immediately. Begin painting the jar with even brush strokes. Take a look at how the paint is looking on the jar and if you want the lines to go one way then paint all in the same direction. If you find that your paint does not stick you will have to clean those spots with the alcohol again.

TIP: I like to keep my hand inside of the jar (well not all of the way) and guide the jar down on the mat once I am finished painting, using the paint brush to hold the bottom of the jar so I can remove my hand as I place it on my mat or table to dry.

How to Chalk Paint Mason Jars

4. If you are painting more jars, continue to the next jar. If you are only painting the one jar, then wait for about 15 minutes before adding a second coat.

5. Let the second coat dry to the touch. Using your sanding block, distress your jar as much or as little as you like.

How to Chalk Paint Mason Jars

OPTIONAL: For added protection to the finish, you can use a coat of Matte Mod Podge once the final coat of paint is dry and you have distressed the jar.

Our Chalk Painted Mason Jar Gallery

Take a look at the finish Chalk Paint Mason Jar project. Our students did a fantastic job to transform a simple jar into a specialty home decor piece that can be used in so many ways. They look amazing in our wooden centerpiece box too.

How to Chalk Paint Mason Jars

How to Chalk Paint Mason Jars
  • « Previous Page
  • 1
  • 2
  • 3
  • 4
  • 5
  • Next Page »

250th United States Anniversary Wholesale Laptop and Water Bottle Stickers Products

Wholesale 250th Anniversary Products for Retailers (America 1776–2026)

250th United States Anniversary Wholesale Bookmarks Products

The 250th Anniversary of the United States: A Semiquincentennial Moment

Coastal Christmas Trees

DIY Coastal Home Decor Ideas

Coastal Creators participate in the Amazon Services LLC Associates Program, an affiliate advertising program designed to provide a means for sites to earn advertising fees by advertising and linking to Amazon and other affiliate programs. Read more

  • HOME
  • BLOG
  • WHOLESALE
  • CONTACT

Copyright © 2026 · Coastal Creators · Our Policies