Coastal Creators of Connecticut

Coastal Creators of Connecticut coastalcreatorsct.com

  • HOME
  • BLOG
  • YOU TUBE
  • CONTACT
    • Our Policies

How to Chalk Paint Mason Jars

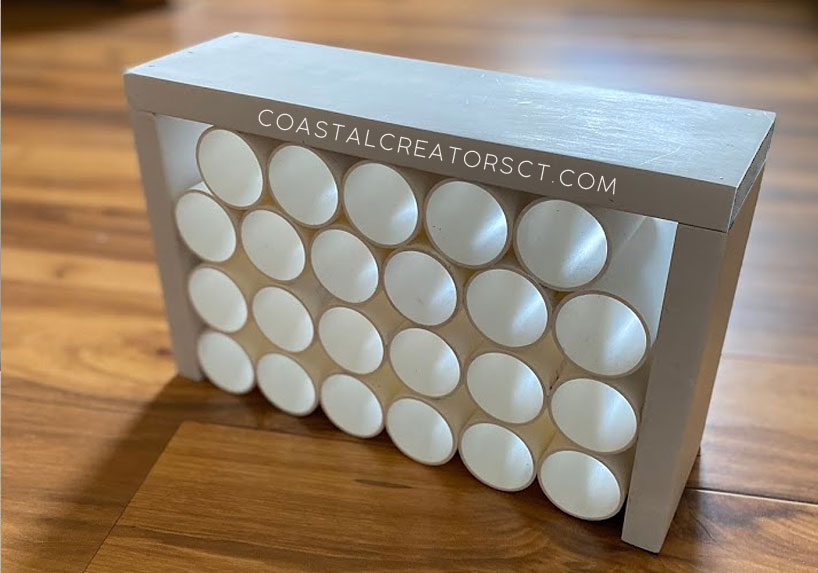
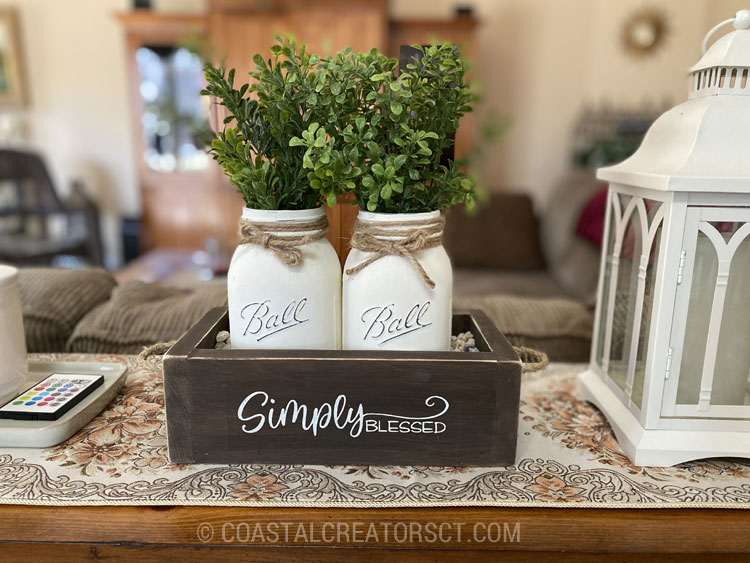
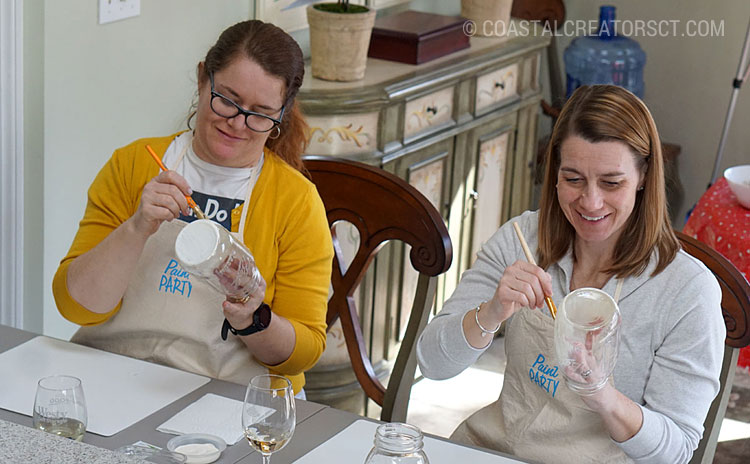
We recently offered a craft class and taught our guests how to chalk paint on Mason Jars. It’s quite simple and the results are stunning. These chalk painted Mason jars are the perfect addition to our Simply Blessed wooden centerpiece box.

How to Chalk Paint Mason Jars

How to Chalk Paint Mason Jars

Disclaimer: this article contains affiliate links. Please read our affiliate policies.

How to Chalk Paint Mason Jars

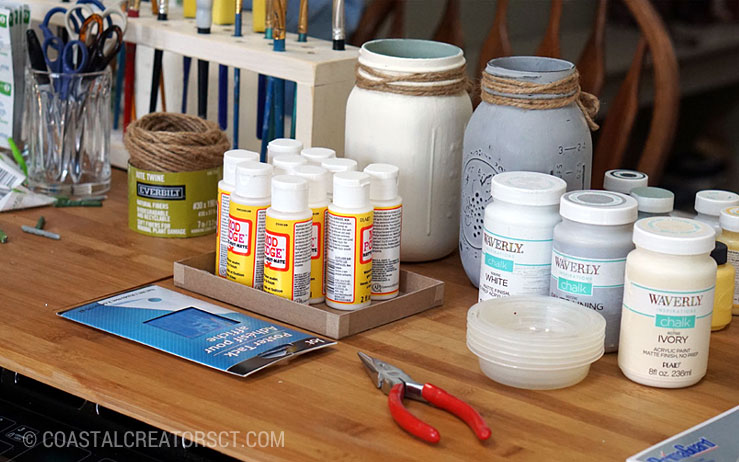
Chalk Paint Mason Jars Supplies List

Here are some of the items you will need to complete your project.

  • 32 oz. Mason Jars (quart size is what we used but you can use smaller)
  • Alcohol pads (Rubbing Alcohol and paper towels work too)
  • Chalk Paint (we like FolkArt Brand)
  • Paint Brushes
  • Sanding Block
  • Twine
  • Rubber gloves (Optional)
  • Mod Podge (Optional)

How to Chalk Paint Mason Jars

How to Chalk Paint Mason Jars

How to Chalk Paint Mason Jars

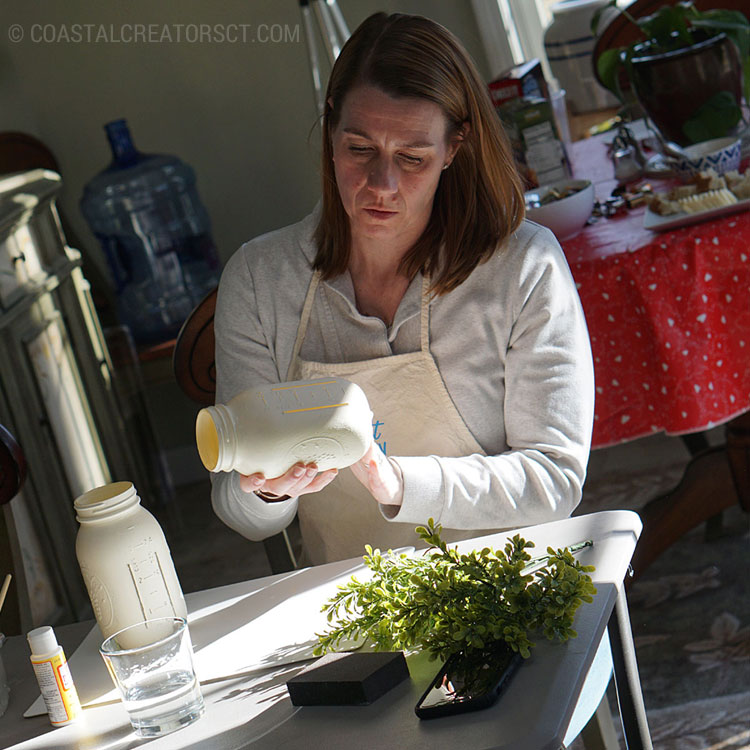
1. The first thing to do is lay out your supplies and be ready with your chalk paint.

2. Next, you need to clean your Mason jar with the alcohol wipe. Put your hand inside of the jar and wipe all around the outside of the jar up and around the rim. Make sure you do not touch the jar once you have cleaned it. By using the alcohol wipe you are removing any dirt or oil. If you have oil on the jar your paint won’t stick properly.

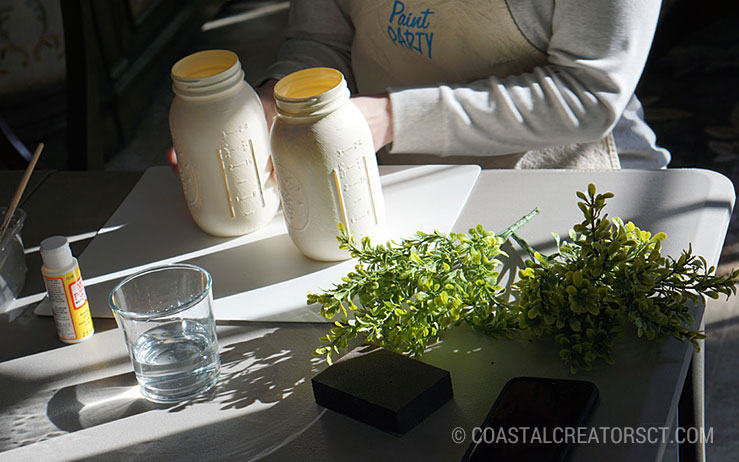
3. The alcohol should dry almost immediately. Begin painting the jar with even brush strokes. Take a look at how the paint is looking on the jar and if you want the lines to go one way then paint all in the same direction. If you find that your paint does not stick you will have to clean those spots with the alcohol again.

TIP: I like to keep my hand inside of the jar (well not all of the way) and guide the jar down on the mat once I am finished painting, using the paint brush to hold the bottom of the jar so I can remove my hand as I place it on my mat or table to dry.

How to Chalk Paint Mason Jars

4. If you are painting more jars, continue to the next jar. If you are only painting the one jar, then wait for about 15 minutes before adding a second coat.

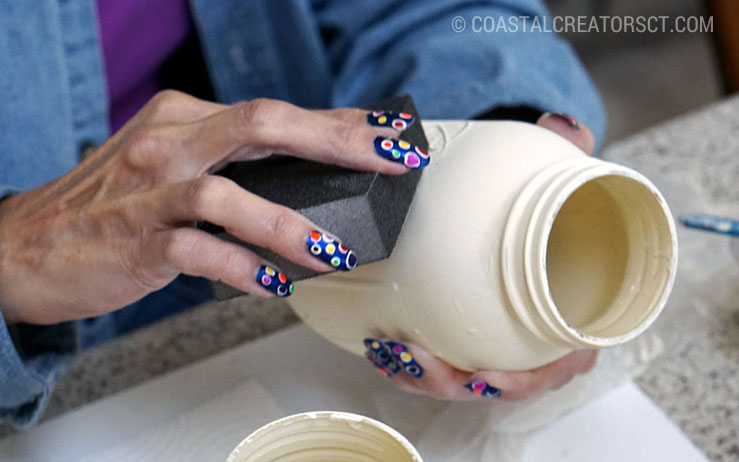
5. Let the second coat dry to the touch. Using your sanding block, distress your jar as much or as little as you like.

How to Chalk Paint Mason Jars

OPTIONAL: For added protection to the finish, you can use a coat of Matte Mod Podge once the final coat of paint is dry and you have distressed the jar.

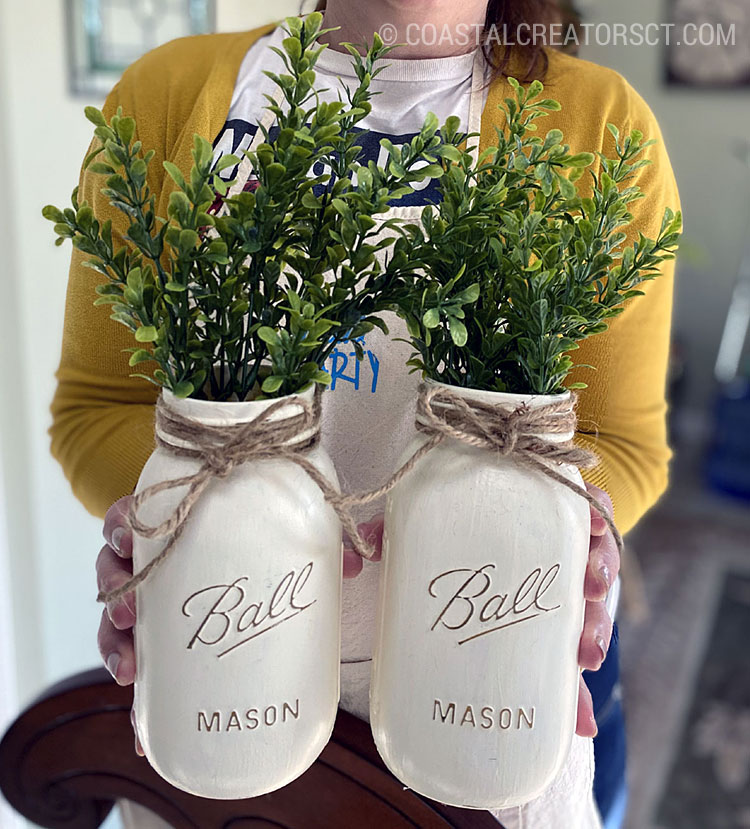
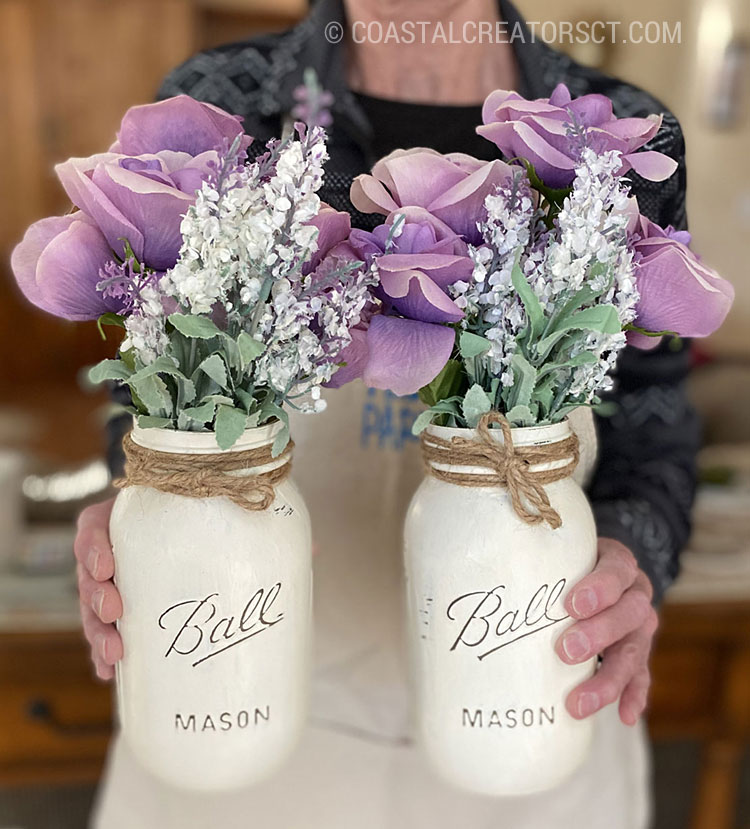
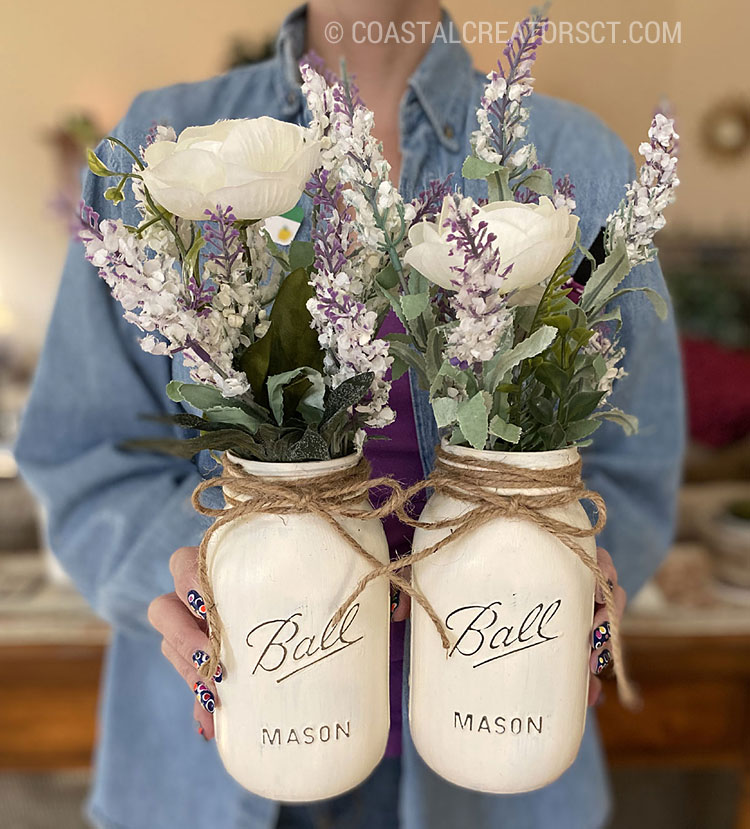
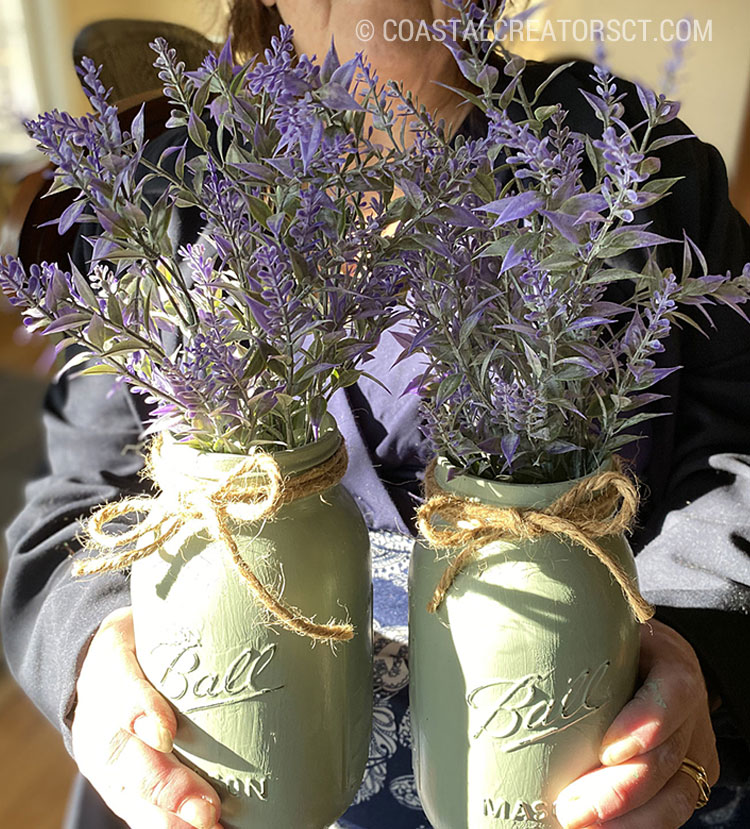
Our Chalk Painted Mason Jar Gallery

Take a look at the finish Chalk Paint Mason Jar project. Our students did a fantastic job to transform a simple jar into a specialty home decor piece that can be used in so many ways. They look amazing in our wooden centerpiece box too.

How to Chalk Paint Mason Jars

How to Chalk Paint Mason Jars

Build a Backyard Planter Bench (Free Plans)

We have a patio outside our kitchen and have been wanting to put a planter bench there for a long time but didn’t want to spend the money to buy a good quality planter. Good quality planter benches can run upwards of $1,000. Yes, you can get a planter bench for $100 that is made out of plastic but we wanted a solid wood planter bench. And yes, you can buy wood planter benches that might cost around $400 to $500 but we wanted a triple planters with 2 benches and weren’t ready to shell out $1,000! So when this happens, what is there to do about it? Make it yourself of course!

You can build this solid wood, triple planter with 2 benches for just around $200! It’s exquisite and you will be the envy of the neighborhood. Create a gathering place in your backyard. Good quality planter benches can run upwards of $1,000 of this size but you will own a solid piece of outdoor furniture for a fraction of the cost.

Build an Exquisite Triple Planter Bench

Following the MyOutdoorPlans.com Planter Bench Plans, we built this planter with two benches and 3 planters. We painted everything white to make it stand out on the red brick patio. We also have a two-seat bench that is white and two small white concrete planters that are white so the white paint brings the whole space together nicely.

"Everest" Sedge Grass

We purchased “Everest” Sedge Grass to put in each of the planters. The variegated green and white leaves look fantastic against the white planters.

Planter Bench Plans

You can follow the bench-making plans at MyOutDoorPlans.com to create these outdoor planter benches.

Materials We Used

  • (12) 8’ tongue and grove pine boards
  • (3) 20 inch square pieces of 5/8 inch plywood
  • (11) 1”x4”x8’ pine boards
  • (4) 2”x4”x8’ boards
  • (3) 1”x3”x8’ pine boards
  • (3) solid wood corner guards
  • 1-1/4” wood screws
  • 2-1/2” wood screws
  • 2-3/4” wood screws
  • Zinsser BIN cover stain
  • KILZ White primer/sealer paint
  • Rust-Oleum Marine Coatings Topside paint, semi-gloss


We used Zinsser BIN cover stain because we used knotty pine. Zinsser’s covers the knots and doesn’t allow them to bleed through the paint. The painting process is probably the longest process in this whole project because we used three paints – primer, Zinsser layer and 2 coats of Rust-Oleum.

Build an Exquisite Triple Planter Bench

Build an Exquisite Triple Planter Bench

Build an Exquisite Triple Planter Bench

Build an Exquisite Triple Planter Bench

Build an Exquisite Triple Planter Bench

It took just about one week working part-time to create one bench and two planters.

DIY Fire Pit in an Hour Project

After we finished this project, we built a fire pit to put in the center of the patio. This fire pit only took about one hour to create. We have full written instructions to build your own fire pit on a companion video on our YouTube channel.

Paint an Old Outdoor Welcome Mat and Make it New Again!

If your old outdoor Welcome Mat is faded and you are about to throw away, stop right there and grab some paints to give it a face-lift. You won’t believe the transformations you can create with some colorful paints. Painting something old always seems to make it look brand new. If you can’t buy a new door mat, upcycle it and give it new life!

For this project you will need some acrylic paints, paint brushes, and a clear spray sealer or polyacrylic clear sealer to put over the paint once it’s dry. You can use matte or glossy paint depending on the finish you are going for.


Here are some examples of outdoor welcome doormats that have been painted to give them new life to get you inspired to paint yours. Looking at the “before” and then “after” images makes you realize just how much a good coat of paint will do wonders for an old doormat.

Paint an Old Outdoor Welcome Mat and Make it New Again!

Upcycle an Ugly Old Outdoor Welcome DoorMat
Photo Credit: Lisa Daulton
Paint an Old Outdoor Welcome Mat and Make it New Again!
Source: Athena Barz
Paint an Old Outdoor Welcome Mat and Make it New Again!
Photo Credit: Michelle Walsh
Upcycle an Ugly Old Outdoor Welcome DoorMat
Source: Tonda Reighard

Paint an Old Outdoor Welcome Mat and Make it New Again!

How to Build a Desktop Paint Bottle Organizer

If you use acrylic paints for craft projects, kids craft, and other painting projects, you probably have a lot of those little 2 oz. bottles of paint. Our favorite to use is Apple Barrel paints and we have ALL of the colors, because let’s face it, you never know what color you will need to have on hand.

We were looking for a good way to organize our paints to we could easily see the color and we came up with a nifty paint bottle organizer using wood and PVC piping. This is an inexpensive project to make. You can make it as large as you like just by adding more rows of PVC piping.

How to Build a Desktop Paint Bottle Organizer

Supplies Needed

  • 8′ length of 1-1/4″ inner diameter PVC pipe
  • 1″ x 4″ pine board (you will need 20″)
  • Glue – we used Gorilla Glue
  • 1-1/4″ Brad Finishing nails
  • Sand paper or random orbit hand sander
  • Saw to cut the wood (we used a compound miter saw)
  • Paint (we used acrylic or satin house paint we already had)


How to Build a Desktop Paint Bottle Organizer

Step-by-Step Instructions

  1. Cut twenty-three (23) 3-3/8″ long pieces from the PVC pipe.
  2. Smooth edges of the PVC pipe sand paper or hand sander.
  3. You may want to lightly sand the outer surface of the PVC to remove the wording. If you don’t want to sand you can also paint over it.
  4. Cut one piece of the 1″ x 4″ wood to 8-1/4″ long.
  5. Cut 2 pieces of the 1″x 4″ wood to 4-1/2″ long.
  6. Lightly sand the wood pieces.
  7. Finish the wood as desired. We painted ours with white paint to match the PVC but you can paint it any color you like.
  8. Nail the 8-1/4″ piece of wood to the two 4-1/2″ pieces of wood.

How to Build a Desktop Paint Bottle Organizer

How to Build a Desktop Paint Bottle Organizer

  1. Glue six pieces of the PVC pipe together, making three rows of six pieces.
  2. Glue the three rows of six pieces on top of each other.
  3. Glue the remaining five pieces of PVC pipe in the valleys of the top row of six pieces of PVC.
  4. Glue the wood frame to PVC pipe so that the frame sits on top of the row of five PVC pieces.

How to Build a Desktop Paint Bottle Organizer

Optional: We didn’t add a piece of wood as a base but you could easily do this by cutting another piece of wood, 8-1/2″ x 1″ x 4″ and nail it onto the bottom.

Conclusion

Our paint bottle desktop storage unit will definitely come in handy on your craft desk to keep all of your paints organized. It’s a much better way to see all of the colors you have on hand when you are working on a paint project. By putting the paint bottles in the PVC tubes you can have the colored ends of the bottles hang out so you can see the colors. You could even organize them by color and make more than one of these paint bottle organizers. Stack them on top of each other to make a whole wall of organizers.

Our Favorite Mod Podge Craft Projects

Mod Podge is such a great, all around sealer that is versatile and offers a lot of uses for a variety of projects. Mod Podge can be used on wood, fabric, metal, glass, plastic and more. It acts like glue and also a protectant and sealer. Therefore, Mod Podge is an all in one decoupage glue, sealer and finish.

Boho Fairy Light Bottle Lamp

Boho Fairy Light Bottle Lamp

Bring the beach vibes inside with a Boho bottle light. This Mod Podge craft utilizes tissue paper and Gloss Mod Podge to create an ocean wave bottle lamp with ombre look. You will need Mod Podge Gloss for this project, a glass jar (or even an old wine bottle), 3 different shades of tissue paper, and a battery operated cork fairy string light.

Tutorial: Plaid Crafts on Facebook

Fancy Decoupaged Mod Podge Sneakers

Funky and Fun Mod Podge Sneakers

Make a fashion statement with fun and bold sneakers by using fabric napkins or fabric by the piece and Mod Podge Fabric waterbase sealer. If you are using a napkin, such as shown in the photo above, it works best if you separate the two layers of the napkin and only use the top, printed layer. If this doesn’t work, you can still use the napkin with all layers intact. Simply use Fabric Mod Podge to apply the paper napkin or fabric pieces to white canvas tennis shoes. Once it is dry, brush another layer of Fabric Mod Podge over top as a sealer. Only machine wash in cold water, gentle cycle after 72 hours but it is often better to surface clean.

photo source: plaidonline.com

Sleek Marble Mod Podge Coasters

Sleek Marble Mod Podge Coasters

We just love this project. They stone coasters are sleek and elegant and look oh so expensive but they cost less than $10 to make. These coasters are made using square stone coaster blank with a cork backing. Brush Mod Podge of your choice (Matte or Satin is good for this project) and place marble scrapbook paper on top of the cork coaster. Use FolkArt Gold Paint and paint the edges and then seal the whole coaster with another coat of Mod Podge.

photo source @schadenfreude

Mod Podge Flower Covered Mason Jars

Mod Podge Flower Covered Mason Jars

These jars pictured Cath Kidston paper prints but since they are only available in the UK we found some other fun floral papers. Clean your Mason jar with alcohol first to remove any oil. If you don’t the paint may chip off. Brush a coat of cream-color acrylic paint or chalk paint over the whole Mason jar. Let it dry. Depending on how much paper you are going to use, you may need to paint the jar again. Let dry thoroughly, about 15 minutes. Cut floral designs from the scrapbook paper or use the entire sheet and add Mod Podge to the back. Smooth the flowers onto the jar to create the design you want. Floral paper napkins also work well. Separate the layers and only use the design layer. Finish the a top coat of Mod Podge. You can finish off your jars with twine wrapped around the neck of the jar and maybe even add a bead to the ends.

photo source: @cottondalecraft

Mod Podge Easter Eggs with Chinese Paper Napkins

Mod Podge Easter Eggs with Chinese Paper Napkins

This is a unique take on an Easter Egg design. Start with white plastic Easter Eggs. Because they look like real eggs and not those cheap plastic colored eggs you find in most stores, you get a more realistic look. Next you will need some paper napkins. We found red Chinese Dragon cocktails napkins and Blue Caspari napkins that look similar to the ones in the photo above. Using a pair of scissors, cut out the designs you want to use from the napkins. Separate the two pieces of napkin so you only have the top design layer. Brush a very small amount of Mod Podge on the egg, lay the design on top and then gently smooth the design over the egg with more Mod Podge. Go slowly and don’t use a lot of Mod Podge or you will tear the napkin.

photo source @totallytikaa

DIY Decorate Wood Birdhouses using Maps
Crafts by Amanda

DIY Decorate Wood Birdhouses using Maps

Decoupage a map of your state to one side of a wood birdhouses and then paint the rest of the birdhouse with colors that match the maps to coordinate.

Faux Broken China Necklace

Faux Broken China Necklace

Coming with the blue theme, we have an easy project that looks stunning. This is a faux version of the popular broken china necklace use blue flower paper napkins, a wood disk, wood beads, Mod Podge and ball chain. This project is super simple and can be whipped up super fast.

Tutorial: cathiefilian.com


Disclaimer: The information found in each project is presented in good faith. Results are not guaranteed. If you have a question about any of these Mod Podge craft projects, visit each website and contact the original designer.

Coastal Christmas Trees

DIY Coastal Home Decor Ideas

Sea Glass Crafts to Make and Sell

10 Beautiful Rustic Wood Centerpiece Boxes

Coastal Creators participate in the Amazon Services LLC Associates Program, an affiliate advertising program designed to provide a means for sites to earn advertising fees by advertising and linking to Amazon and other affiliate programs. Read more

  • HOME
  • BLOG
  • YOU TUBE
  • CONTACT

Copyright © 2025 · Coastal Creators · Our Policies