Coastal Creators of Connecticut

Coastal Creators of Connecticut coastalcreatorsct.com

  • HOME
  • BLOG
  • YOU TUBE
  • CONTACT
    • Our Policies

How to Make & Decorate a Rustic Wooden Christmas Tree

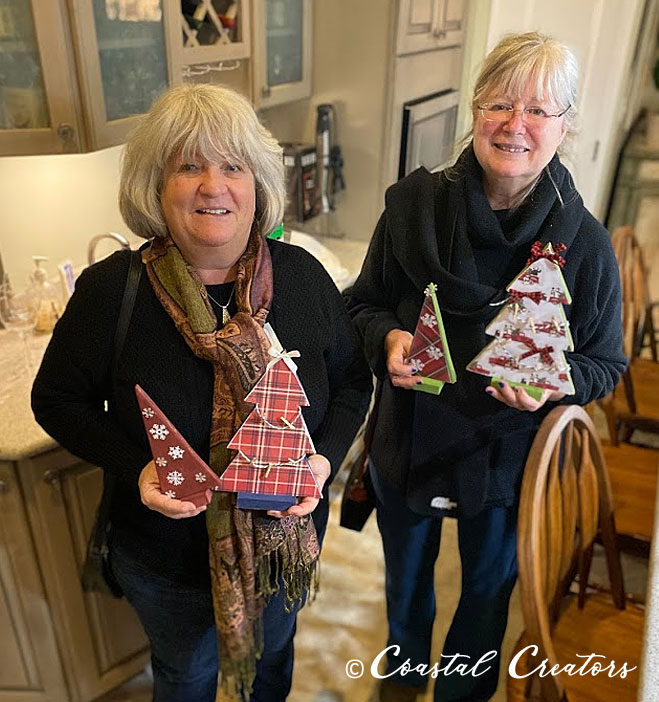
Coastal Creators Crafters group met for our monthly craft class in December and we decorated Rustic Wooden Christmas trees.

Disclaimer: this article contains affiliate links. Please read our affiliate policies.

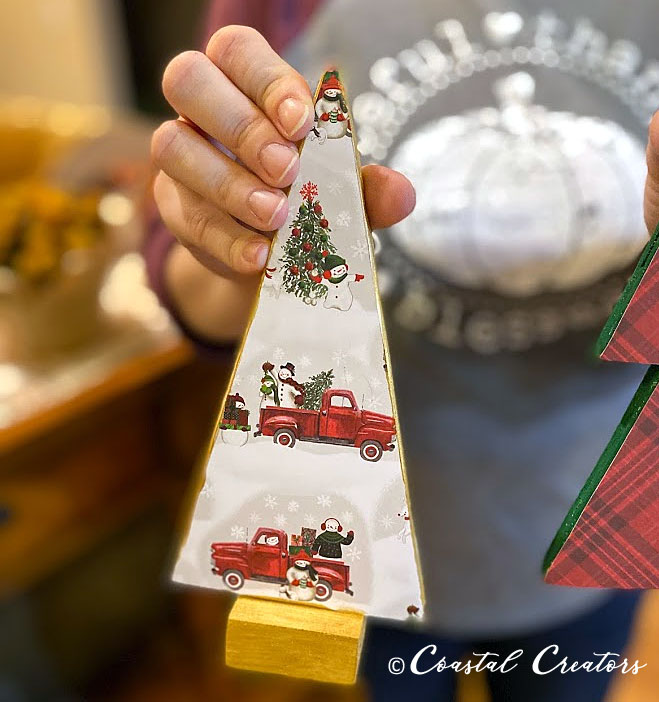
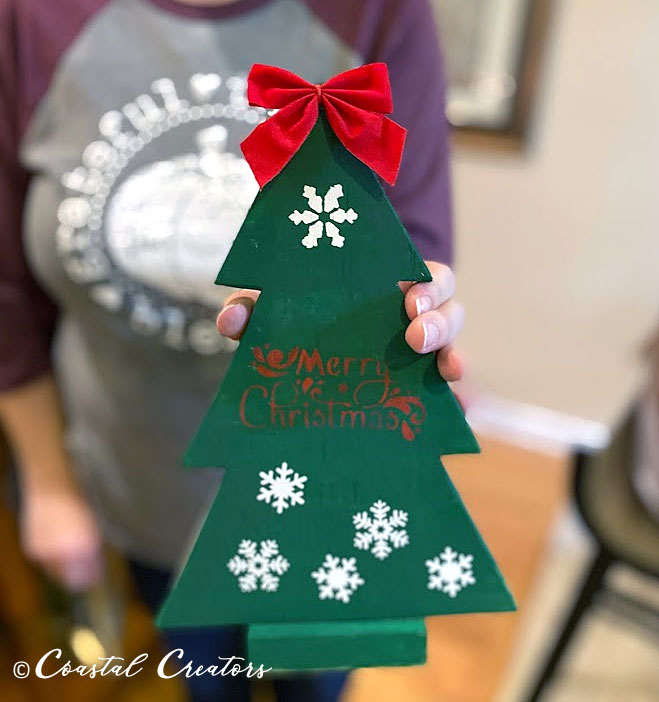
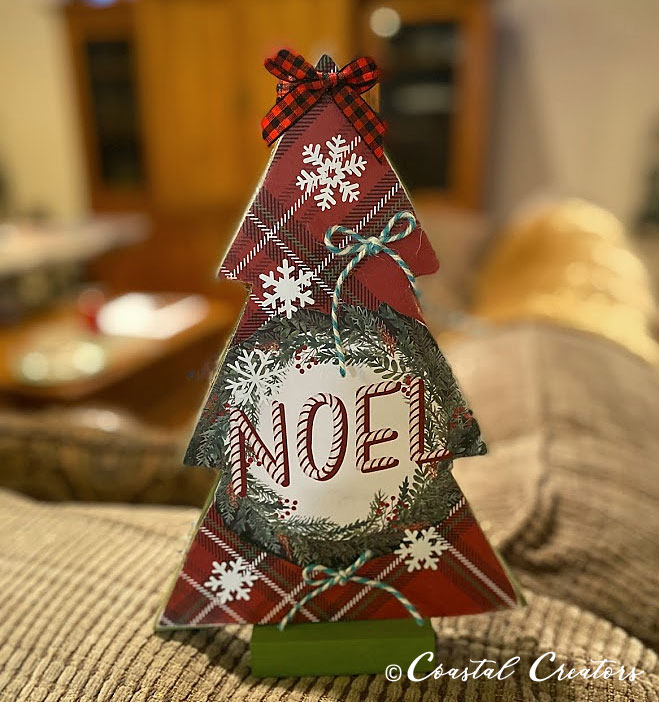
Each person received two trees – one traditional pine tree and the other more like a birch tree with straight lines. We provided the wooden trees, paint, decorative papers, ribbons, stickers, stencils and embellishments and students brought their creativity to decorate their trees with their own unique flair!

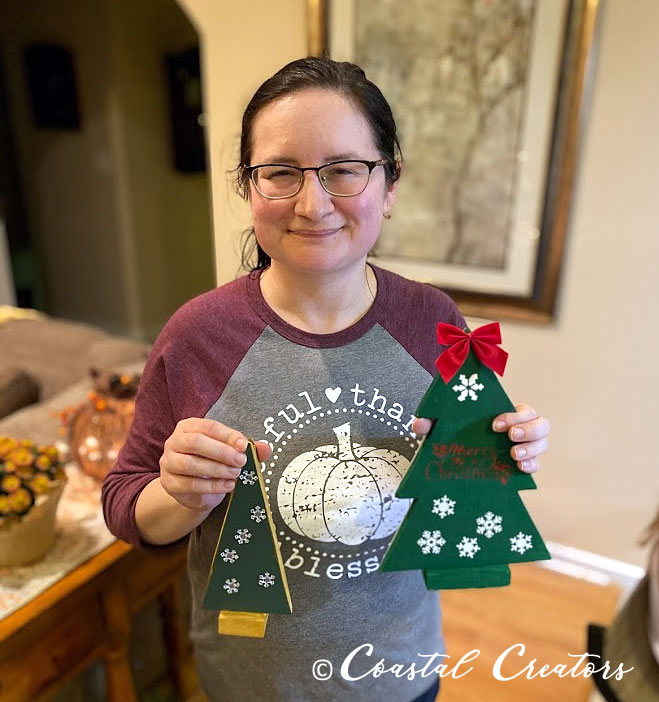
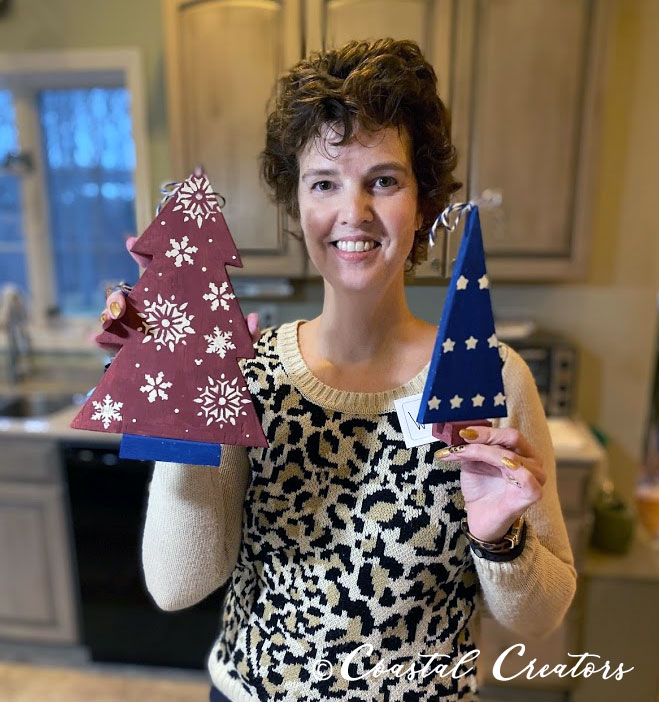
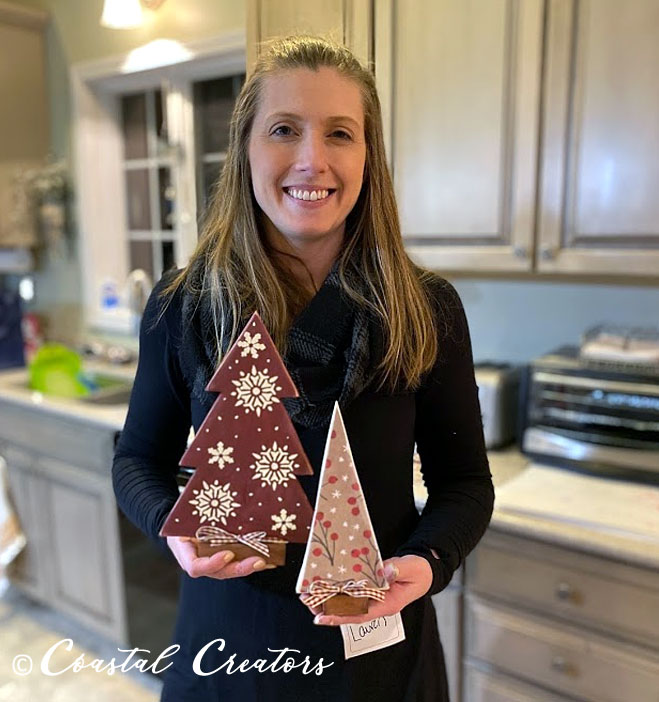
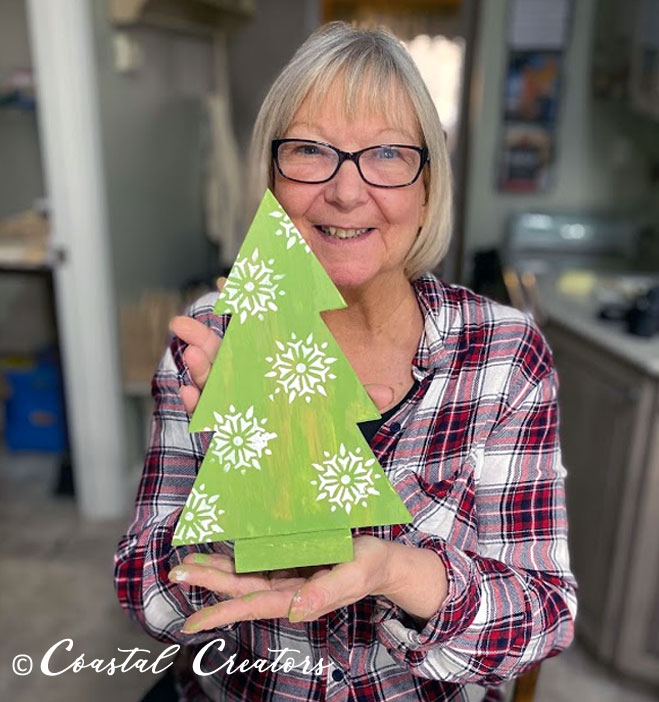
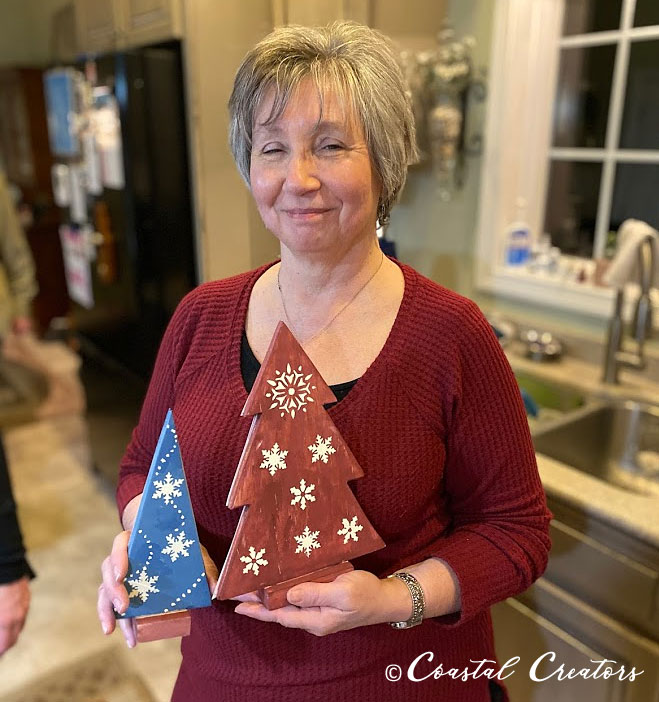
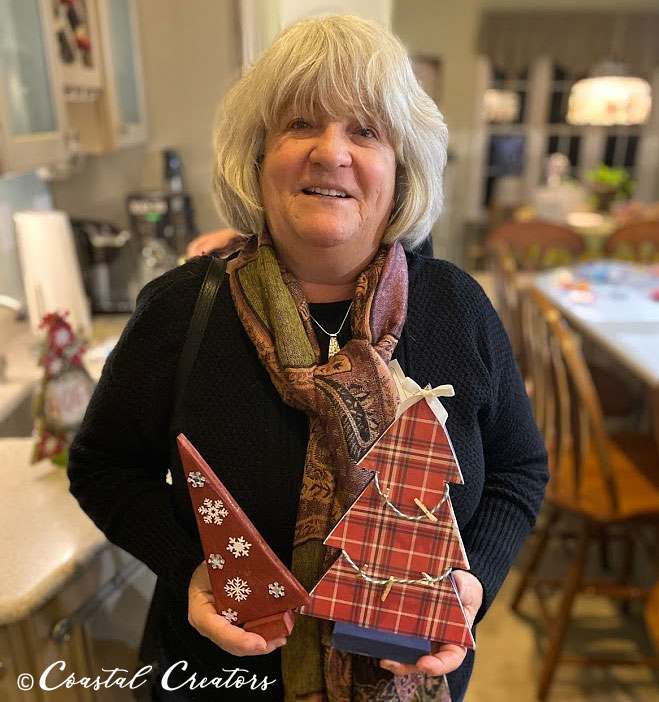
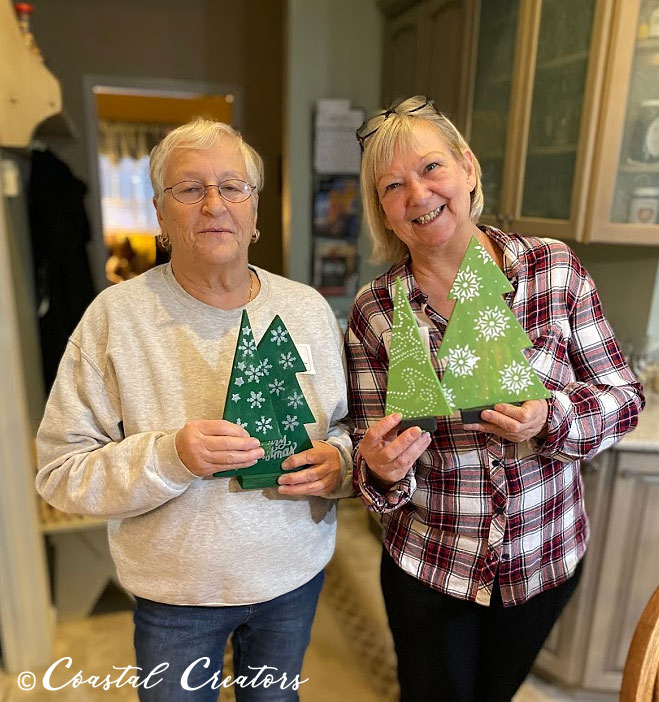
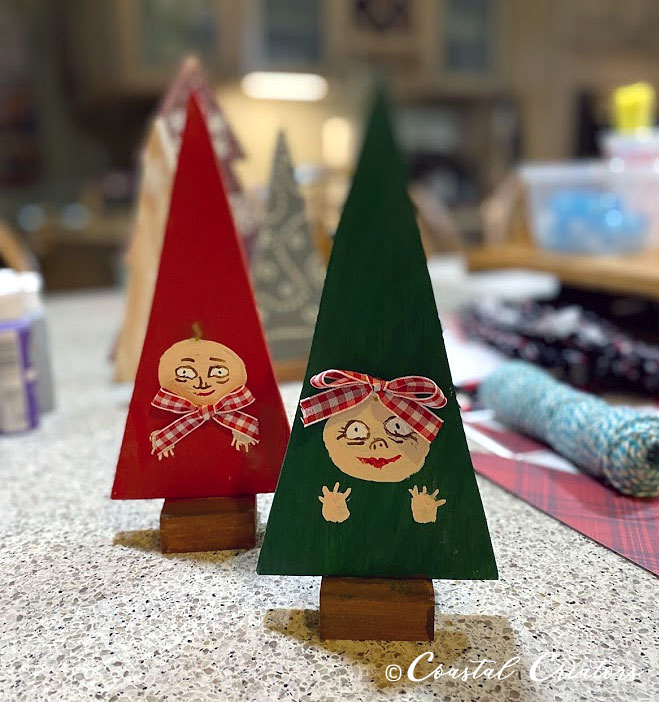
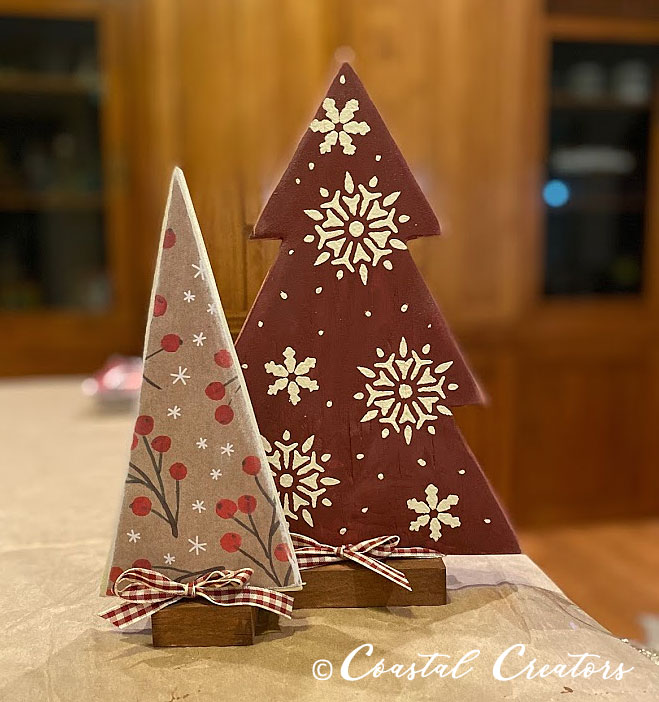
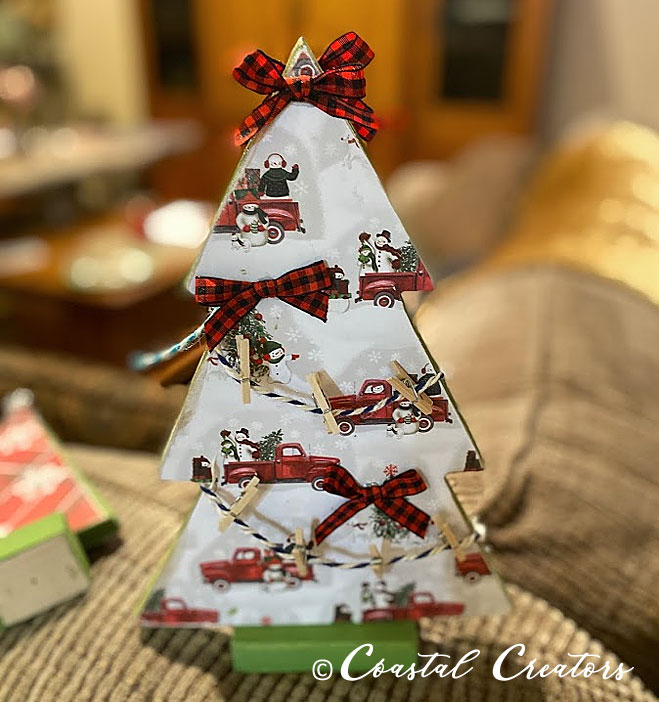
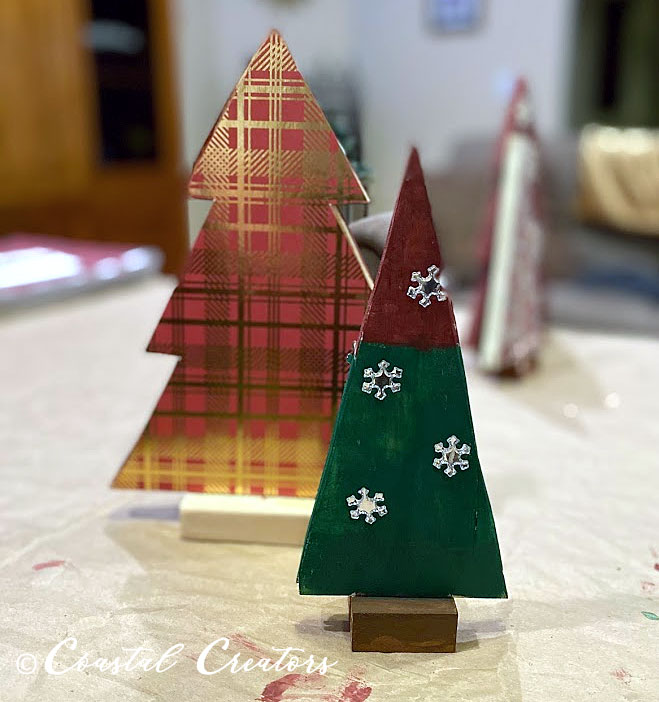
Take a look at some of the Christmas tree designs our students came up with.

Scroll down to find out how to make your very of Wooden Christmas Tree.

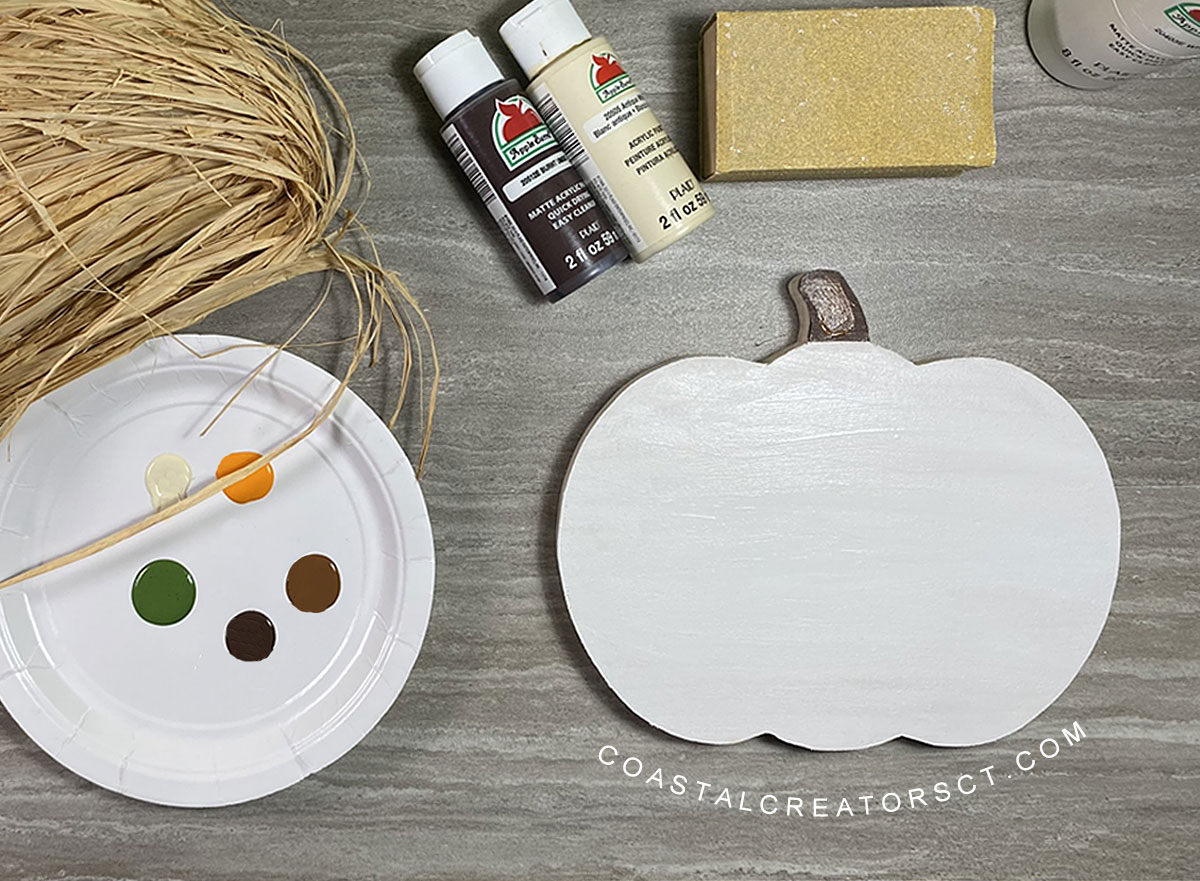
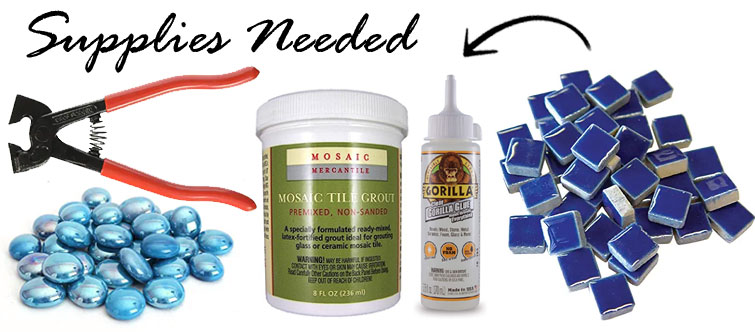
Rustic Wooden Christmas Tree Supplies List:

If you are following along at home, you will need the following supplies to make your own set of Wooden Christmas trees. These make great accents to put on the mantel, dresser, foyer, or anywhere you decorate for the holiday season.

Wooden Christmas Tree Supplies List

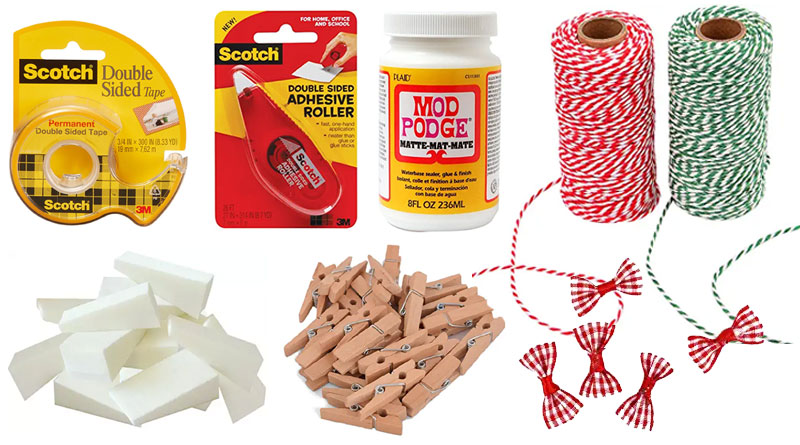
  • Pine boards or plywood
  • Decorative Scrapbook Papers
  • Double-back tape, Modge Podge, Tacky Glue, Glue Runners, or glue sticks
  • Acrylic Paint
  • Paint Brushes, Makeup sponge applicators for dabbing
  • Tiny clothes pins
  • Bakers Twine
  • Tiny Ribbon Bows
  • Sanding blocks
  • Stencils (see below)
  • 4mil to 6mil Mylar
  • Embellishments

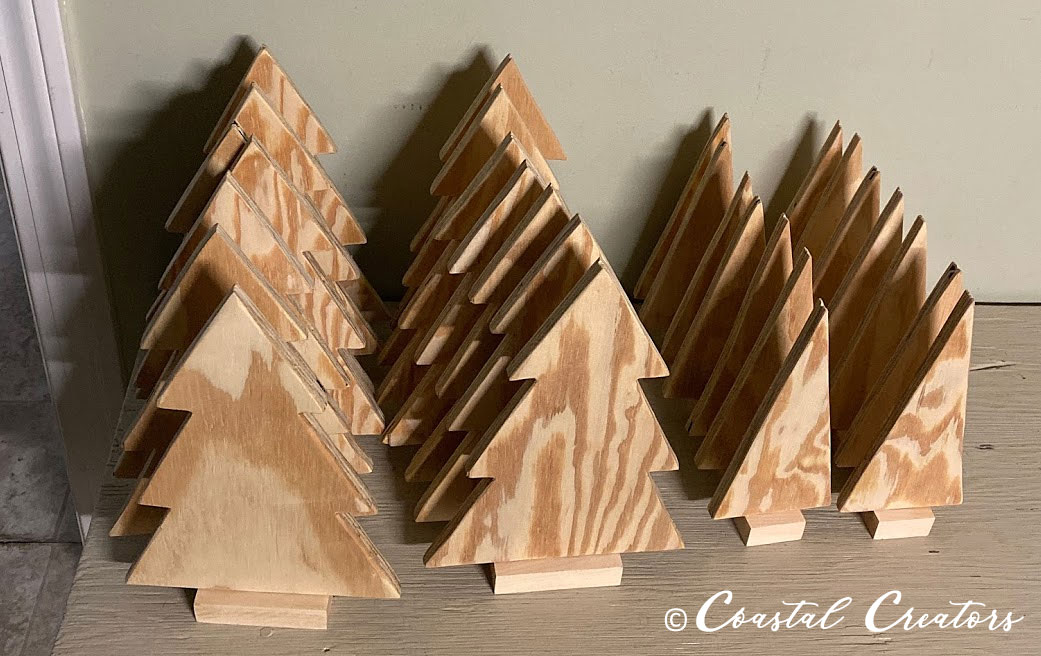
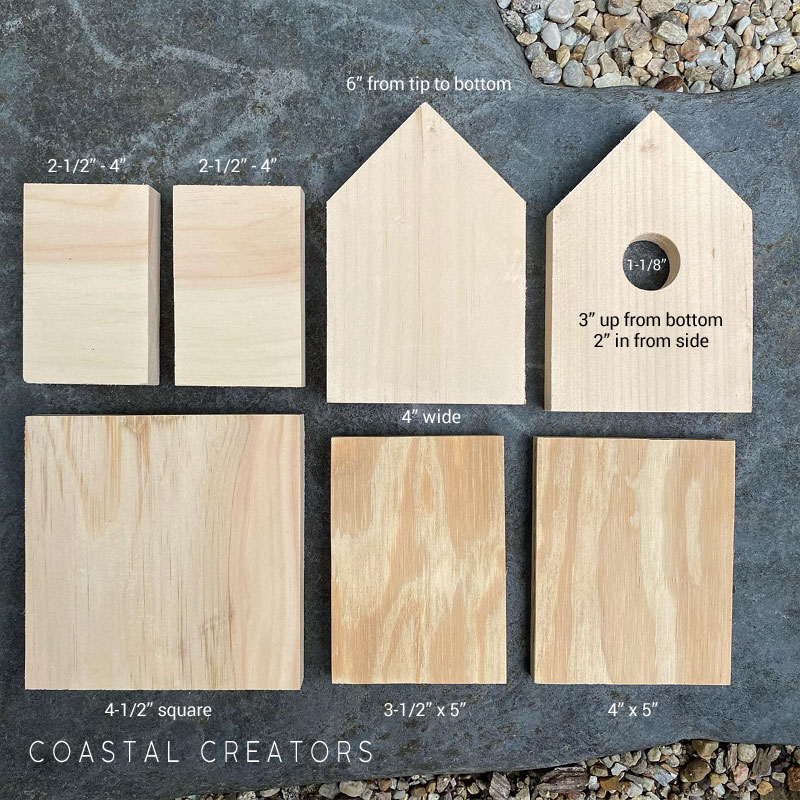
How to Cut a Wooden Christmas Tree

We created our own template to make these trees. You can download the stencil to make your own. Trace the tree onto the wood and then use a jigsaw to cut out the design.

  • Large Christmas Tree Stencil
  • Small Christmas Tree Stencil

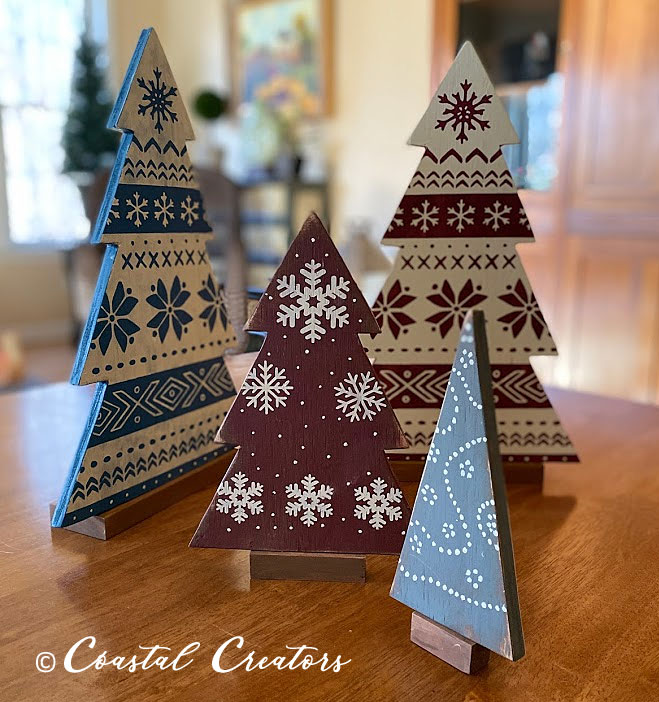
The large tree measures approximately 7″ x 9-3/4″ (10-1/2″ high with base) and the smaller tree measures 3-1/4″ x 7-1/2″ (8-1/4″ high with base). These are just guidelines and you can make them any size you wish. We even made a larger 16″ high trees to make a “Sweater Christmas trees” (see photo above)

Wooden Christmas Tree Base

You may want a base to keep your trees from falling over. We used a 1×2 board to create the bases. Scraps of wood work fine as well. The large tree base measures 3-1/4″ x 1-1/2″ x 3/4″ thick and the small tree base measures 1-1/2″ x 1-1/2″ x 3/4″ thick.

We glued the bases on the bottom of the trees and then used Quick-Grip Clamps to hold them in place. Then we used Cordless Nail Gun to staple the base into place. We let the bases dry overnight.

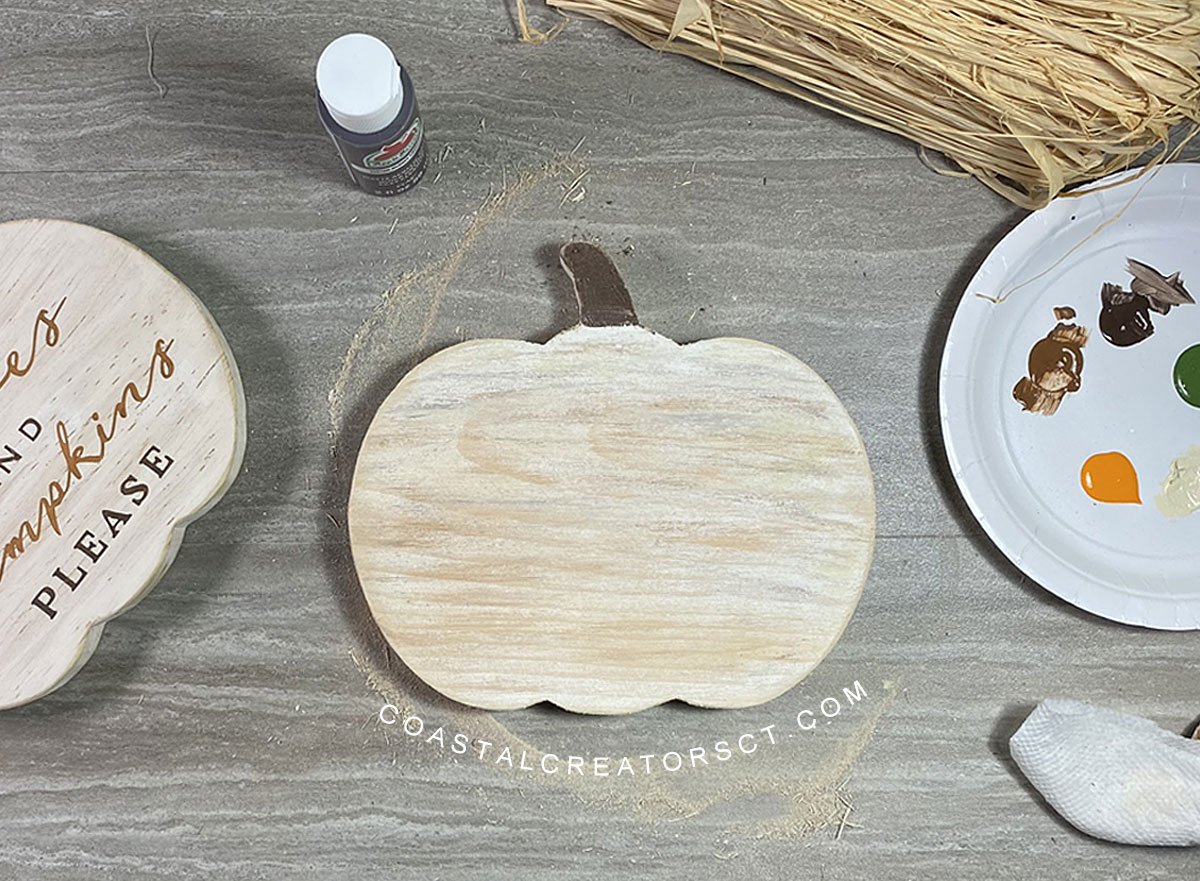
Use a power sander or sanding block to shape the edges and get rid of any rough edges and bumps on the surface of the wood.

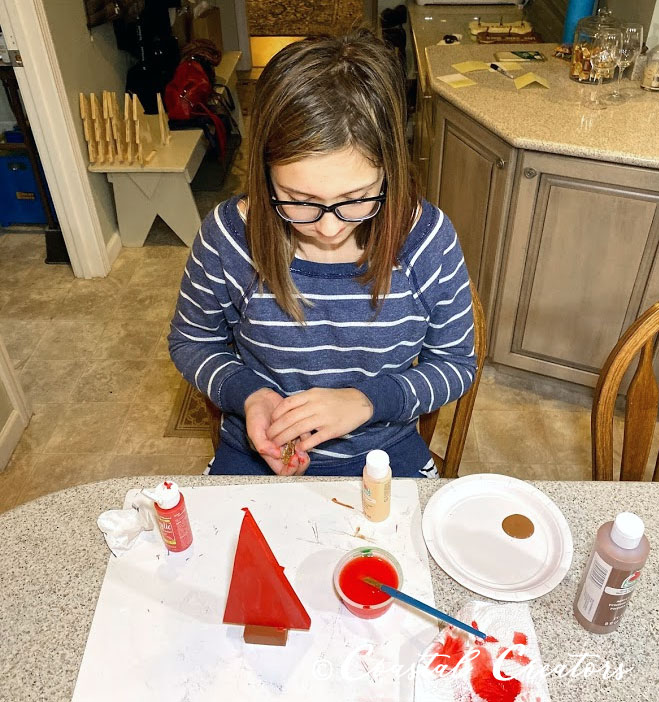
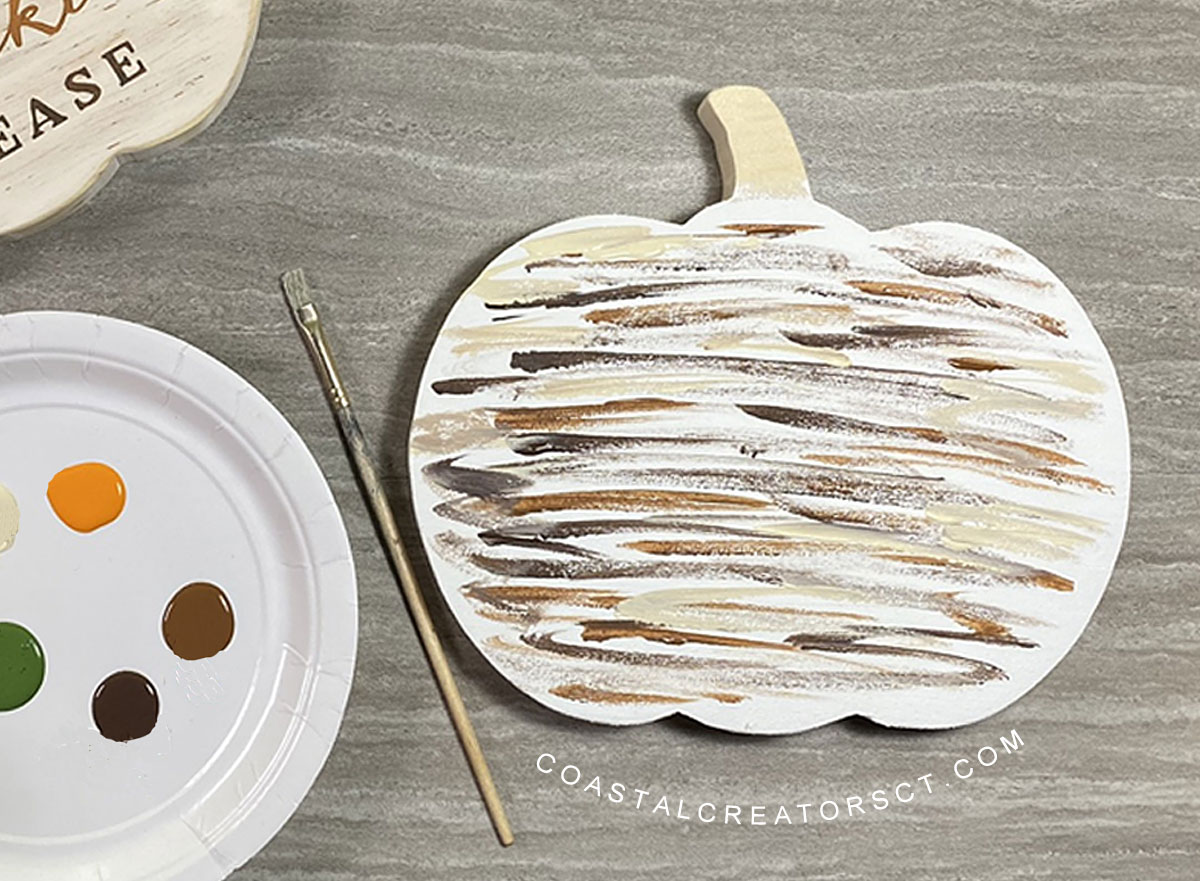
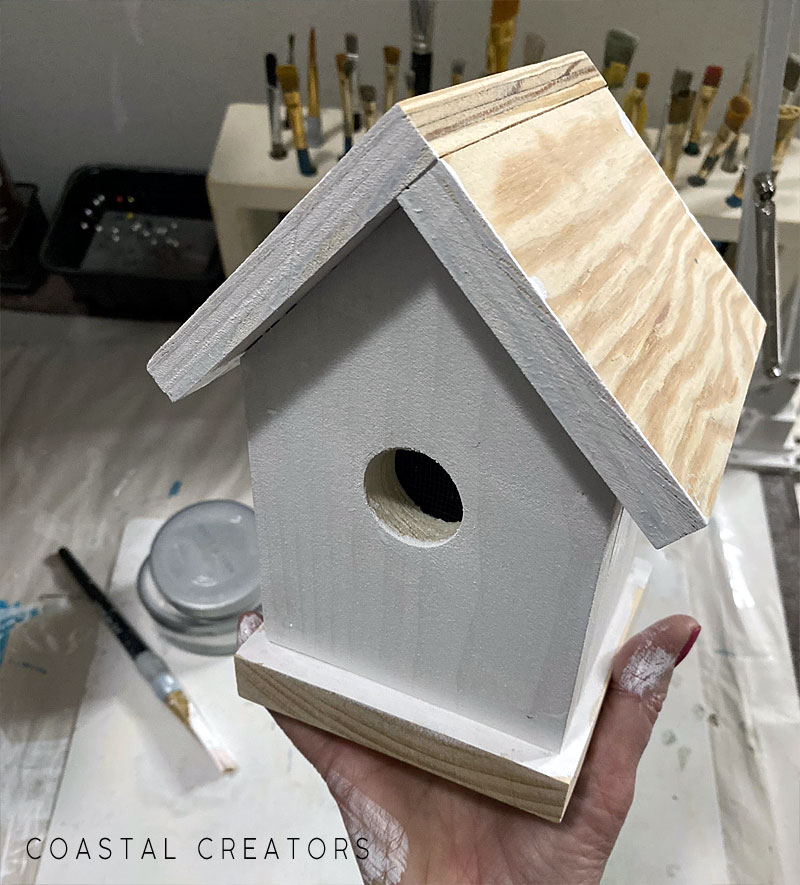
How to Decorate a Wooden Christmas Tree

The first thing you will want to do is paint your tree with a base color. Even if you are using decorative papers on your tree you want to make sure the wood is painted because the edges will show and maybe some of the wood around the paper. We also created our own stencils and used 4mil Mylar with our Cricut machine to cut them out. You can also create vinyl stencils.

Free Christmas Stencils

Here are some of the stencils we created for our students that you can download and use for free. You can use these .png files and upload them to your Cricut or other cutting machine and cut out stencils from Mylar, or make vinyl sticker stencils or even vinyl stickers.

  • Star border
  • Holly leaf border
  • Poinsettia
  • Large Snowflake
  • Merry Christmas – Design #1
  • Merry Christmas – Design #2
  • Wreath with berries

If you want to use decorative papers to decorate your wooden tree, use the original tree stencil to cut out the shape of the tree on the decorative paper. By laying the stencil on the paper you can see what the design will look like once it is glued to the tree.

TIP: Since the tree may be a slightly different shape than the original stencil once you are done cutting it out, you may want to make your decorative paper cutout slightly larger and then trim the edges around the tree.

You can use glue sticks, Double-back tape, Modge Podge, Tacky Glue, Glue Runners, or glue sticks to adhere decorative paper to your trees.

You may want to use Baker’s Twine and tiny clothespin to add to your tree and then you can hang tiny greeting cards or photos from the clothespins.

Paint or decorate both sides of your trees and if you get tired of looking at one side, you can turn them around.

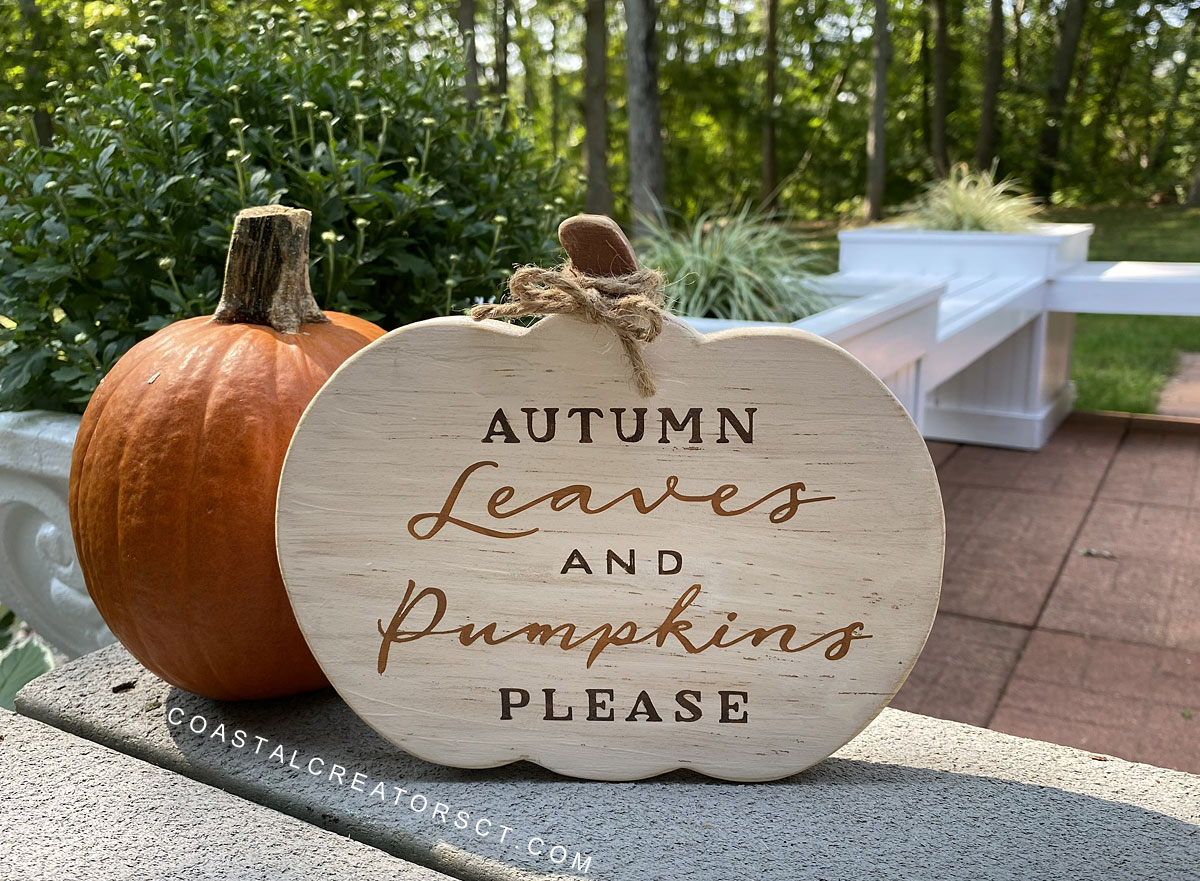
Wooden Christmas Tree Decoration Inspiration

These handmade Wooden Christmas trees make great gifts and so much fun to make if you are hosting a craft class.

Take a look at how some of our students decorated their wooden Christmas Trees. Hopefully they will inspire you to make your own. Most of the students decorated both sides of each tree.

How to Make & Decorate a Rustic Wooden Christmas Tree


Craft a Wood Pumpkin Shelf Sitter to Keep, Sell or Gift

It’s fall and that means pumpkins and leaves, lots of leaves. We like to call it “leaf season” because we have so many trees in our yard. It’s a beautiful time of year in Connecticut. The trees are bursting with color. It’s also time for some Fall crafts. I am going to show you how to create this Fall wood pumpkin shelf sitter that you can keep, sell or gift! Wood crafts to sell are in high demand.

Craft a Wood Pumpkin Shelf Sitter to Keep, Sell or Gift

Craft a Wood Pumpkin Shelf Sitter to Keep, Sell or Gift

Supplies List

  • Pine wood (we used a 1×8)
  • Scroll Saw
  • Paints (I used Apple Barrel Matte white, Harvest Orange, Nutmeg Brown, and Burnt Umber)
  • Paint Brushes
  • 80 Grit Sand Paper (or sanding block)
  • Disposable eye liner brushes (optional)
  • Natural Raffia Ribbon
  • Oracal Stencil Vinyl
  • Vinyl Transfer Tape
  • Cricut Cutting Machine

Other colors that work well to paint these wood pumpkins are Apple Barrel Mossy Green, Antique White, Chestnut, Tuscan Red and Pumpkin Orange. If you don’t have a specific color you can also make your own by combining in colors.

Craft a Wood Pumpkin Shelf Sitter to Keep, Sell or Gift

Apple Barrel paints are good quality and they are very affordable. You can get each 2 oz bottle for 50 cent at Walmart. If you can’t find a specific color at Walmart you can also purchase Apple Barrel paints through Plaidonline.com or Amazon.


Tip: If you are selling these pumpkins you may want to purchase the exact color and not make your own. This keeps the colors consistent when you are making a lot of the same item.

Free Template and Stencils

We are offering the pumpkin template and 4 stencils designs for Free to our email subscribers. Full instructions for how to use the stencil designs are also provided in the Template Gallery. Click Here to subscribe or fill out the form below to get access to the Free Template Gallery.

Note about Selling: If you are selling these pumpkins you are free to use the designs to make your own pumpkins but you cannot use our photographs in your listings. These are copyright to Coastal Creators.

Here are two of the designs you will get plus there are 2 more.

Video Tutorial

Step-by-Step Instructions

Note: These instructions assume you know how to cut out a stencil using a Cricut or Silhouette or other cutting machine. I am only showing you how to make the pumpkin project, not how to use the cutting machine. However, feel free to ask questions in the comments below if you need help cutting the stencil.

1. Cut the pumpkin shape from the 1×8 pine board. The finished size is 8-1/4″ wide x 7-1/4″ high x 3/4″ deep. We cut the pumpkin from the pine board using a scroll saw.

You could always make a larger pumpkin. When you go to print out the template just enlarge it through the printer.

Craft a Wood Pumpkin Shelf Sitter to Keep, Sell or Gift

2. Cut the stencil and add transfer tape on top.

Craft a Wood Pumpkin Shelf Sitter to Keep, Sell or Gift

3. Paint the pumpkin white and the stem dark brown.

Craft a Wood Pumpkin Shelf Sitter to Keep, Sell or Gift

4. Add streaks of brown to the pumpkin. You will have to play around with the amount of color you put on to create the final look you want.

Alternative: you could paint the background color brown, let it dry and then add white paint over-top. When you sand, the brown color will come through.

Craft a Wood Pumpkin Shelf Sitter to Keep, Sell or Gift

4. Sand the pumpkin with a coarse sand paper. We used 80 grit and made out own sanding block by stapling the sand paper to a piece of scrap wood. Make sure to sand the edges to give the pumpkin a rustic look.

5. Add the stencil and paint. Make sure you really flatten out the stencil so you don’t get a lot of bleeds. You want to use very little paint. You can use any type of brush. Remove the stencil.

Tip: To clean up bleeds, I use disposable eye liner brushes. They are super small and cost around 7 to 10 cent each. They are also great to use if you are teaching a painting class because they are so affordable and the students can take them home.

Disposable Eye liner brushes are great for cleaning up painting bleeds when making wood signs

5. Tie a piece of raffia to the stem. You could also use twine if you prefer that look.

Your pumpkin is finished. Now you can place it on your shelf, give it as a gift or sell it on Etsy, Facebook Marketplace, in Facebook group, and more.

Happy Crafting!

Craft a Wood Pumpkin Shelf Sitter to Keep, Sell or Gift

Build a Backyard Planter Bench (Free Plans)

We have a patio outside our kitchen and have been wanting to put a planter bench there for a long time but didn’t want to spend the money to buy a good quality planter. Good quality planter benches can run upwards of $1,000. Yes, you can get a planter bench for $100 that is made out of plastic but we wanted a solid wood planter bench. And yes, you can buy wood planter benches that might cost around $400 to $500 but we wanted a triple planters with 2 benches and weren’t ready to shell out $1,000! So when this happens, what is there to do about it? Make it yourself of course!

You can build this solid wood, triple planter with 2 benches for just around $200! It’s exquisite and you will be the envy of the neighborhood. Create a gathering place in your backyard. Good quality planter benches can run upwards of $1,000 of this size but you will own a solid piece of outdoor furniture for a fraction of the cost.

Build an Exquisite Triple Planter Bench

Following the MyOutdoorPlans.com Planter Bench Plans, we built this planter with two benches and 3 planters. We painted everything white to make it stand out on the red brick patio. We also have a two-seat bench that is white and two small white concrete planters that are white so the white paint brings the whole space together nicely.

"Everest" Sedge Grass

We purchased “Everest” Sedge Grass to put in each of the planters. The variegated green and white leaves look fantastic against the white planters.

Planter Bench Plans

You can follow the bench-making plans at MyOutDoorPlans.com to create these outdoor planter benches.

Materials We Used

  • (12) 8’ tongue and grove pine boards
  • (3) 20 inch square pieces of 5/8 inch plywood
  • (11) 1”x4”x8’ pine boards
  • (4) 2”x4”x8’ boards
  • (3) 1”x3”x8’ pine boards
  • (3) solid wood corner guards
  • 1-1/4” wood screws
  • 2-1/2” wood screws
  • 2-3/4” wood screws
  • Zinsser BIN cover stain
  • KILZ White primer/sealer paint
  • Rust-Oleum Marine Coatings Topside paint, semi-gloss


We used Zinsser BIN cover stain because we used knotty pine. Zinsser’s covers the knots and doesn’t allow them to bleed through the paint. The painting process is probably the longest process in this whole project because we used three paints – primer, Zinsser layer and 2 coats of Rust-Oleum.

Build an Exquisite Triple Planter Bench

Build an Exquisite Triple Planter Bench

Build an Exquisite Triple Planter Bench

Build an Exquisite Triple Planter Bench

Build an Exquisite Triple Planter Bench

It took just about one week working part-time to create one bench and two planters.

DIY Fire Pit in an Hour Project

After we finished this project, we built a fire pit to put in the center of the patio. This fire pit only took about one hour to create. We have full written instructions to build your own fire pit on a companion video on our YouTube channel.

Build and Decorate a Broken China (Mosaic) Birdhouse

A Broken China Birdhouse is a labor of love created by adding broken china pieces to a wood birdhouse using glue and grout. We will teach you how to build the birdhouse, how to find broken china, how to add broken china pieces to your birdhouse and how to give your broken china birdhouse a good finish so it will last for many years.

Build and Decorate a Broken China Mosaic Birdhouse

When building a broken china birdhouse you will need certain materials but they are very affordable. You’ll need some china you don’t mind breaking or tiles you purchased, pine wood to build the birdhouse and a few other supplies, that we list below.

Build and Decorate a Broken China Birdhouse

One day, I bumped into my hutch and broke this beautiful tea cup and saucer. It literally came flying out at me and crashed onto the floor. All was not lost because I decided to turn it into the lovely birdhouse I am going to show you how to build and decorate.

Where to Get Broken China

If you own a piece of china that has chips on it and you are willing to part with it, you can use it for your broken china birdhouse. If you don’t have any broken china, you will easily find a chipped tea cup or china saucer or maybe a tea cup that is missing it’s saucer at your local Goodwill store or Thrift shop. If it is summertime, stop by some yard sales and see what pieces of china you can find.

Online you can also visit local “free cycle” or “buy it nothing” groups to see who is giving away china that you could use for your broken china birdhouse project. Check Facebook Marketplace and Craigslist under the free section. Someone is always giving away china they don’t want or use anymore that would be perfect for this project.

Using Other Embellishments

You can also embellish your birdhouse with other elements such as stained glass, jewelry beads, pieces of decorative stone, Tesserae tiles, ceramic tiles, or even pieces of metal. This is the kind of project that allows you to be creative.

Mosaic Tile Supplies

Supplies Needed

  • 1/2″ plywood
  • 1″ x 6′ pine board
  • 2″ square piece of fiberglass screen
  • 1 1/4″ brad / finishing nails
  • Saw to cut the wood (we used a compound miter saw)
  • Sand paper or random orbit hand sander
  • Drill
  • Tile Cutter
  • Pointed Tweezers
  • China you can break or purchased tiles
  • Grout Sealer
  • work gloves
  • Tile Adhesive (We use Mapei Type 1)
  • Tile Grout
  • Plastic Spatula
  • Tile Grout


Build and Decorate a Broken China Birdhouse

Step-by-Step Birdhouse Instructions

1. Using the 1/2″ plywood, cut one piece to be 3-1/2″ wide by 5″ long.

2. Cut a second piece to be 4″ wide by 5″ long.

3. Using the 1″ x 6″ pine board cut a 4-1/2 ” square to be used as the bottom of the birdhouse.

4. Using the 1″ x 6″ pine board cut the two sides to be 2-1/2″ wide by 4″ long.

5. Using the 1″ x 6″ pine board cut two pieces to be 4″ wide by 6″ long. These are the front and back of the birdhouse.

6. The front and back need to have a peak. Do this by measuring in 2″ from the side of each piece at the top of the 6″ length. Using a 45 degree angle, draw a line from where the angle intersects the 2″ mark to the edge of the board.  This should result in the correct length of the peak.

If a 45 degree angle is not available, still mark the top 2″ inches in, basically the middle of the board. Then measure 2″ down from the top of the board and draw a line from side to side.  Taking a straight edge, draw a line from the 2″ mark at the middle of the top to the 2″ line on the edge of the board.  Do either method for the left and right sides of the board. Cut on the 45 degree lines to form the peak.

Build and Decorate a Broken China Mosaic Birdhouse

7. Select one of the 4″ x 6″ pieces for the front. Drill a 1-1/8″ diameter hole, 3″ up the bottom and 2″ in from the side.

8. Lightly sand each piece of wood. (Sand paper or random orbit hand sander)

9. Before assembling, attach the fiberglass screen behind the hole, using staples.

10. To assemble the birdhouse, start by nailing the sides to the front and back. The sides go between the front and backs, so once fully assembled the body of the birdhouse will be 4″ x 4″.

11. Next, nail the 3-1/2″ x 5″ roof piece onto the body of the birdhouse at the peak with the 5″ side going across the wide of the birdhouse.  The top edge of this roof piece needs to be flush with point of the peak. The sides and bottom of the roof piece should overhang the birdhouse by 1/2″.

12. Nail the 4″ x 5″ roof piece to the other side of the peak. Align this roof piece so one edge overlaps the already attached roof piece. This roof piece should also overlap the birdhouse by 1/2″.

13. Nail the bottom to the birdhouse so that there is approximately 1/4″ of the bottom showing around all sides of the birdhouse.

Now that your birdhouse is built you may want to sand it lightly. I also give my birdhouse a base coat. I use basic white acrylic paint. You could skip this step if you wish.

Build and Decorate a Broken China Birdhouse

Cover the Opening

We use fiberglass screen to cover the opening in our birdhouse. We are not building a birdhouse that is actually going to be used by birds. Our birdhouse is a decorative art piece that we will display in the garden, to display on a shelf in our home, or even to sell.

If you are using our birdhouse instructions, you will want to add a piece of fiberglass screen behind the hole because you do not want birds to go into the birdhouse and build a nest. There are two reasons for this. Our birdhouse is small, too small for a bird to build a proper nest. Also, the hole is small and most birds will not be able to fit properly. The second reason is, if you want to make this broken china birdhouse as a decorative piece, you want to discourage birds from trying to build a nest inside. The fiberglass screen solves both.

You could use metal screen instead of fiberglass screen if you have it on-hand. We just had some fiberglass screen on hand that was leftover from the screen door project. We replaced the screen in our screen door and we had a small amount leftover. If you can use scraps for projects like these, you can make them super affordable. Fiberglass screen is also easier to work with and staple onto the wood.

Build and Decorate a Broken China Birdhouse

Prepare the China Pieces

To prepare the china pieces you will want to break the pieces of china into pieces that are about 1/2″ in size. Each piece of china is going to be a unique shape anyway but generally keeping the pieces around 1/2″ to 3/4″ in size seems to work out the best.

Put gloves on to protect your hands from getting shards of the china in your skin. Grab the nippers and make a clean break on the edge of the china. Continue until the whole piece has been cut and you have a lot of small pieces to work with for your birdhouse design.

Build and Decorate a Broken China Mosaic Birdhouse

Create Your Design

Lay out the china pieces on the birdhouse before you glue everything down. Once you glue a piece down it will be harder to move things around. This is where the tweezers come in handy. Some china pieces may be small and using tweezers makes it easier to get them positioned just right. You may need to use the Tile Nippers to cut small edges of the tiles to fit them into your design just right.

Visit our Birdhouse Design Gallery to get some ideas.

Glue the China Pieces to the Birdhouse

Once you have your design in place, use the tweezers to pick each piece up and put some glue on the wood. Then press your piece firmly in place. If you want to skip this step, you can cover one side of the birdhouse with glue and press the broken china pieces in place, arranging your design as you go.

Let your birdhouse set overnight to make sure the glue is really firm and dry.

Grout the Broken China

Mix your grout with a spatula or plastic spreader. Using the spatula to spread the grout over the surface of your broken china, making sure to get in all of the little grooves. When you are finished with the whole birdhouse, use an old rag and wipe it down to make a level surface.

Let your birdhouse set overnight to make sure the grout is really firm and dry.

Apply a Finish

Your broken china birdhouse is now finished. You may want to add a Grout Sealer that will protect it and also give your birdhouse a more finished look. Grout Sealer is completely clear so it won’t add any color to your beautiful creation.

Build and Decorate a Broken China Mosaic Birdhouse

Sell Broken China Birdhouses

Broken China, Tiled and Hand Painted birdhouses are always in demand. People like pretty things to decorate their home and garden. Pretty things sell! If you are a craft, artist or painter you most likely make your own pretty things but there are millions of people who are not artistic or have no time to create pretty things for their home or garden. These decorative birdhouses could be sold at arts and craft fairs, online at Etsy, or your own website.

Creating these decorative birdhouse is very affordable. You can make one for probably $3 to $5 and sell them upwards of $40 each! All you need to do is invest some of your time. As a hobbiest you could work on them in your spare time. It’s good for the soul too as painting and crafting is very therapeutic! When we craft we don’t think of the cares and woes of our daily lives.

If you don’t mind taking a bit less, you could sell them directly to gift shops in your area at wholesale prices or on consignment. To sell to a local shop you usually cut your price in half so the shop owner can charge double and earn the other half. The advantage of selling to a shop owner is that you deal with one person and not individual people. Sell 40 birdhouses to 1 person or deal with 40 people. One makes you more money but you will have to figure out how to find and sell to 40 people whereas selling to a shop owner takes the pressure off of you having to find those customers.

Mosaic Ceramic China Tile Birdhouses

Build a Pallet Wood Swimming Pool Deck

If you own an above-ground swimming pool or plan on adding one to your yard, you are going to love this DIY project. The supplies are basically free. All you need to do is supply the labor. Who knew that wood pallet could be so versatile but keep reading because you will find out just how to build a swimming pool deck out of free wooden pallets.

Wooden pallets are easy to come by. You can find them at local businesses who want to give them away. If you don’t spot some in your area, just go on Craigslist or Facebook Marketplace because someone is always giving away free wood pallet s.

We didn’t come up with this idea to use pallets to create a swimming pool deck. This idea came from José Adimilson Franco who lives in Brazil. We loved his ideas and thought our readers could benefit from his ingenuity. You can check out other wood projects he has created by visiting his Facebook page.

This swimming pool deck made out of pallet wood is built around an approximately 12′ x 30″ above-ground swimming pool.

Step One: Prepare the Pallets

The first step is to acquire free wooden pallets. Then you will need to take the pallets apart so you have the wooden slats to work with. Of course, this type of platform could also be built by purchasing brand new wood from a hardware store but we want to make this project as cheap as possible.

Not all pallet wood will be suitable for a swimming pool deck and platform. You need to pick the best wood that will weather well and have uniform sizes you can use. You may also want to preserve the wood by adding a coat or two of Rust-Oleum paint. Rust-Oleum paint weathers well in the elements. You could also stain the pallet wood if you prefer.

Step Two: Prepare the Area

You will want to prepare the ground around and under the swimming pool. A large tarp should be laid on the ground before the swimming pool is erected. With any type of above-ground swimming pool you add to your yard you will want to level the ground first, then add the tarp, and then the swimming pool. If you already have the swimming pool in place you can skip this step and move to the next step.

How to Build a Swimming Pool Deck out of Wooden Palettes

Step Three: Build the Base

The next phase of this swimming pool deck project is to create the foundation. While we are not providing the exact measurements because each swimming pool size will be different, you can use the photo to get a good idea of what you will need to create.

How to Build a Swimming Pool Deck out of Wooden Palettes


Step Four: Build the Platform

Once the swimming pool platform base has been erected, arrange the pallet wood on the deck until you have the design you will to create. Use 1-1/2″ finishing nails and a brad nailer to nail each board in place. You could use a regular hammer but a brad nailer will cut the time in half and save your tired hands. You will also need a saw to cut odd size pallet wood pieces. We suggest using a circular saw.

A set of 3 steps have been added to one corner. Pallet wood can be used to create the steps but in a pinch wood crates will also do the trick. You will want steps to make it easy to climb onto the swimming pool deck.

How to Build a Swimming Pool Deck out of Wooden Palettes

Now that you have seen what you can do with pallet wood and a swimming pool, you could keep building you deck up on the sides by adding lattice walls and even an outdoor shower.

  • « Previous Page
  • 1
  • 2
  • 3
  • Next Page »

Coastal Christmas Trees

DIY Coastal Home Decor Ideas

Sea Glass Crafts to Make and Sell

10 Beautiful Rustic Wood Centerpiece Boxes

Coastal Creators participate in the Amazon Services LLC Associates Program, an affiliate advertising program designed to provide a means for sites to earn advertising fees by advertising and linking to Amazon and other affiliate programs. Read more

  • HOME
  • BLOG
  • YOU TUBE
  • CONTACT

Copyright © 2025 · Coastal Creators · Our Policies