Coastal Creators of Connecticut

Coastal Creators of Connecticut coastalcreatorsct.com

  • HOME
  • BLOG
  • WHOLESALE
  • CONTACT
    • Our Policies

DIY Clay Pot Lighthouse Bird Feeders

Whether you are feeding birds to help them through the long, cold winter months or feed birds during warm weather, having a functional bird feeder will attract a lot of variety of birds to your yard. Birds are enjoyable to watch. You can attract different birds by using a variety of seeds. You will attract titmouse, finches, sparrows, and chickadees with tiny seeds like nyjer, thistle, millet, cracked corn, flax and safflower. Cardinals, blue jays, doves, thrashers, and cowbirds like black oil sunflower and larger seed mixes.


DIY Clay Pot Lighthouse Bird Feeders

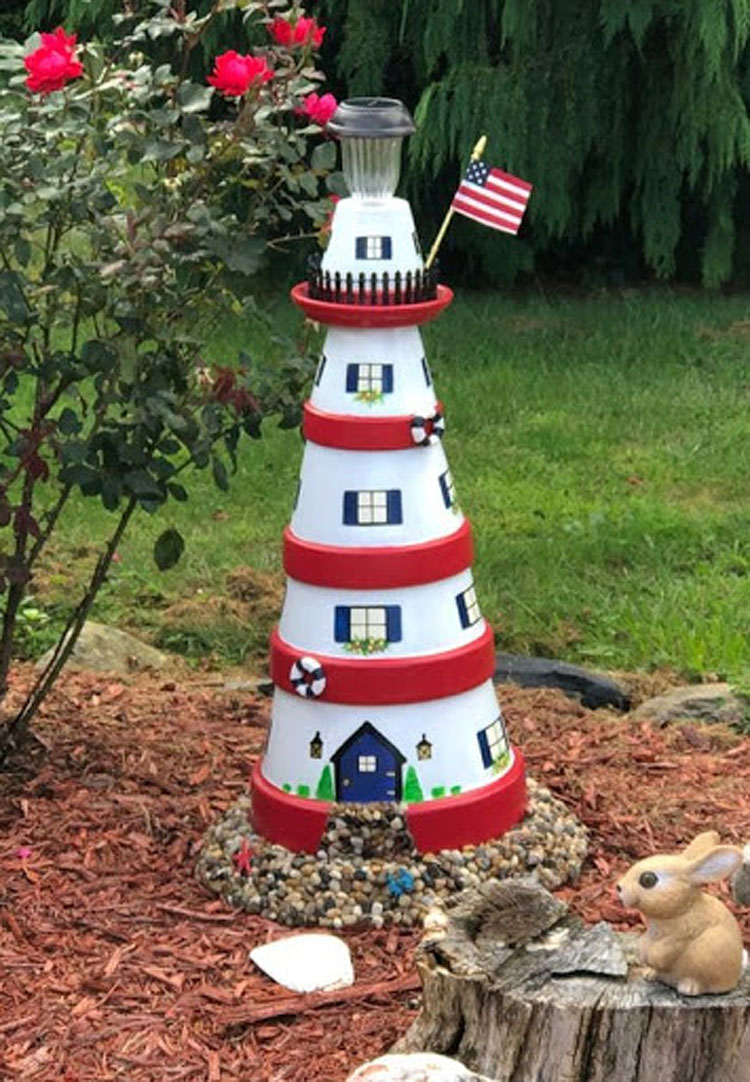
Here is an idea for a cute coastal bird feeder and garden decor all in one. These lighthouse bird feeders are made using clay pots that have been glued together and then painted. Get your creative juices flowing and grab your paints because it’s time for another coastal craft project.

Clay Pot DIY Lighthouse Bird Feeder
Image Credit: Crafts by Courtney

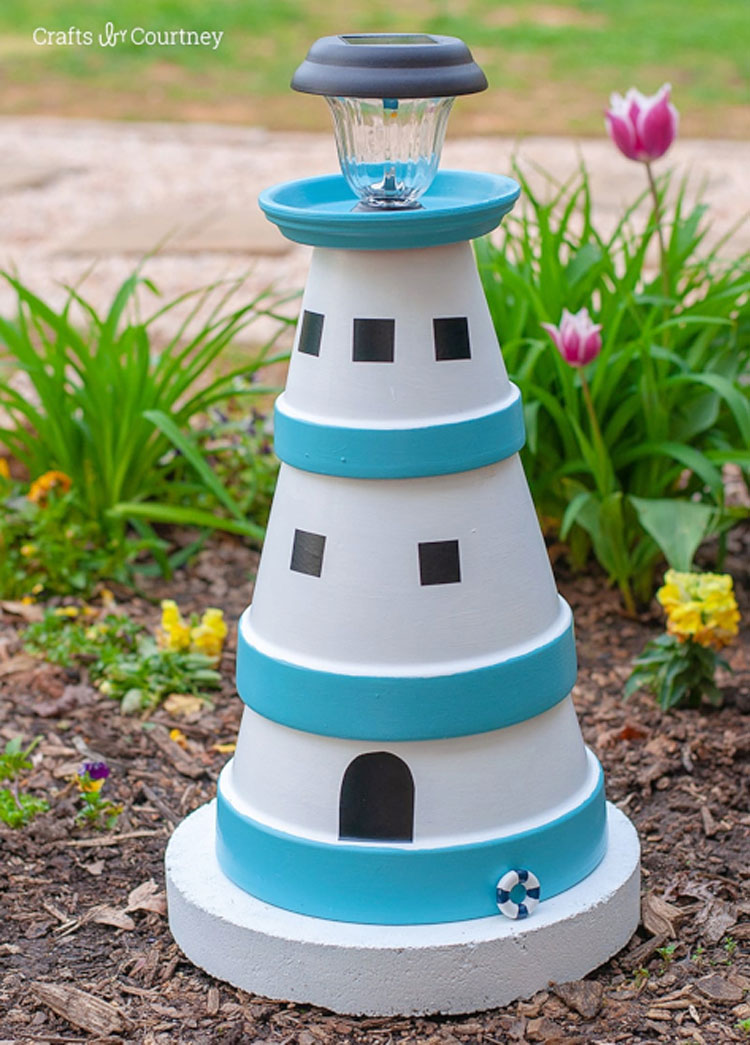
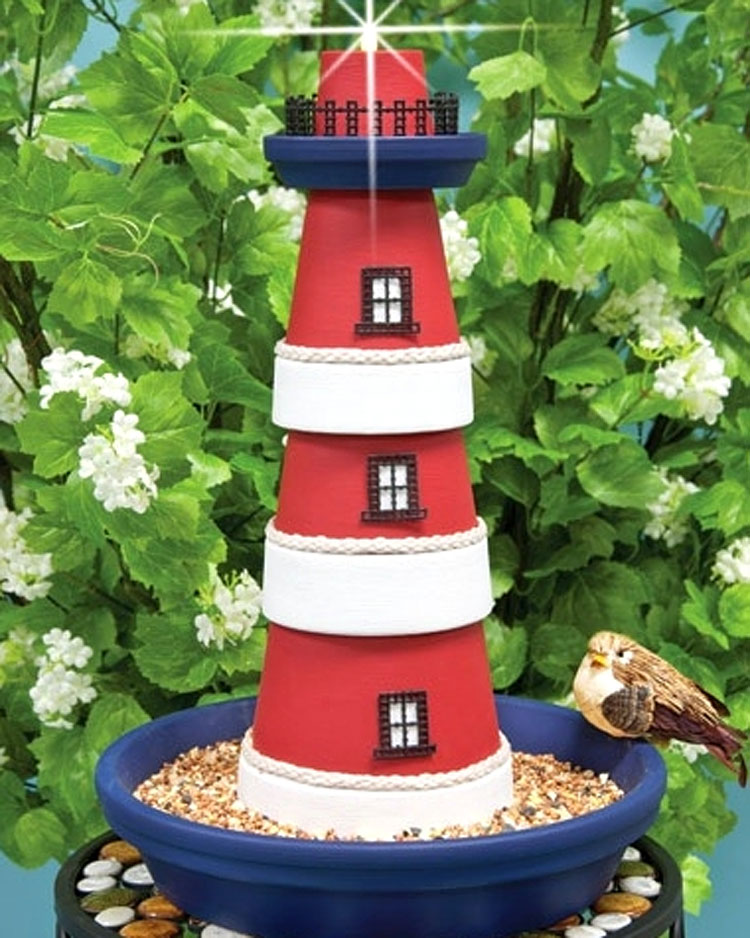
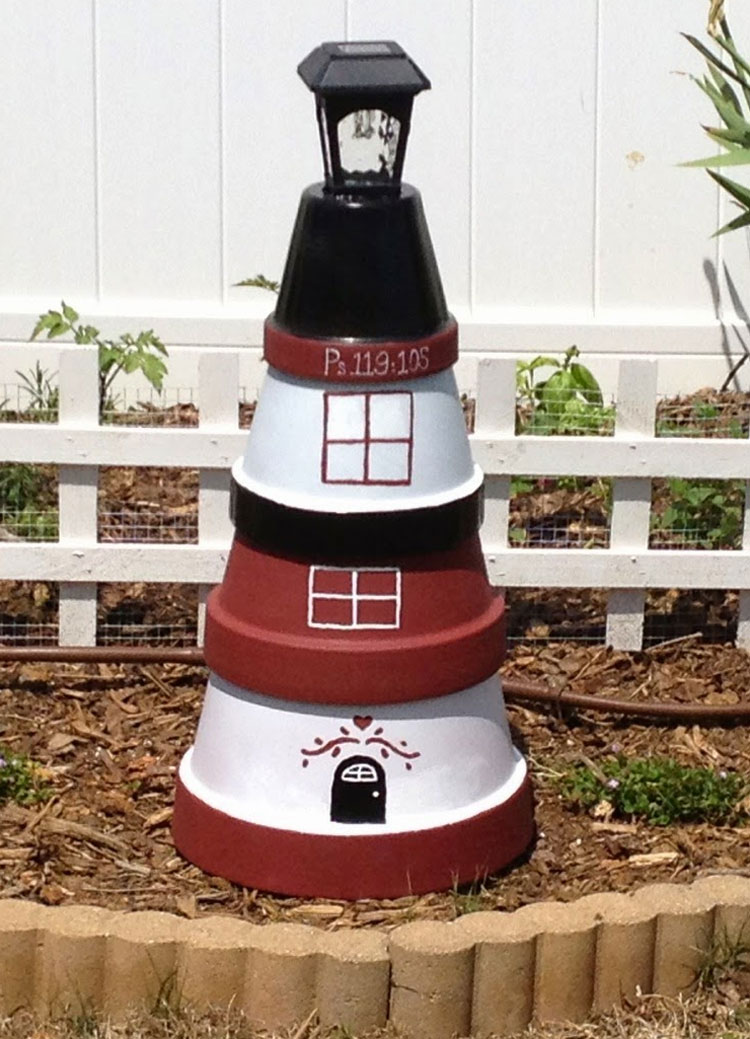
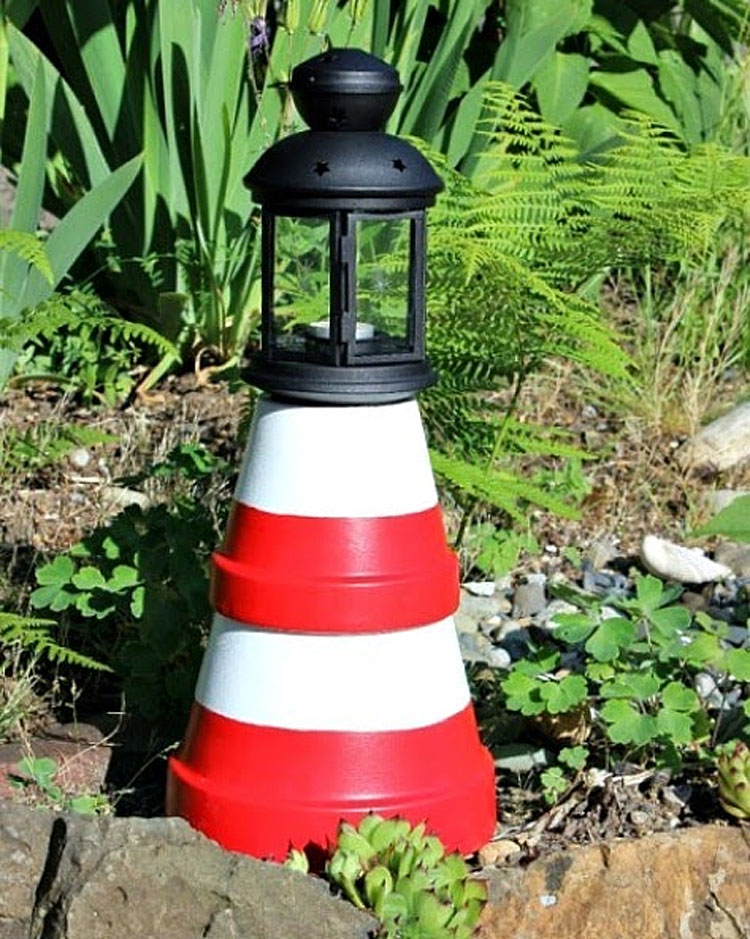
A lighthouse bird feeder made from Terra Cotta clay pots is very easy to assemble. You can feature a lantern on top to cast a warm glow. Place it in the garden as a decoration or add the clay pot saucer on the top or bottom and fill the edges with bird seed to feed our hungry feathered friends.


Clay Pot DIY Lighthouse Bird Feeders
Image Credit: Unknown

Let these examples show you how you can take clay pots to make a lighthouse bird feeder. Add a solar light to the top. The pot’s saucer is placed on top as the bird feeder. Now you have a coastal bird feeder that is also coastal garden decor.


Clay Pot DIY Lighthouse Bird Feeders
Image Credit: Jonathan Fong

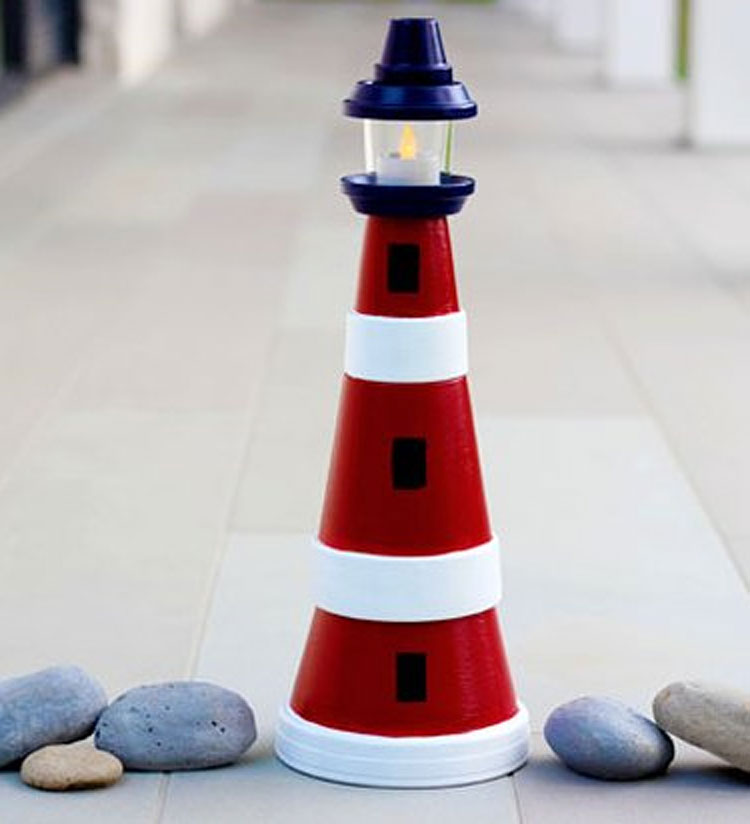
Not all of these Terra Cotta Pot lighthouses feature a bird feeder but you can easily change that by adding the pot saucer to the top or the bottom.

Clay Pot DIY Lighthouse Bird Feeders
Image Credit: Mae


Clay Pot DIY Lighthouse Bird Feeders
Image Source: Pinterest
Clay Pot DIY Lighthouse Bird Feeders
Image Credit: Thrifty Fun

How to Make & Decorate a Rustic Wooden Christmas Tree

Coastal Creators Crafters group met for our monthly craft class in December and we decorated Rustic Wooden Christmas trees.

Disclaimer: this article contains affiliate links. Please read our affiliate policies.

Each person received two trees – one traditional pine tree and the other more like a birch tree with straight lines. We provided the wooden trees, paint, decorative papers, ribbons, stickers, stencils and embellishments and students brought their creativity to decorate their trees with their own unique flair!

Take a look at some of the Christmas tree designs our students came up with.

Scroll down to find out how to make your very of Wooden Christmas Tree.

Rustic Wooden Christmas Tree Supplies List:

If you are following along at home, you will need the following supplies to make your own set of Wooden Christmas trees. These make great accents to put on the mantel, dresser, foyer, or anywhere you decorate for the holiday season.

Wooden Christmas Tree Supplies List

  • Pine boards or plywood
  • Decorative Scrapbook Papers
  • Double-back tape, Modge Podge, Tacky Glue, Glue Runners, or glue sticks
  • Acrylic Paint
  • Paint Brushes, Makeup sponge applicators for dabbing
  • Tiny clothes pins
  • Bakers Twine
  • Tiny Ribbon Bows
  • Sanding blocks
  • Stencils (see below)
  • 4mil to 6mil Mylar
  • Embellishments

How to Cut a Wooden Christmas Tree

We created our own template to make these trees. You can download the stencil to make your own. Trace the tree onto the wood and then use a jigsaw to cut out the design.

  • Large Christmas Tree Stencil
  • Small Christmas Tree Stencil

The large tree measures approximately 7″ x 9-3/4″ (10-1/2″ high with base) and the smaller tree measures 3-1/4″ x 7-1/2″ (8-1/4″ high with base). These are just guidelines and you can make them any size you wish. We even made a larger 16″ high trees to make a “Sweater Christmas trees” (see photo above)

Wooden Christmas Tree Base

You may want a base to keep your trees from falling over. We used a 1×2 board to create the bases. Scraps of wood work fine as well. The large tree base measures 3-1/4″ x 1-1/2″ x 3/4″ thick and the small tree base measures 1-1/2″ x 1-1/2″ x 3/4″ thick.

We glued the bases on the bottom of the trees and then used Quick-Grip Clamps to hold them in place. Then we used Cordless Nail Gun to staple the base into place. We let the bases dry overnight.

Use a power sander or sanding block to shape the edges and get rid of any rough edges and bumps on the surface of the wood.

How to Decorate a Wooden Christmas Tree

The first thing you will want to do is paint your tree with a base color. Even if you are using decorative papers on your tree you want to make sure the wood is painted because the edges will show and maybe some of the wood around the paper. We also created our own stencils and used 4mil Mylar with our Cricut machine to cut them out. You can also create vinyl stencils.

Free Christmas Stencils

Here are some of the stencils we created for our students that you can download and use for free. You can use these .png files and upload them to your Cricut or other cutting machine and cut out stencils from Mylar, or make vinyl sticker stencils or even vinyl stickers.

  • Star border
  • Holly leaf border
  • Poinsettia
  • Large Snowflake
  • Merry Christmas – Design #1
  • Merry Christmas – Design #2
  • Wreath with berries

If you want to use decorative papers to decorate your wooden tree, use the original tree stencil to cut out the shape of the tree on the decorative paper. By laying the stencil on the paper you can see what the design will look like once it is glued to the tree.

TIP: Since the tree may be a slightly different shape than the original stencil once you are done cutting it out, you may want to make your decorative paper cutout slightly larger and then trim the edges around the tree.

You can use glue sticks, Double-back tape, Modge Podge, Tacky Glue, Glue Runners, or glue sticks to adhere decorative paper to your trees.

You may want to use Baker’s Twine and tiny clothespin to add to your tree and then you can hang tiny greeting cards or photos from the clothespins.

Paint or decorate both sides of your trees and if you get tired of looking at one side, you can turn them around.

Wooden Christmas Tree Decoration Inspiration

These handmade Wooden Christmas trees make great gifts and so much fun to make if you are hosting a craft class.

Take a look at how some of our students decorated their wooden Christmas Trees. Hopefully they will inspire you to make your own. Most of the students decorated both sides of each tree.

How to Make & Decorate a Rustic Wooden Christmas Tree


How to Chalk Paint Mason Jars

We recently offered a craft class and taught our guests how to chalk paint on Mason Jars. It’s quite simple and the results are stunning. These chalk painted Mason jars are the perfect addition to our Simply Blessed wooden centerpiece box.

How to Chalk Paint Mason Jars

How to Chalk Paint Mason Jars

Disclaimer: this article contains affiliate links. Please read our affiliate policies.

How to Chalk Paint Mason Jars

Chalk Paint Mason Jars Supplies List

Here are some of the items you will need to complete your project.

  • 32 oz. Mason Jars (quart size is what we used but you can use smaller)
  • Alcohol pads (Rubbing Alcohol and paper towels work too)
  • Chalk Paint (we like FolkArt Brand)
  • Paint Brushes
  • Sanding Block
  • Twine
  • Rubber gloves (Optional)
  • Mod Podge (Optional)

How to Chalk Paint Mason Jars

How to Chalk Paint Mason Jars

How to Chalk Paint Mason Jars

1. The first thing to do is lay out your supplies and be ready with your chalk paint.

2. Next, you need to clean your Mason jar with the alcohol wipe. Put your hand inside of the jar and wipe all around the outside of the jar up and around the rim. Make sure you do not touch the jar once you have cleaned it. By using the alcohol wipe you are removing any dirt or oil. If you have oil on the jar your paint won’t stick properly.

3. The alcohol should dry almost immediately. Begin painting the jar with even brush strokes. Take a look at how the paint is looking on the jar and if you want the lines to go one way then paint all in the same direction. If you find that your paint does not stick you will have to clean those spots with the alcohol again.

TIP: I like to keep my hand inside of the jar (well not all of the way) and guide the jar down on the mat once I am finished painting, using the paint brush to hold the bottom of the jar so I can remove my hand as I place it on my mat or table to dry.

How to Chalk Paint Mason Jars

4. If you are painting more jars, continue to the next jar. If you are only painting the one jar, then wait for about 15 minutes before adding a second coat.

5. Let the second coat dry to the touch. Using your sanding block, distress your jar as much or as little as you like.

How to Chalk Paint Mason Jars

OPTIONAL: For added protection to the finish, you can use a coat of Matte Mod Podge once the final coat of paint is dry and you have distressed the jar.

Our Chalk Painted Mason Jar Gallery

Take a look at the finish Chalk Paint Mason Jar project. Our students did a fantastic job to transform a simple jar into a specialty home decor piece that can be used in so many ways. They look amazing in our wooden centerpiece box too.

How to Chalk Paint Mason Jars

How to Chalk Paint Mason Jars

Craft a Wood Pumpkin Shelf Sitter to Keep, Sell or Gift

It’s fall and that means pumpkins and leaves, lots of leaves. We like to call it “leaf season” because we have so many trees in our yard. It’s a beautiful time of year in Connecticut. The trees are bursting with color. It’s also time for some Fall crafts. I am going to show you how to create this Fall wood pumpkin shelf sitter that you can keep, sell or gift! Wood crafts to sell are in high demand.

Craft a Wood Pumpkin Shelf Sitter to Keep, Sell or Gift

Craft a Wood Pumpkin Shelf Sitter to Keep, Sell or Gift

Supplies List

  • Pine wood (we used a 1×8)
  • Scroll Saw
  • Paints (I used Apple Barrel Matte white, Harvest Orange, Nutmeg Brown, and Burnt Umber)
  • Paint Brushes
  • 80 Grit Sand Paper (or sanding block)
  • Disposable eye liner brushes (optional)
  • Natural Raffia Ribbon
  • Oracal Stencil Vinyl
  • Vinyl Transfer Tape
  • Cricut Cutting Machine

Other colors that work well to paint these wood pumpkins are Apple Barrel Mossy Green, Antique White, Chestnut, Tuscan Red and Pumpkin Orange. If you don’t have a specific color you can also make your own by combining in colors.

Craft a Wood Pumpkin Shelf Sitter to Keep, Sell or Gift

Apple Barrel paints are good quality and they are very affordable. You can get each 2 oz bottle for 50 cent at Walmart. If you can’t find a specific color at Walmart you can also purchase Apple Barrel paints through Plaidonline.com or Amazon.


Tip: If you are selling these pumpkins you may want to purchase the exact color and not make your own. This keeps the colors consistent when you are making a lot of the same item.

Free Template and Stencils

We are offering the pumpkin template and 4 stencils designs for Free to our email subscribers. Full instructions for how to use the stencil designs are also provided in the Template Gallery. Click Here to subscribe or fill out the form below to get access to the Free Template Gallery.

Note about Selling: If you are selling these pumpkins you are free to use the designs to make your own pumpkins but you cannot use our photographs in your listings. These are copyright to Coastal Creators.

Here are two of the designs you will get plus there are 2 more.

Video Tutorial

Step-by-Step Instructions

Note: These instructions assume you know how to cut out a stencil using a Cricut or Silhouette or other cutting machine. I am only showing you how to make the pumpkin project, not how to use the cutting machine. However, feel free to ask questions in the comments below if you need help cutting the stencil.

1. Cut the pumpkin shape from the 1×8 pine board. The finished size is 8-1/4″ wide x 7-1/4″ high x 3/4″ deep. We cut the pumpkin from the pine board using a scroll saw.

You could always make a larger pumpkin. When you go to print out the template just enlarge it through the printer.

Craft a Wood Pumpkin Shelf Sitter to Keep, Sell or Gift

2. Cut the stencil and add transfer tape on top.

Craft a Wood Pumpkin Shelf Sitter to Keep, Sell or Gift

3. Paint the pumpkin white and the stem dark brown.

Craft a Wood Pumpkin Shelf Sitter to Keep, Sell or Gift

4. Add streaks of brown to the pumpkin. You will have to play around with the amount of color you put on to create the final look you want.

Alternative: you could paint the background color brown, let it dry and then add white paint over-top. When you sand, the brown color will come through.

Craft a Wood Pumpkin Shelf Sitter to Keep, Sell or Gift

4. Sand the pumpkin with a coarse sand paper. We used 80 grit and made out own sanding block by stapling the sand paper to a piece of scrap wood. Make sure to sand the edges to give the pumpkin a rustic look.

5. Add the stencil and paint. Make sure you really flatten out the stencil so you don’t get a lot of bleeds. You want to use very little paint. You can use any type of brush. Remove the stencil.

Tip: To clean up bleeds, I use disposable eye liner brushes. They are super small and cost around 7 to 10 cent each. They are also great to use if you are teaching a painting class because they are so affordable and the students can take them home.

Disposable Eye liner brushes are great for cleaning up painting bleeds when making wood signs

5. Tie a piece of raffia to the stem. You could also use twine if you prefer that look.

Your pumpkin is finished. Now you can place it on your shelf, give it as a gift or sell it on Etsy, Facebook Marketplace, in Facebook group, and more.

Happy Crafting!

Craft a Wood Pumpkin Shelf Sitter to Keep, Sell or Gift

Coastal Blue Marble Painted Pumpkins

Blue marble painted pumpkins are a unique coastal take on a traditional Fall pumpkin. If you like to decorate with shades of blue, these marbled pumpkins are for you. They are easy to create and take just a few supplies.

Get into the Fall spirit by making your own Marbled blue Pumpkins! It’s an easy DIY for a super cool effect! Great for Halloween party decorations or just for impressing your friends.

Supplies you’ll need:

  • Nail Polish
  • Toothpicks
  • White Pumpkins
  • Plastic Container

Can you believe that these blue marbled pumpkins are created by adding 4 to 5 drops of nail polish to a cup of water? As long as the water isn’t too cold the nail polish will stick to your pumpkins, creating a marbled effect.

If you don’t can’t find white pumpkins in your local area, you can always buy rustic harvest white pumpkins from Amazon. You will also need Indigo blue nail polish.


This craft idea was originally posted on AliceandLois.com

Coastal Blue Marble Painted Pumpkins
Source: Alice & Lois
  • « Previous Page
  • 1
  • 2
  • 3
  • 4
  • 5
  • 6
  • …
  • 8
  • Next Page »

250th United States Anniversary Wholesale Laptop and Water Bottle Stickers Products

Wholesale 250th Anniversary Products for Retailers (America 1776–2026)

250th United States Anniversary Wholesale Bookmarks Products

The 250th Anniversary of the United States: A Semiquincentennial Moment

Coastal Christmas Trees

DIY Coastal Home Decor Ideas

Coastal Creators participate in the Amazon Services LLC Associates Program, an affiliate advertising program designed to provide a means for sites to earn advertising fees by advertising and linking to Amazon and other affiliate programs. Read more

  • HOME
  • BLOG
  • WHOLESALE
  • CONTACT

Copyright © 2026 · Coastal Creators · Our Policies