Coastal Creators of Connecticut

Coastal Creators of Connecticut coastalcreatorsct.com

  • HOME
  • BLOG
  • WHOLESALE
  • CONTACT
    • Our Policies

Perfect Pallet Projects For Your Home & Garden

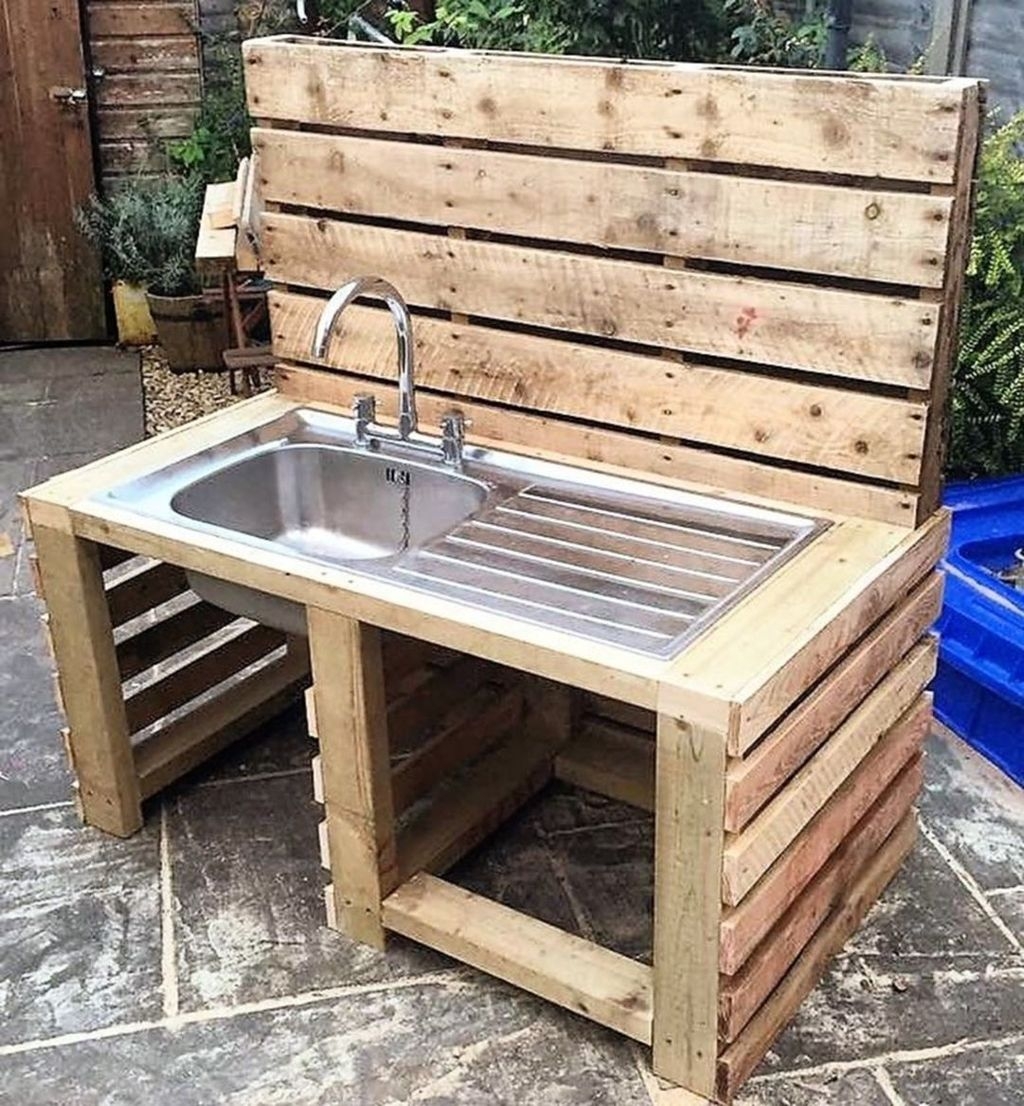
Pallet wood is good solid wood to use for making all kinds of things like furniture, signs, plant holders and lots more. Pallet wood is free and most local business will have them if you stop by and ask they may give them to you. You can also find Free pallets by using Craigslist or Facebook Marketplace because business are always trying to get rid of their unwanted pallets.

There are many cool pallet projects, what will you make first?

If you are looking for inspiration for just what you can make out of pallet wood, we have a great collection for you.

Follow Coastal Creators on Pinterest for even more inspiration!

Pallet Wood Furniture, Garden, Home Project Ideas
Source unknown

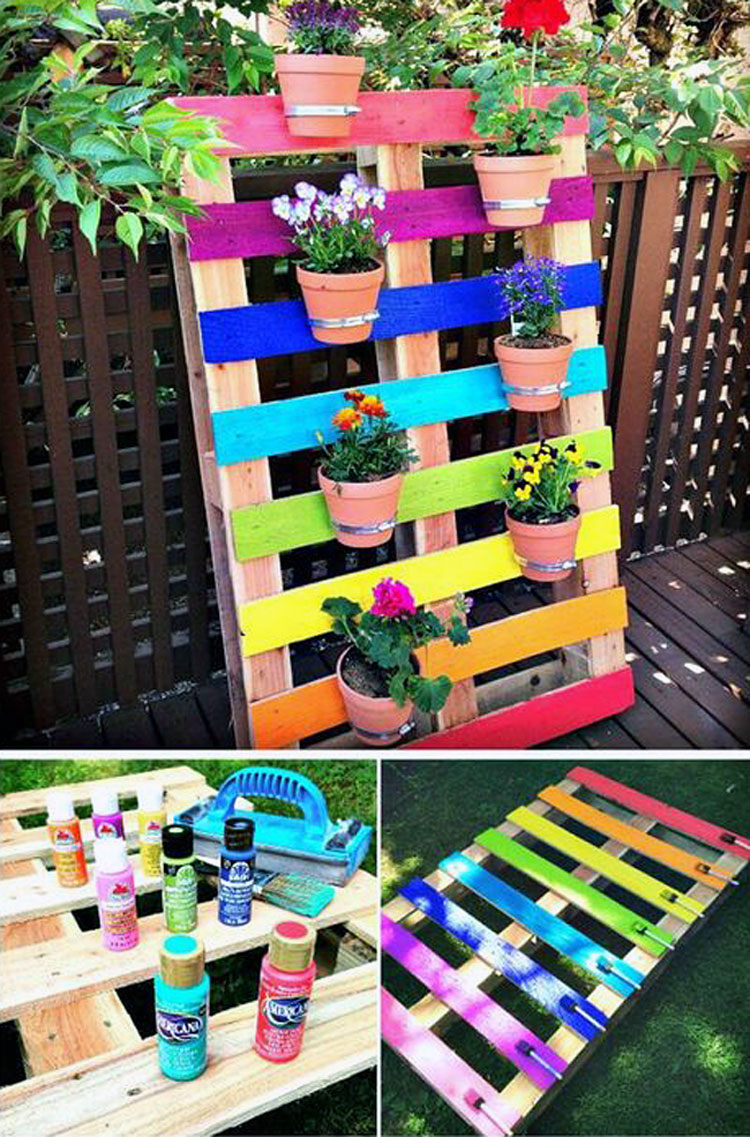
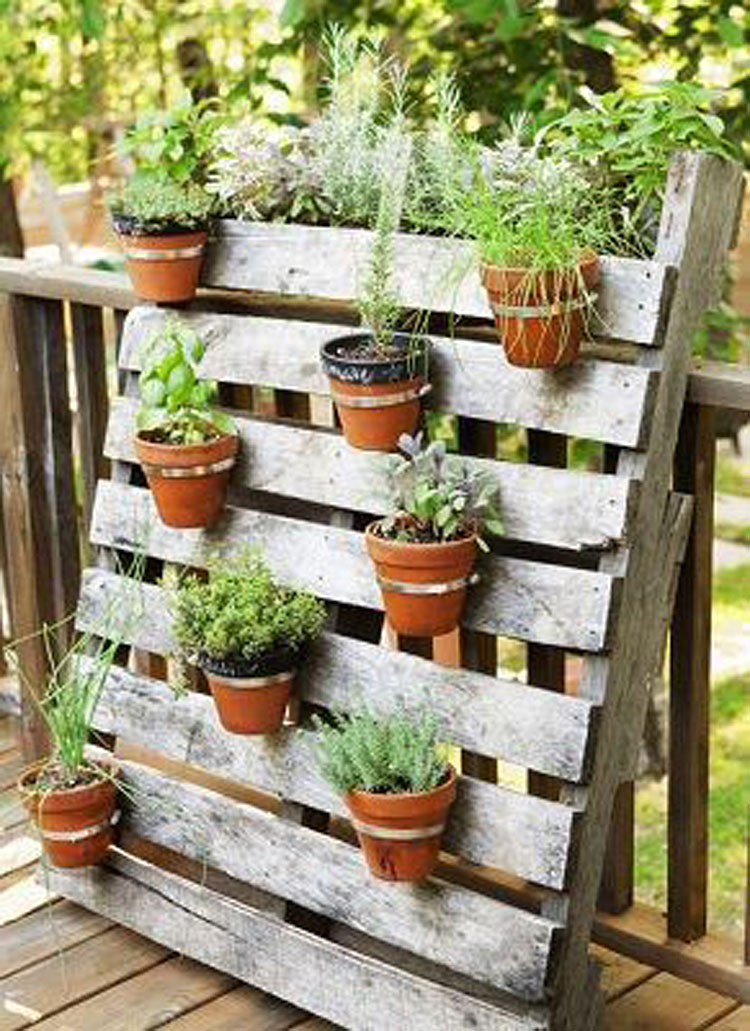
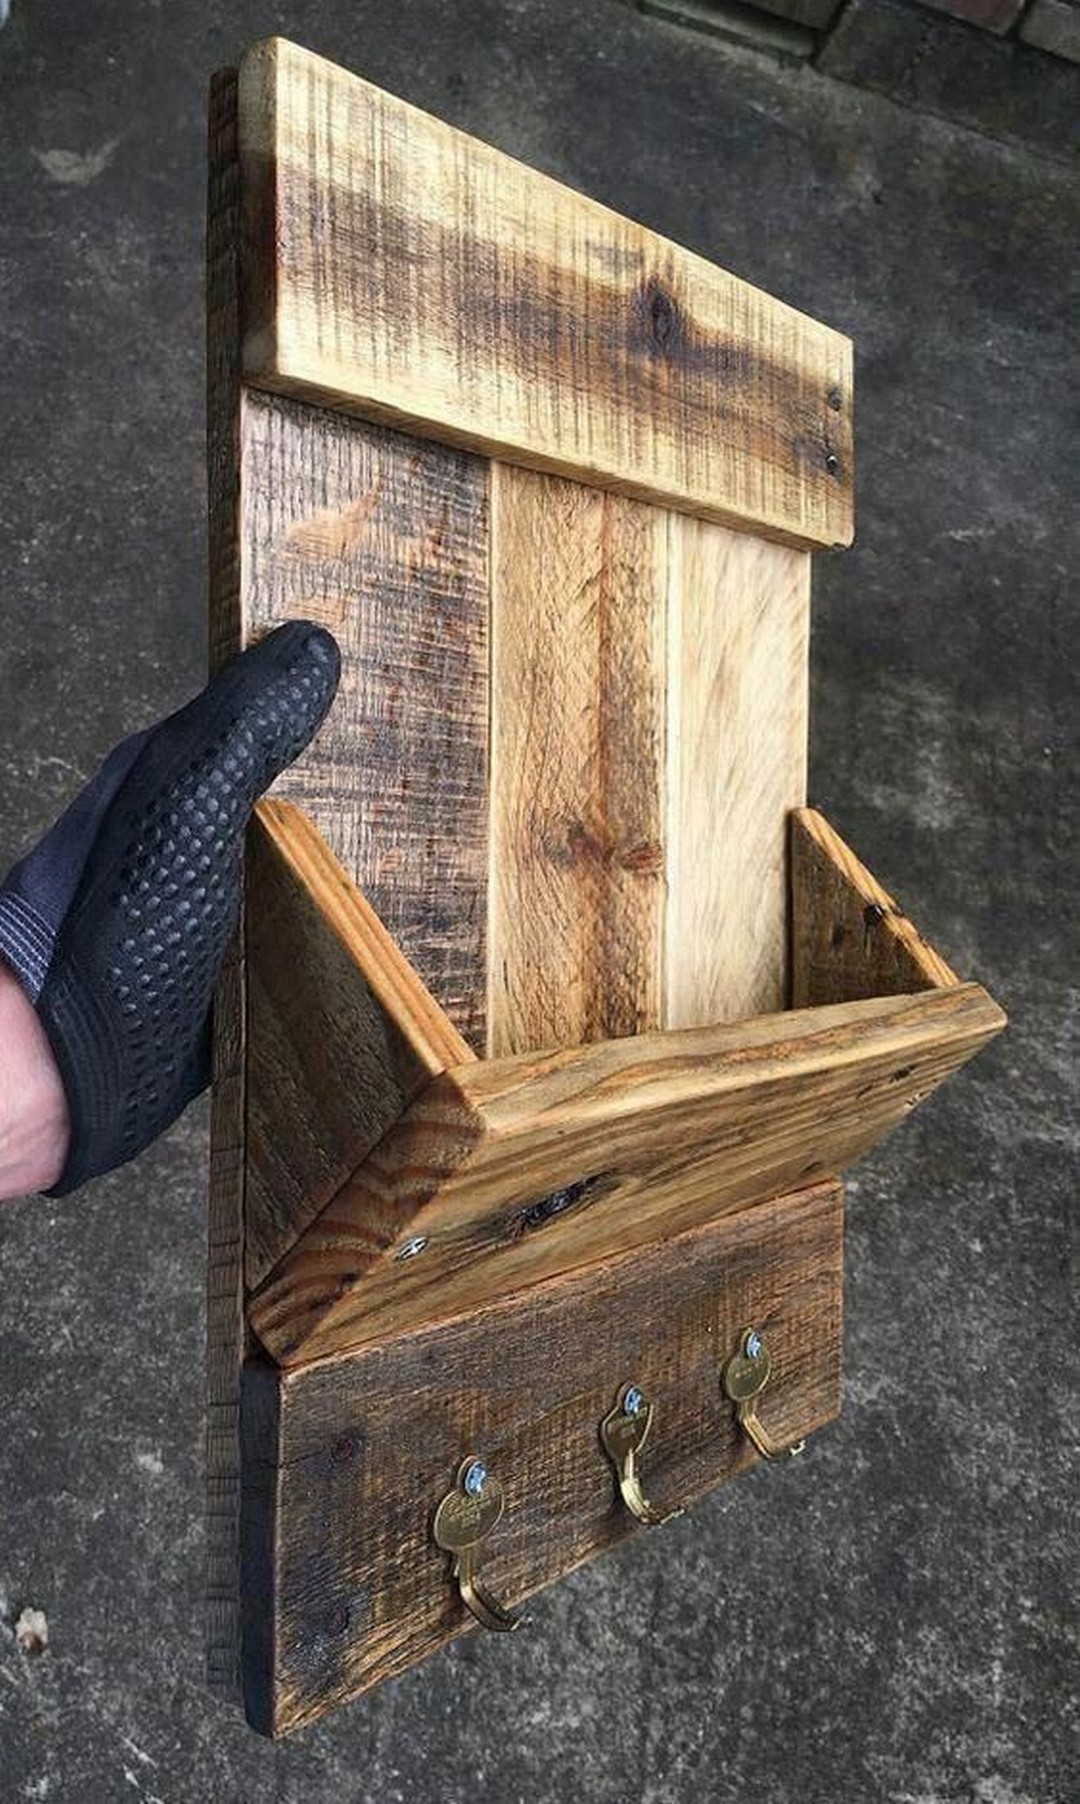
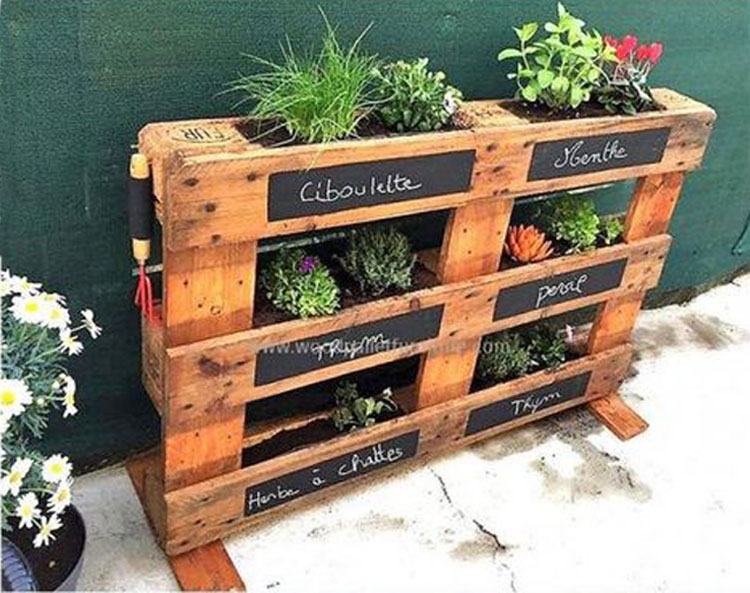
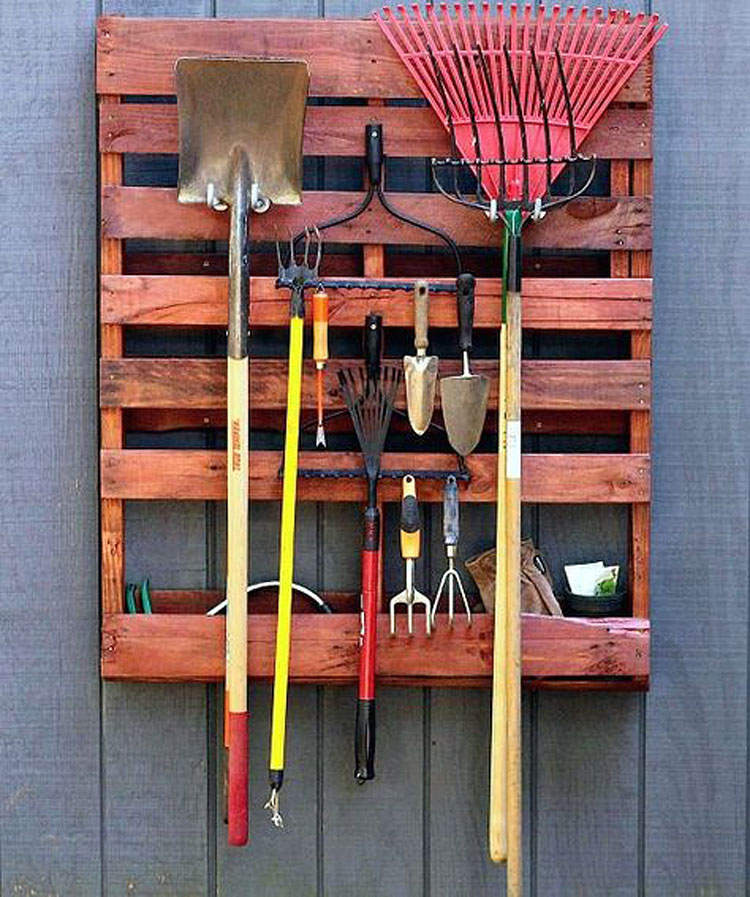
These pallet projects use a complete pallet without having to take it apart. Just clean it up, stain or paint it and it is ready to go. For the Garden tools display, just add hooks that you can find at your local hardware or garden center. For the plant holder, attach stainless steel hose clamps to the pallet to hold the pots. You could just use pots that have hangers already attached added to make it easier.

Pallet Wood Furniture, Garden, Home Project Ideas

Pallet Wood Furniture, Garden, Home Project Ideas

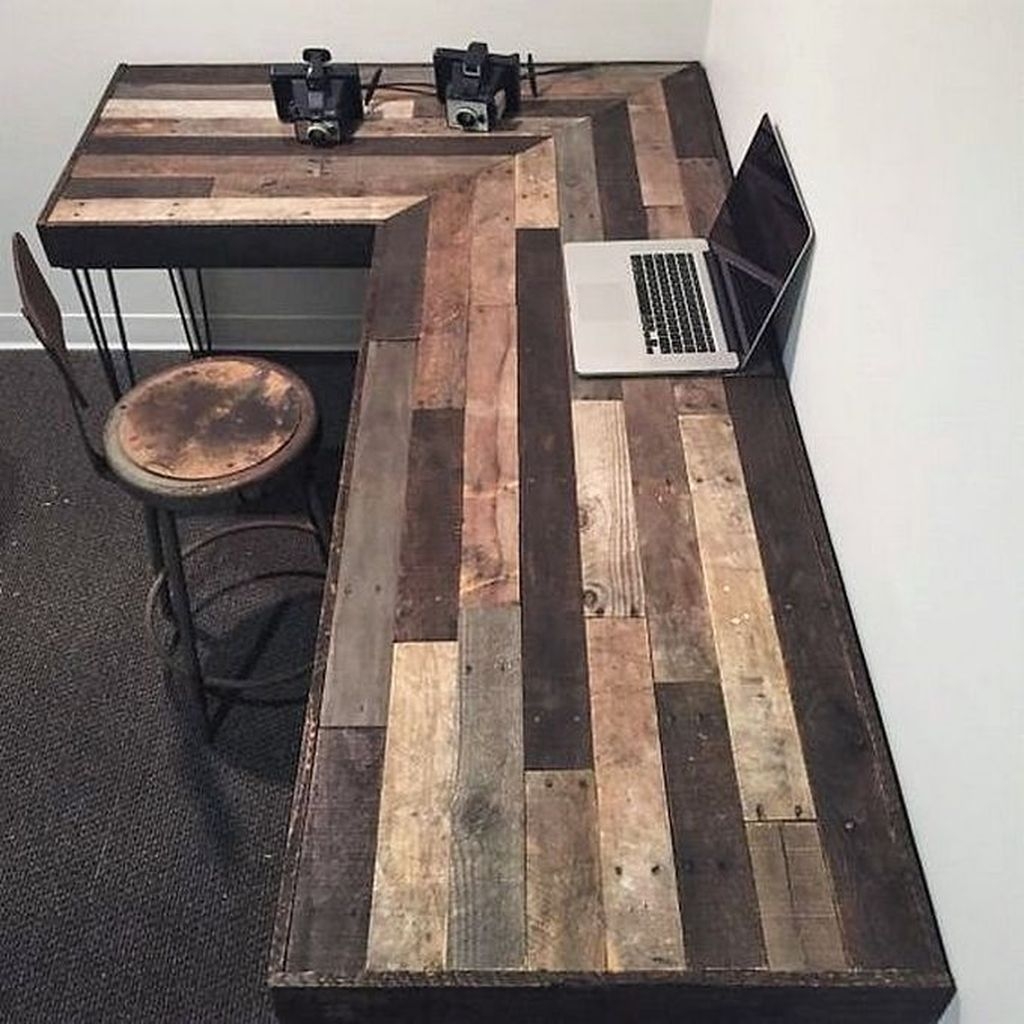
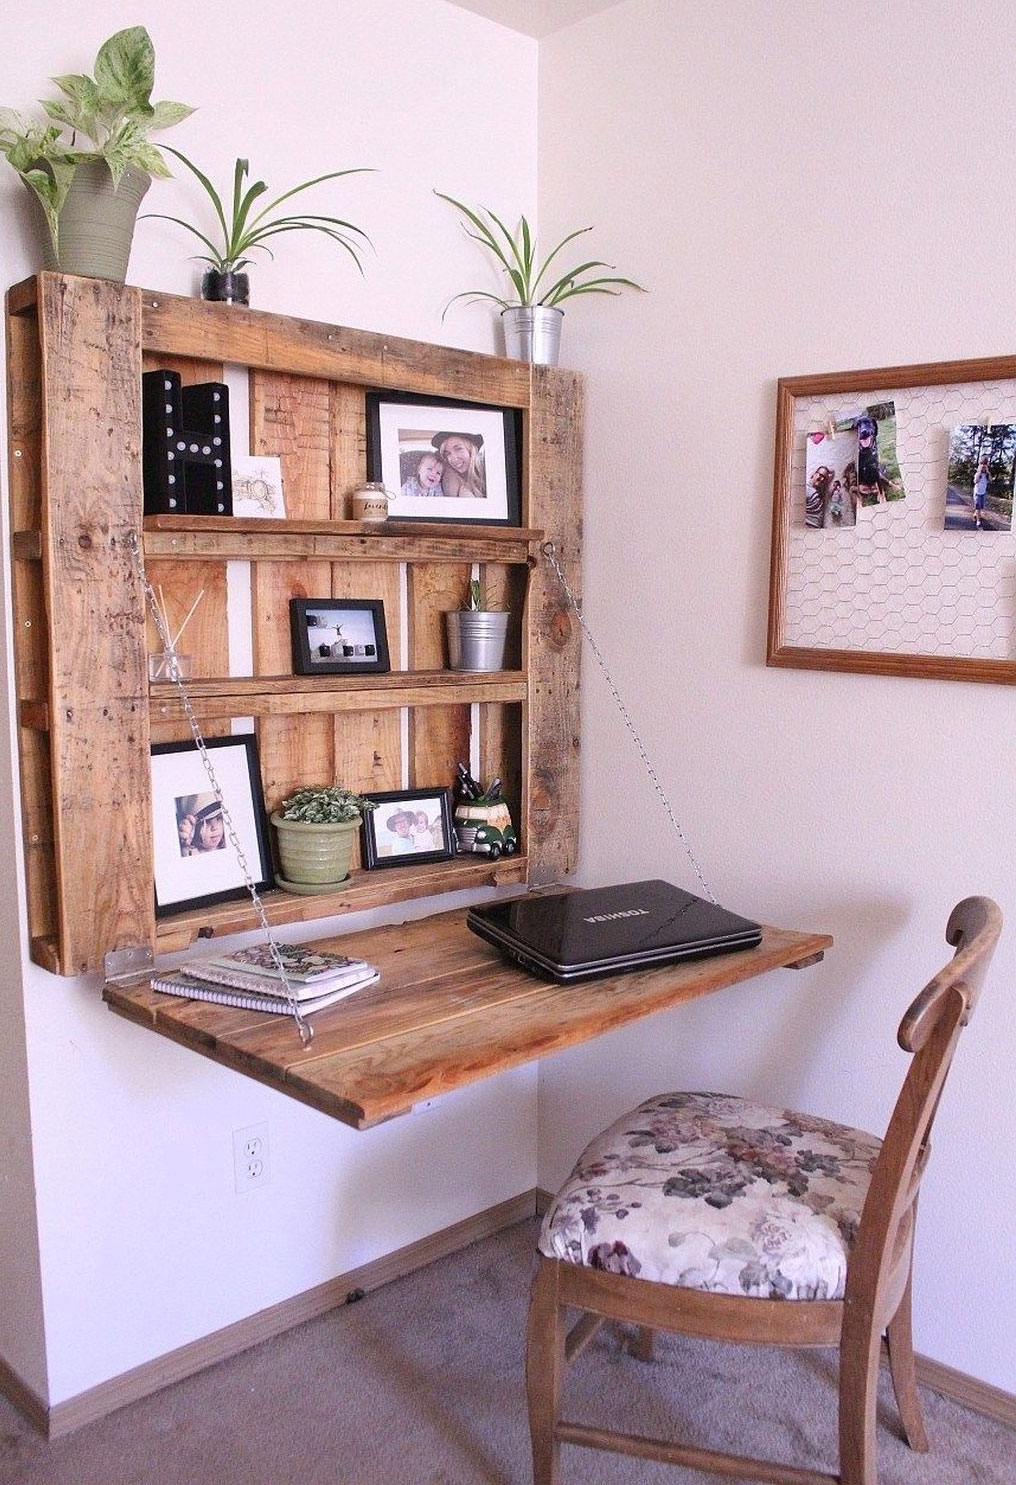
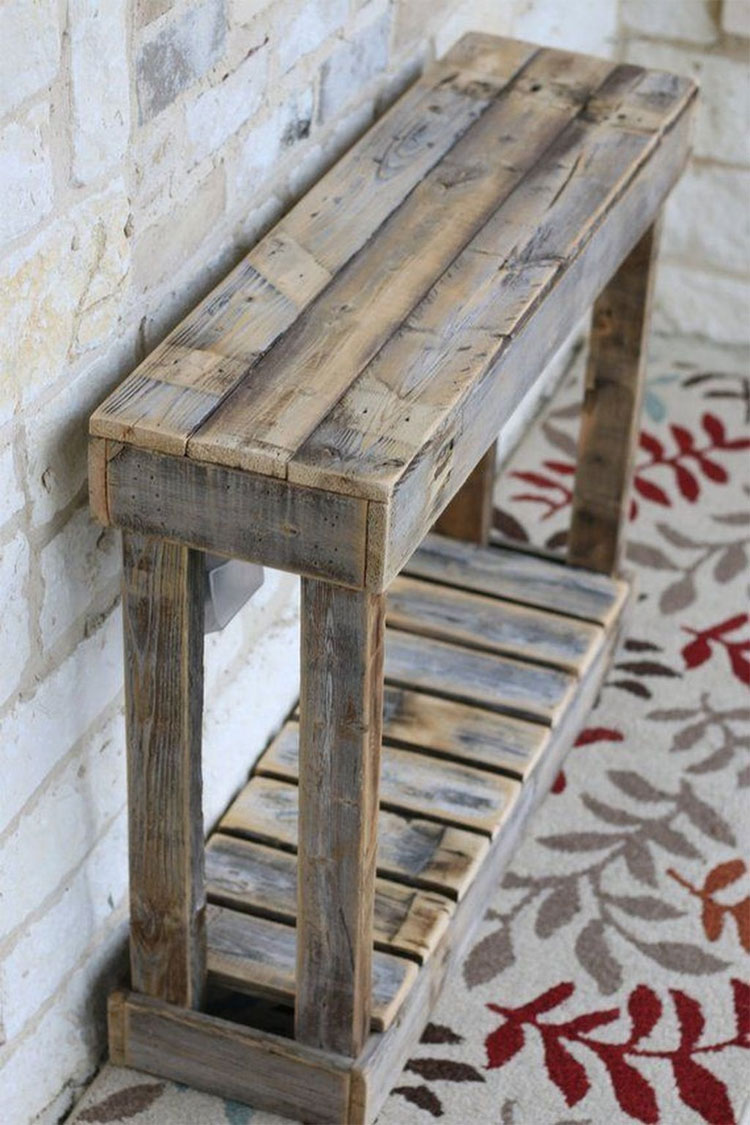
Wouldn’t it be cool to have a desk made out of pallet wood? Or maybe a side table? The different shades of wood that has been left out in the elements gives this desk and side table a rustic and weathered look.

Pallet Wood Furniture, Garden, Home Project Ideas

A Beautiful Mess

A Dog Bed made out of wood makes the coolest dog bed ever and you can make it yourself. It will last a long time and be sturdier than a dog bed you can buy at the pet shop. When making something out of pallet wood for pets or even children, you have to be careful because the wood has often been cured with chemicals. Ruggy DIY came up with a neat doggie bed that is inexpensive and uses furring strips instead of pallet wood. While this article is about pallet furniture and projects, we still thought this was neat enough to include and since it’s affordable to make, that is just fine with us.

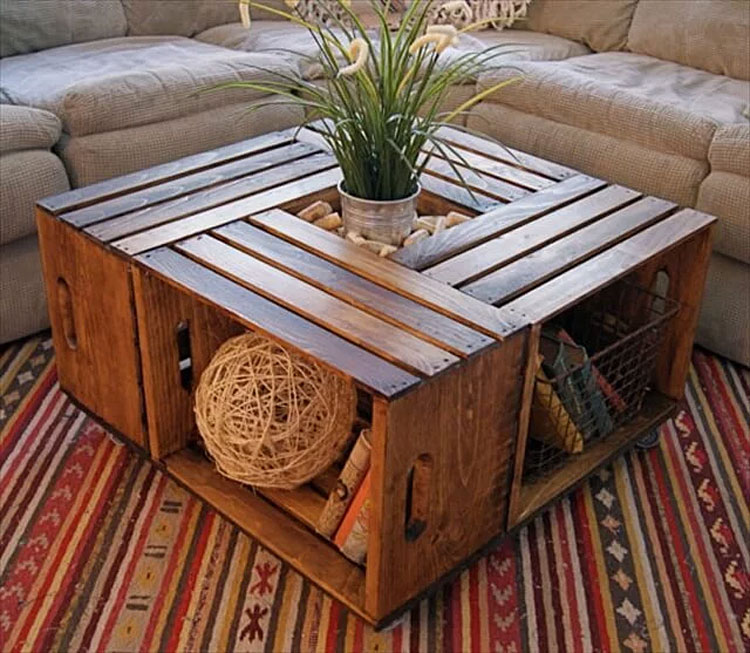
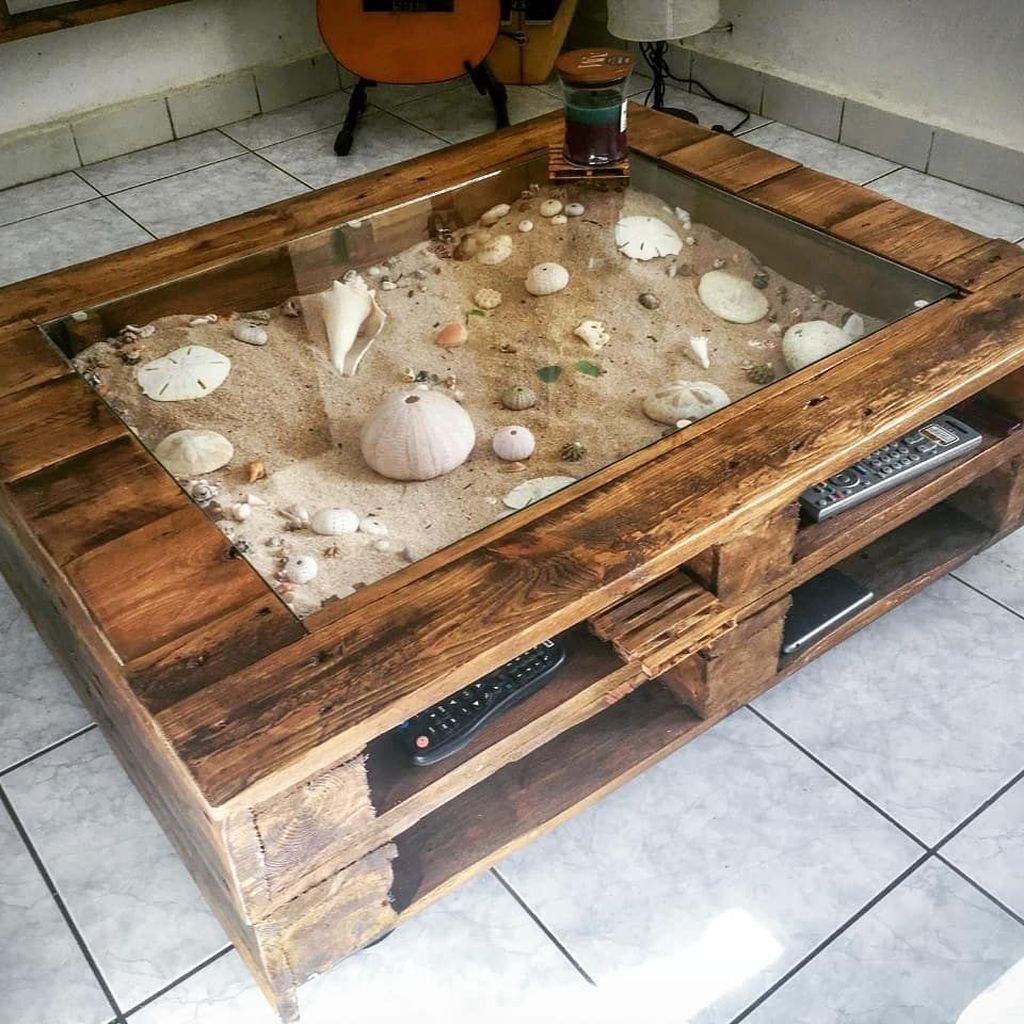
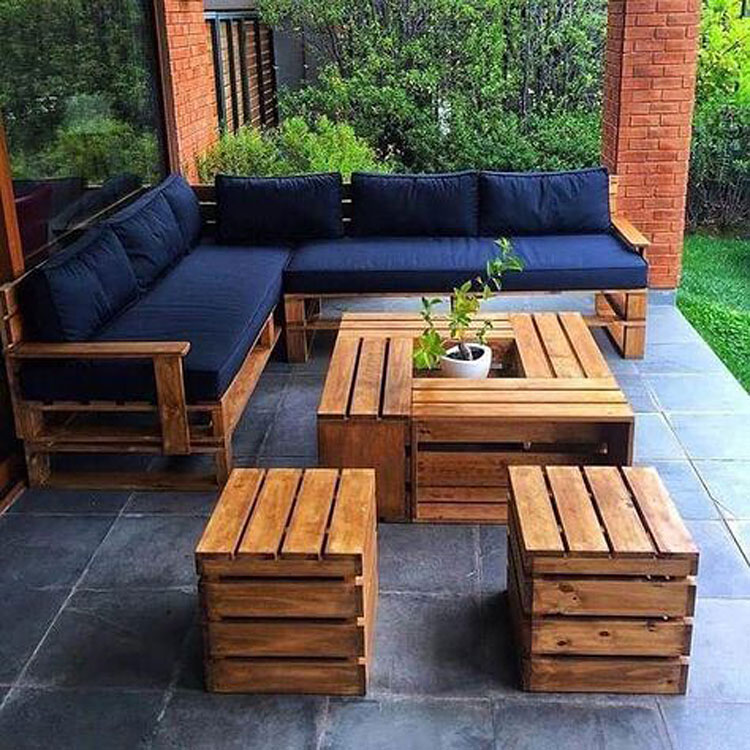
Here is another wood project we just had to include. This very cool, very easy, and very affordable coffee table makes use of wood crates. It is so easy to attach them with some wood glue and a few nails, stain and you have an amazing coffee table. If you want to roll it around add rollers on the bottom. You can buy unfinished wood crates online or at many local craft stores.

Pallet Wood Furniture, Garden, Home Project Ideas
A Beautiful Mess

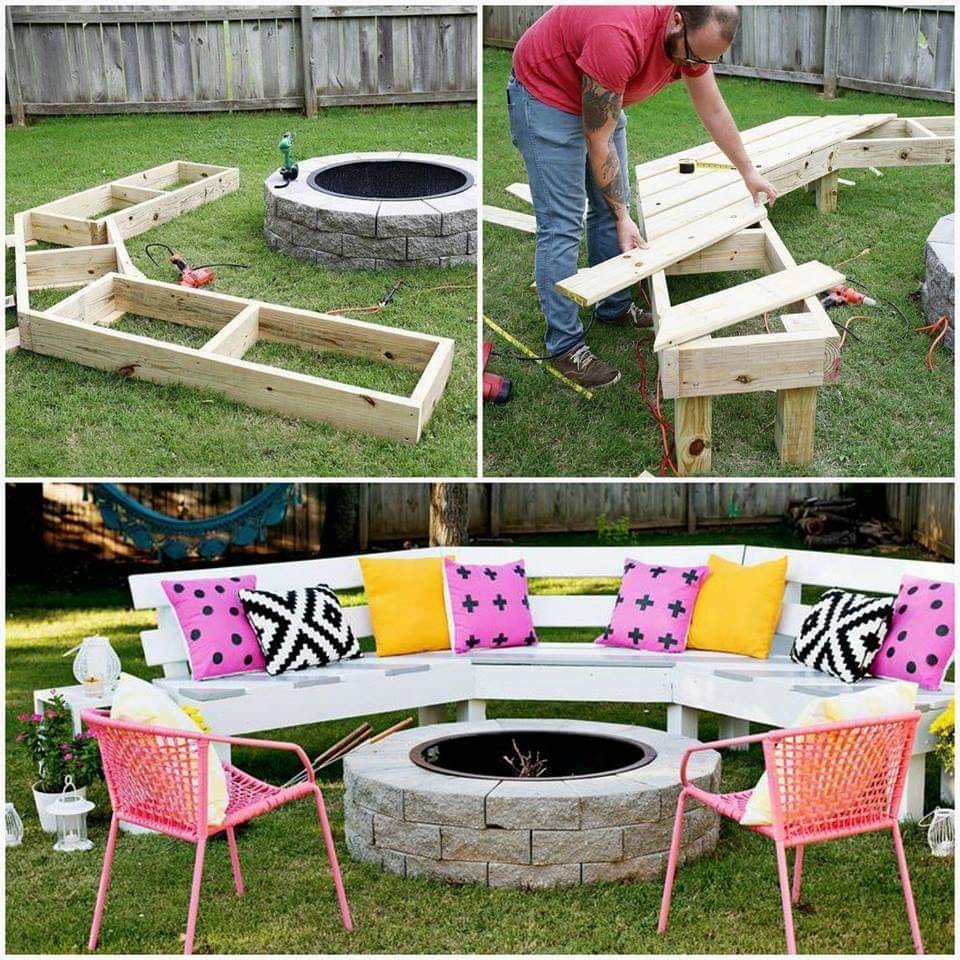
This outdoor bench costs less than $200 to make instead of thousands. It looks so cozy and when you light the fire everyone will come running. This is a must for your backyard for the Summer and Fall months.

Keep scrolling for more inspiration and browse our other craft articles.

Pallet Wood Furniture, Garden, Home Project Ideas

Pallet Wood Furniture, Garden, Home Project Ideas

Pallet Wood Furniture, Garden, Home Project Ideas

Pallet Wood Furniture, Garden, Home Project Ideas

Pallet Wood Furniture, Garden, Home Project Ideas

Pallet Wood Furniture, Garden, Home Project Ideas

Pallet Wood Furniture, Garden, Home Project Ideas

Pallet Wood Furniture, Garden, Home Project Ideas

Our Favorite Mod Podge Craft Projects

Mod Podge is such a great, all around sealer that is versatile and offers a lot of uses for a variety of projects. Mod Podge can be used on wood, fabric, metal, glass, plastic and more. It acts like glue and also a protectant and sealer. Therefore, Mod Podge is an all in one decoupage glue, sealer and finish.

Boho Fairy Light Bottle Lamp

Boho Fairy Light Bottle Lamp

Bring the beach vibes inside with a Boho bottle light. This Mod Podge craft utilizes tissue paper and Gloss Mod Podge to create an ocean wave bottle lamp with ombre look. You will need Mod Podge Gloss for this project, a glass jar (or even an old wine bottle), 3 different shades of tissue paper, and a battery operated cork fairy string light.

Tutorial: Plaid Crafts on Facebook

Fancy Decoupaged Mod Podge Sneakers

Funky and Fun Mod Podge Sneakers

Make a fashion statement with fun and bold sneakers by using fabric napkins or fabric by the piece and Mod Podge Fabric waterbase sealer. If you are using a napkin, such as shown in the photo above, it works best if you separate the two layers of the napkin and only use the top, printed layer. If this doesn’t work, you can still use the napkin with all layers intact. Simply use Fabric Mod Podge to apply the paper napkin or fabric pieces to white canvas tennis shoes. Once it is dry, brush another layer of Fabric Mod Podge over top as a sealer. Only machine wash in cold water, gentle cycle after 72 hours but it is often better to surface clean.

photo source: plaidonline.com

Sleek Marble Mod Podge Coasters

Sleek Marble Mod Podge Coasters

We just love this project. They stone coasters are sleek and elegant and look oh so expensive but they cost less than $10 to make. These coasters are made using square stone coaster blank with a cork backing. Brush Mod Podge of your choice (Matte or Satin is good for this project) and place marble scrapbook paper on top of the cork coaster. Use FolkArt Gold Paint and paint the edges and then seal the whole coaster with another coat of Mod Podge.

photo source @schadenfreude

Mod Podge Flower Covered Mason Jars

Mod Podge Flower Covered Mason Jars

These jars pictured Cath Kidston paper prints but since they are only available in the UK we found some other fun floral papers. Clean your Mason jar with alcohol first to remove any oil. If you don’t the paint may chip off. Brush a coat of cream-color acrylic paint or chalk paint over the whole Mason jar. Let it dry. Depending on how much paper you are going to use, you may need to paint the jar again. Let dry thoroughly, about 15 minutes. Cut floral designs from the scrapbook paper or use the entire sheet and add Mod Podge to the back. Smooth the flowers onto the jar to create the design you want. Floral paper napkins also work well. Separate the layers and only use the design layer. Finish the a top coat of Mod Podge. You can finish off your jars with twine wrapped around the neck of the jar and maybe even add a bead to the ends.

photo source: @cottondalecraft

Mod Podge Easter Eggs with Chinese Paper Napkins

Mod Podge Easter Eggs with Chinese Paper Napkins

This is a unique take on an Easter Egg design. Start with white plastic Easter Eggs. Because they look like real eggs and not those cheap plastic colored eggs you find in most stores, you get a more realistic look. Next you will need some paper napkins. We found red Chinese Dragon cocktails napkins and Blue Caspari napkins that look similar to the ones in the photo above. Using a pair of scissors, cut out the designs you want to use from the napkins. Separate the two pieces of napkin so you only have the top design layer. Brush a very small amount of Mod Podge on the egg, lay the design on top and then gently smooth the design over the egg with more Mod Podge. Go slowly and don’t use a lot of Mod Podge or you will tear the napkin.

photo source @totallytikaa

DIY Decorate Wood Birdhouses using Maps
Crafts by Amanda

DIY Decorate Wood Birdhouses using Maps

Decoupage a map of your state to one side of a wood birdhouses and then paint the rest of the birdhouse with colors that match the maps to coordinate.

Faux Broken China Necklace

Faux Broken China Necklace

Coming with the blue theme, we have an easy project that looks stunning. This is a faux version of the popular broken china necklace use blue flower paper napkins, a wood disk, wood beads, Mod Podge and ball chain. This project is super simple and can be whipped up super fast.

Tutorial: cathiefilian.com


Disclaimer: The information found in each project is presented in good faith. Results are not guaranteed. If you have a question about any of these Mod Podge craft projects, visit each website and contact the original designer.

How To Restick Your Cricut Mat (The Easy Way)

What is the best way to restick your Cricut mat so you can keep using the same one over and over? This method is the easiest way to restick a Cricut mat and it actually works seamlessly. I have never purchased a second Cricut mat because I use this method over and over to restick my Cricut mat.

Note: This method also work for for other cutting machine mats like those used with Silhouette, Sizzix, or Brother ScanNcut cutting machines.

How To Restick Your Cricut Mat The Easy Way

When you use a Cricut or other cutting machine a lot, the mat loses some of it’s stickiness and this makes the paper or vinyl not stick so well. You need a super sticky Cricut mat to ensure your crafting paper or vinyl adheres to the mat and won’t move around when the machine is cutting the design.

The easiest way to restick a Cricut mat is to use a ZIG Memory glue stick. This is also the fastest method to restick a Cricut mat.

Supplies Need to Restick a Cricut Mat

  • ZIG Memory System Two-Way Glue stick (pen)
  • Big Head straight pen (or Cricut weeding tool)
  • Tweezers with pointed end (or Cricut tweezers)
  • GooGone in Spray bottle (optional)


1. Clean the Cricut Mat

The first thing you will want to do is to remove any bits and pieces of leftover project material such as paper and sticker backing from your Cricut board. Also remove any pieces of hair. We used a big head straight pin (big head makes it easier to hold) that has a sharp point to lift up the hair and bits and then a pair of tweezers to remove the bits so no fancy tools are needed, not even the Cricut tools. However, if you own the Cricut weeding tools and tweezers use can use them as well to accomplish this step.

How To Restick Your Cricut Mat (The Easy Way)

TIP: If your Cricut mat is really dirty or has a lot of bits and pieces stuck to it, you can also use GooGone to remove everything. Spray GooGone on a paper towel and rub it over the Cricut mat, especially on bits and pieces that are really stuck. If your mat is really dirty, you may have to rub GooGone over the mat, really soaking it and then let it sit for awhile.

2. Prime the ZIG Glue Stick

Take the top off of the ZIG Memory System glue stick and press it up and down on a piece of paper, napkin, or paper towel until the blue color is showing at the very end of the tip. What this does is to get the glue started. It takes a few minutes to get it to come out of the glue stick and saturate the tip.

Note: once the glue is dry it will not show up as blue. It will be clear and produce a shiny finish on the mat.

3. Use the ZIG Memory Glue Stick

Rub the glue stick over the cleaned surface of your Cricut mat. Try to make even strokes so you don’t end up with a gloppy mess. We didn’t even tape the edges or use Vaseline as some other method suggested. Vaseline seemed too messy and taping is too much work. It’s super easy to do this and even a beginner will be able to cover the mat with ZIG Memory System glue stick.

4. Dry the Cricut Mat

Wait until the glue dries. It literally took 2 minutes before the glue was completely dried so it’s pretty fast. If you don’t want to wait for the glue to dry, use a hair dryer on a low setting and run it back and forth over the Cricut mat to make the glue dry faster.

You can see the sticky surface on our Cricut mat after using the ZIG Memory System glue stick.

The ZIP Glue stick costs around $5.99 whereas buying a new Cricut mat every time it loses stickiness will cost you much more. Based on the size of the ZIP pen (we bought the large one), you can probably re-stick a Cricut mat over 25 to 30 times. That’s a HUGE savings.

How To Restick Your Cricut Mat The Easy Way

Handmade Mother’s Day Gifts for Mom

Mother’s Day falls on the second Sunday each May. You will want to get started on those handmade gifts so you are ready for the special day. You don’t have to spend a lot to make something special for Mom on Mother’s Day. A gift from the heart says I love you just as much as something you buy online or at the store.

Grab your craft supplies and let’s get to work on some simple, easy and affordable gifts for Mom.

Handmade Mother's Day Gifts for Mom: Mason Jar Picture Frame Vase

Mason Jar Picture Frame Vase

The Mason Jar Picture Frame Vase from Home Stories is super affordable. You may even have most of the supplies you need lying around the house. You will need paint, a large mason jar, paint brush, painters tape, and a few other supplies to create this masterpiece. Add some fresh flowers and you have a great Mother’s Day gift.

Handmade Mother's Day Gifts - Mom's Emergency Candy Stash
Eighteen 25

Mom’s Emergency Candy Stash

I just love this idea. Plastic storage boxes are so cheap. You can find them at the Dollar Store – Dollar Tree is our favorite. Fill the box with some miniature candies, add a tag and bow and you have a wonderful gift for mom.

Handmade Mother's Day Gifts for Mom: Fabric Gift Envelopes

Fabric Gift Envelopes

These clever, and very pretty fabric envelopes will definitely impress Mom. You will need to grab your sewing machine and then head on over to Sew4Home to find the pattern. You can fill your envelope with candies, a gift card, jewelry or even seeds to mom can start her garden.

Handmade Mother's Day Gifts for Mom: Polka Dotted Apron with Ruffles

Polka Dotted Apron with Ruffles

Here’s another quick sewing project for you, a polka dotted apron with ruffles, made just for Mom. Crazy Little Projects will show you just how to make this and it won’t take too long.

DIY Wood Sign Paint Kit

DIY Wood Sign Paint Kit

If you aren’t crafty, how about buying Mom a DIY wood sign painting kit. Wood sign making parties are so much fun and if mom isn’t able to get out to have some fun with her friends, why not bring the fun to her. A DIY Art in a Box Wood Sign Paint Kit includes the wood, stencil, paint, brushes and instructions too!

Stained Glass Birdhouse Pattern Instructions

Stained Glass Birdhouse

Purchase an unfinished wood birdhouse or build your own birdhouse, use painter’s tape and create an exquisite stained glass design. Paint inside of the sections, remove the painter’s tape, use a ruler and draw lines around each section with a Sharpie marker.

Free DIY Birdhouse Plans

Handmade Mother's Day Gifts for Mom: A DIY Mother's Necklace
Not So Idle Hands

A DIY Mother’s Necklace

Make a Mother’s Necklace using inexpensive washers and a metal stamp kit and then add a decorative bead and hang it on a ribbon. Stamp the words “Mom”, “Love”, or even a child’s name.

How to Get More Sales on Facebook Marketplace

Do you have a product you would like to sell on Facebook Marketplace but you can’t seem to get anyone to buy it? There are definitely some good strategies you need if you want more views and more sales on Facebook Marketplace. Keep reading to find out what they are.

Join Yard Sale and Resale Facebook Groups

This is actually our very first step before even setting up your Facebook Marketplace listing. These groups will be used on the very last step once your listing is ready, see below.

Here are some examples of groups on Facebook. You can find some in your area to join by typing in resale, yard sale, buy, trade, etc. under the Groups section on Facebook.

You should join at least 20 to get started.

TIP: Since you only using these groups to sell your products, you may not want to see all of the things people are seeing in our Facebook feed all day long. Once you join a group, look at the top for the 3 dots. Click that and click Unfollow this group. You will still be a member of the group but now you won’t see any of the content in your main feed.

How to Get More Sales on Facebook Marketplace

Setup your Facebook Marketplace Listing Properly

The first thing you need when setting up your listing is good quality, clear photos. Your photos need to entice someone to want to buy your item. Make sure to show various angles of the item and closeup views.

Add a Descriptive Title

The title is very important. Make sure you add as much information about the item as you can in the title, especially near the beginning because some of the wording will get cut off at the end if it is too long.

Adding the Product Description

The first sentence of your product description is THE most important part of the description. Many people never expand the description to even read the rest so make sure your first sentence tells as much about the product as possible.

Here are some starter sentences you could try. Just change out X for your product name and change out sizes as needed.

This X is brand new in the box and comes with all accessories.

X is brand new and measures 10″ high x 12″ wide x 4″ deep. It comes in 3 different colors.

I am selling an X that is in good condition. There is a very small scratch on the top.

Once you have your first sentence, continue to tell more about the item you are selling. Give dimensions, color, and anything else that might make someone want to buy your item. Ask yourself – what would I want to know about this item if I were looking at it? What questions would I ask?

Fill out other fields

Make sure to add the price, category and condition. The other categories such as color, material, product tags and SKU are optional and we have not found that they help much in getting views or sales.

On the next page you will decide whether to ship or just offer local pick.

List in Yard Sale and Resale Facebook Groups

IMPORTANT! Make sure you list your item around 9 am ET, noon ET, or 6 or 7 pm ET. You want to post your item at peak times when more people are looking. You only get one shot to post it so make sure you post it at a good time.

Here is where the magic comes in. On the last page you will be presented with a list of all of those groups you joined. Click next to each group to select it. You can list your Facebook Marketplace listing in up to 20 groups at a time.

Preview your listing and when everything looks good, submit your listing. Your listing will now appear in Facebook Marketplace AND in all of the groups you selected.

Boosting your Facebook Marketplace listing for Free

Here is a trick we found that really helps your Facebook Marketplace listing get more views without paying to boost it.

Once you listing has been on Facebook for one or two days, the views from those groups will go down. Here are a couple of things you can do to boost your listing for free.

Go into each of those groups, search for your listing (type a keyword you have in the title to find it easily), and like and comment on your listing. Everything that gets posted to a group can be pushed back to the top of the group by liking and commenting.

Search for and join more yard sale and resale groups.

Next, go back to your Selling Dashboard, find your listing, click on the 3 dots and click on List in More Places. If you have joined more than 20 groups you can now list your item in another 20 groups. Once again, make sure to do this at a peak time.

How to Get More Sales on Facebook Marketplace

By utilizing some of these tricks, you will ensure your Facebook Marketplace listing gets seen by more people without having to pay to boost.

  • « Previous Page
  • 1
  • 2
  • 3
  • 4
  • 5
  • Next Page »

250th United States Anniversary Wholesale Laptop and Water Bottle Stickers Products

Wholesale 250th Anniversary Products for Retailers (America 1776–2026)

250th United States Anniversary Wholesale Bookmarks Products

The 250th Anniversary of the United States: A Semiquincentennial Moment

Coastal Christmas Trees

DIY Coastal Home Decor Ideas

Coastal Creators participate in the Amazon Services LLC Associates Program, an affiliate advertising program designed to provide a means for sites to earn advertising fees by advertising and linking to Amazon and other affiliate programs. Read more

  • HOME
  • BLOG
  • WHOLESALE
  • CONTACT

Copyright © 2026 · Coastal Creators · Our Policies